As the world’s most popular CMS, WordPress is constantly evolving, improving stability, and securing any vulnerabilities that are discovered. As such, you need to know how to update WordPress, and there are several ways to do this.
One of the most common ways is to not even do it yourself and allow the platform to automatically do so. This ensures your site is always up to date, and you can set it up to update during non-peak hours.
Or, you could just do so the more traditional way and do it manually. There are numerous ways to go about each way, and there are even situations where you may want to roll back an update in the event something stops working on your site.
No matter what you are looking for, today I will demonstrate how to update WordPress in a variety of ways.
Important Note: It is always recommended to create a backup of your website before you update WordPress. This ensures that if the update breaks something, you can easily restore your website before the update.
Automatically Update WordPress
Most users will opt for automatic updates as it is one less thing they need to manage about their site. There are several ways to enable these features depending on your web hosting environment.
Automatic Updates Using GreenGeeks Dashboard
Our customers have access to the easiest method on this list, as you can enable automatic updates directly from your GreenGeeks dashboard. Log into your web hosting account to begin.
Click on the “Manage” button next to the domain name you wish to enable auto updates on.

Click on the WordPress tab and select the Autoupdates option.
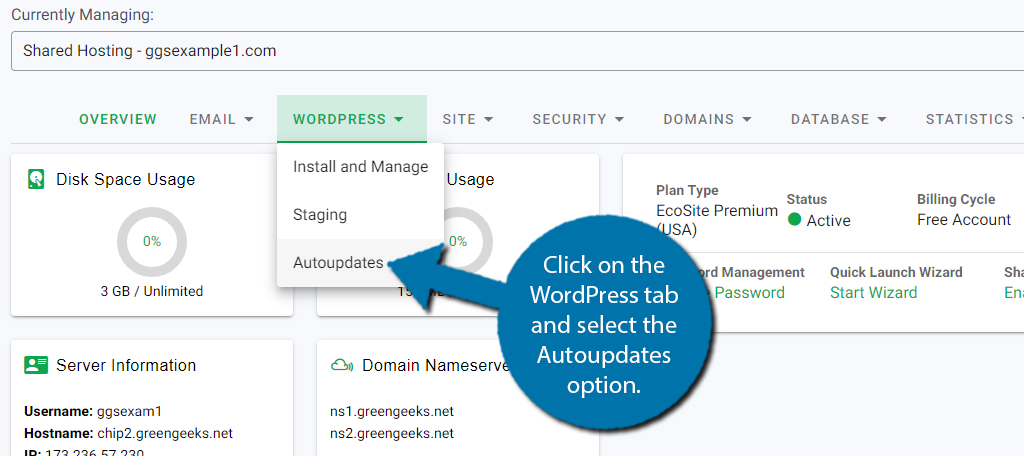
Here you can enable updates for all kinds of content like themes, WordPress core files, and plugins. In this case, we want to select the “Upgrade to any latest version available” option.
Once this is done, click on the “Save” button.
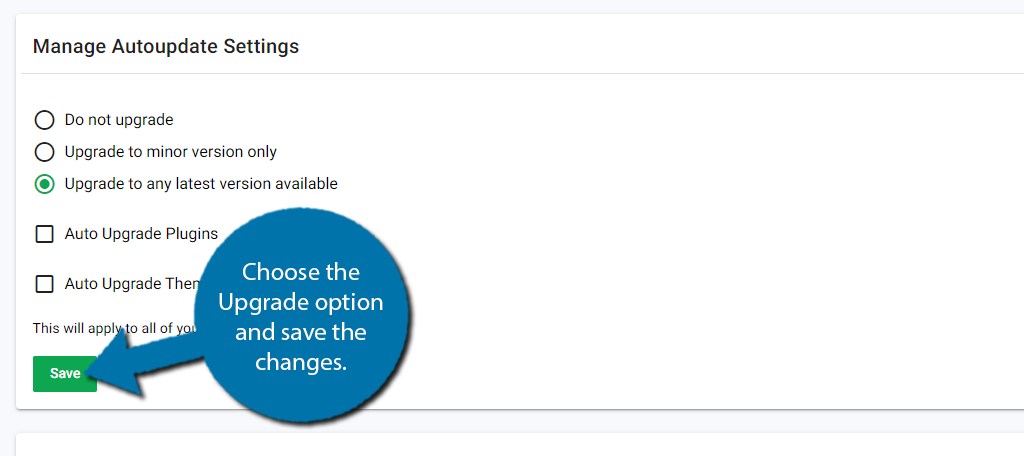
And that’s it. This will have WordPress receive updates automatically. If you ever want to disable this, just select the Do Not Update option. There are also options for auto updates for plugins and themes if you are interested by selecting the relevant checkboxes.
Automatic Upgrade through Softaculous
If you used Softaculous to install WordPress, you can also set it to update that install automatically. This way, you can simply set it and forget it. Since most web hosts utilize Softaculous, this is one of the more popular ways to do this.
Start by accessing your web hosting account and selecting the cPanel option.
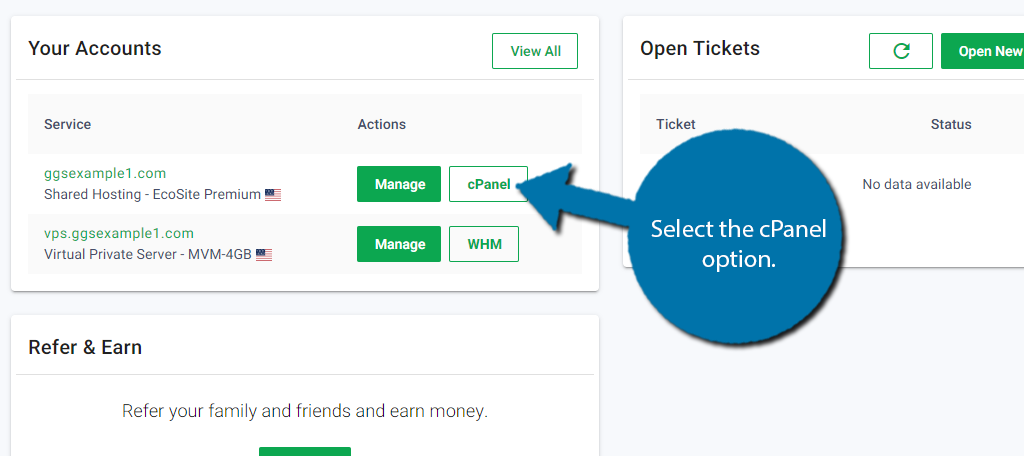
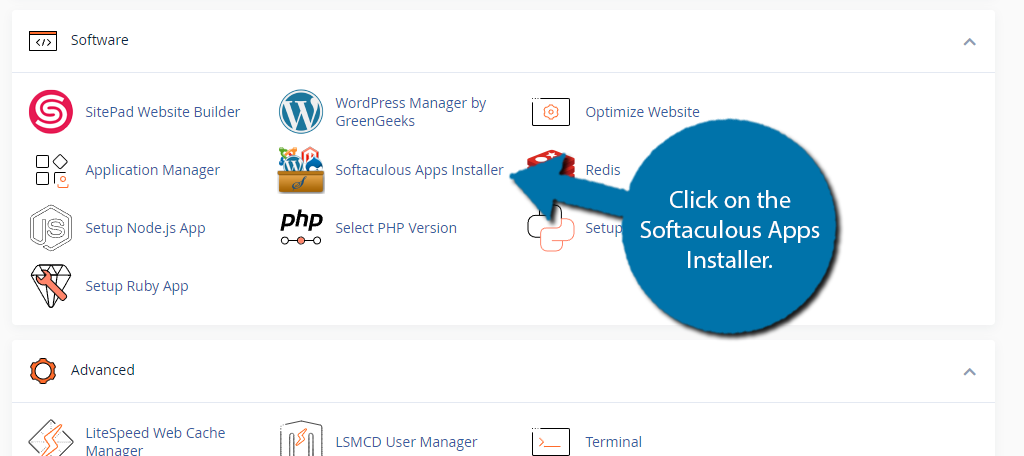
Once in the cPanel, locate the Software section and click on the Softaculous Apps Installer.
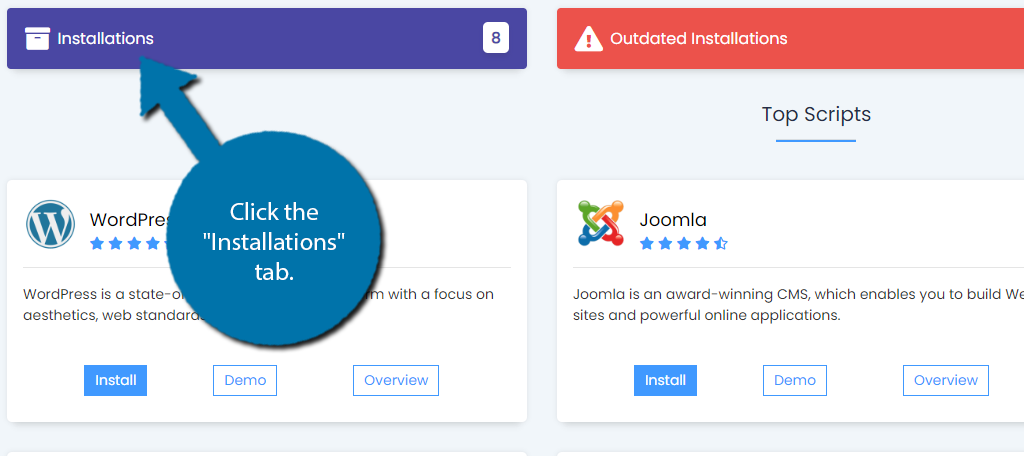
Click the “Installations” tab on the top of the screen. This will show you everything you have installed with Softaculous.
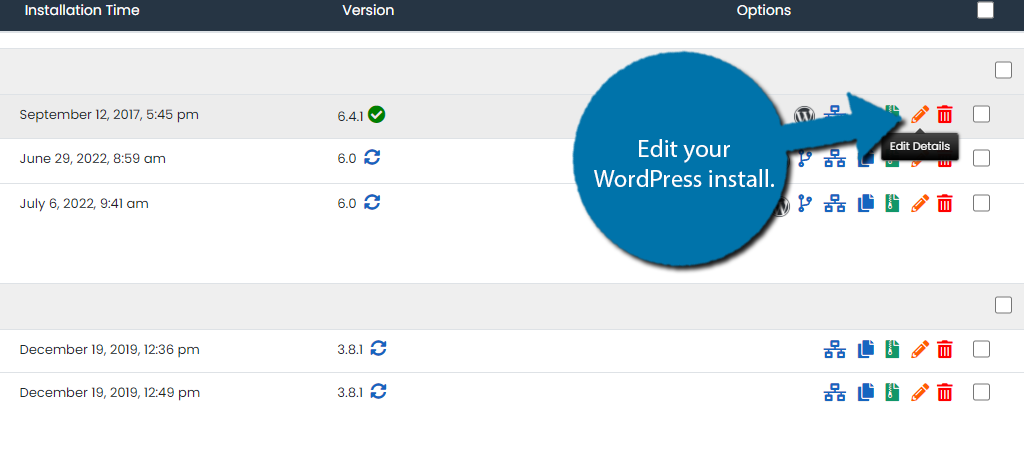
In most cases, you will only have a single installation from WordPress visible in this section. If this is the case, you can just click on the Edit option (represented by a pencil icon). If not, you need to identify which WordPress install your site uses.
You can identify it by the URL in the first column.
Here, you will see a lot of options, but this time around we are just interested in telling it to enable auto-updates. To do this, just select the “Upgrade to any latest version available (Major as well as Minor)” option.
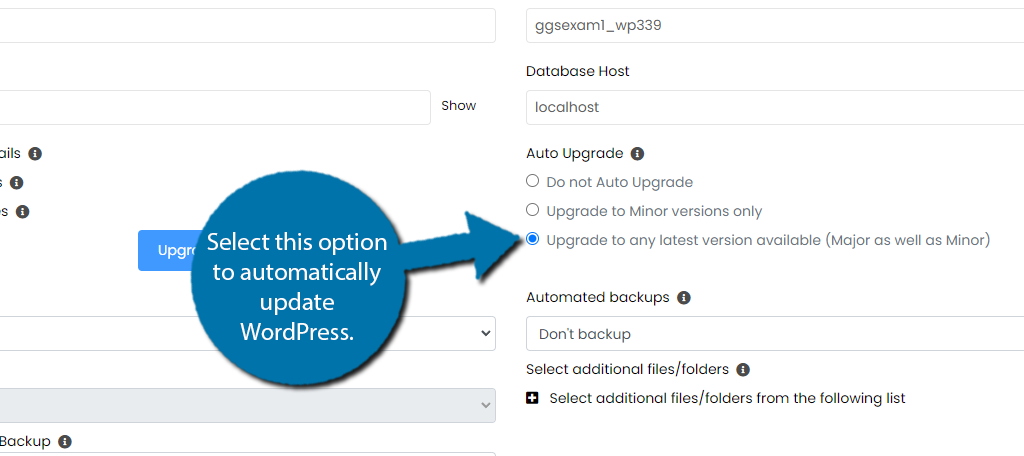
Be sure to save the changes with this option selected. And that’s it. Softaculous will now automatically upgrade files as they become available. Again, there are options to also update the plugins and themes here as well.
Automatic Updates from the WordPress Dashboard
Another way to set WordPress to update automatically is right from the WordPress dashboard. All you need to do is click on Dashboard and select the Updates option.
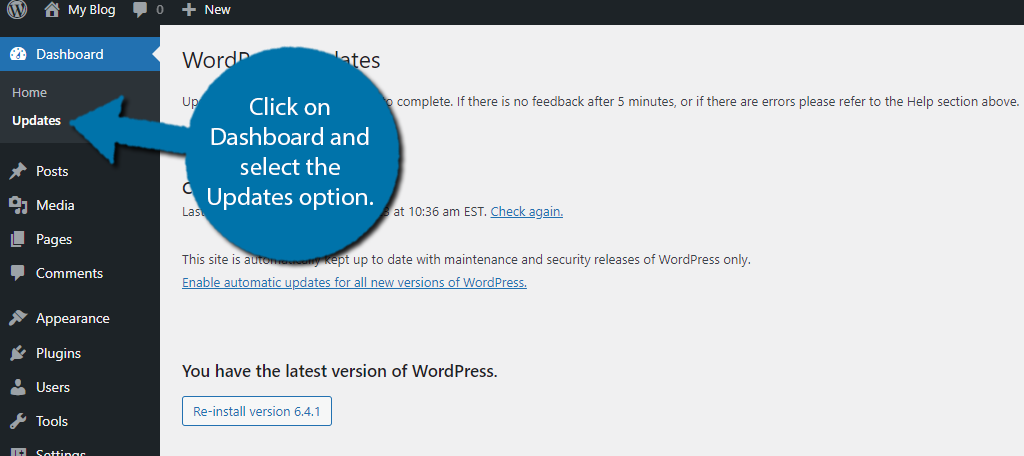
Here, you can see all of the items in WordPress that need updating like core files, plugins, and themes. To enable auto updates from this area, simply click on the Enable automatic updates for all new versions of WordPress.
This will ensure that WordPress is automatically updated.
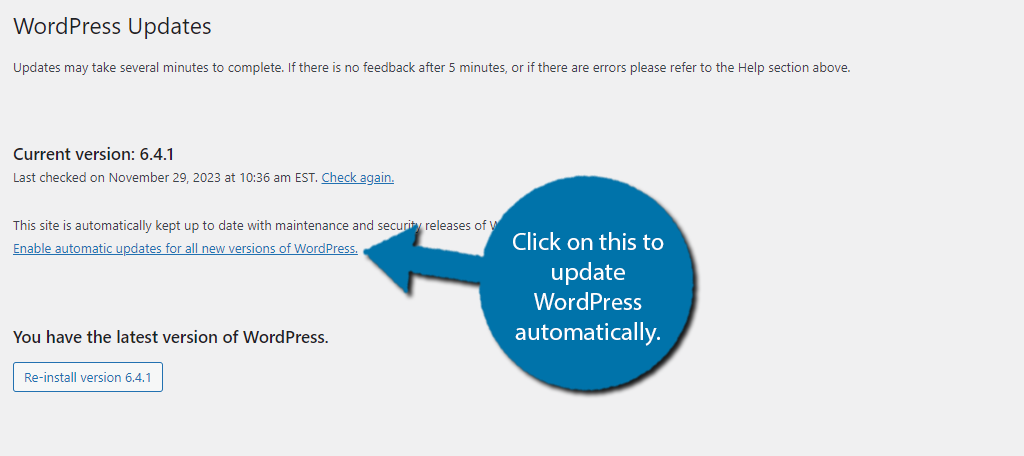
If you do not see this as the option, but instead see “Switch to automatic updates for maintenance and security releases only” then you already have automatic updates enabled for WordPress. And that’s it.
Manually Update WordPress
Although the automatic methods above are easier, some developers would rather upgrade systems manually. This could be because of certain scripts or plugins that need testing before rolling out the WordPress core.
In some cases, an update can break your site, which is always bad. And it can be worse if an update goes through when you are away. This could lead to extended downtime for the site. As such, many developers opt to manually update WordPress.
In any case, manual upgrades are not all that difficult. However, it takes more time to do so, and there is a risk you could mess something up. As such, always back up WordPress before you do this.
Step 1: Download the Latest Version of WordPress
Go to WordPress.org and download the newest version. This will add a zip file to your Downloads file on your computer.
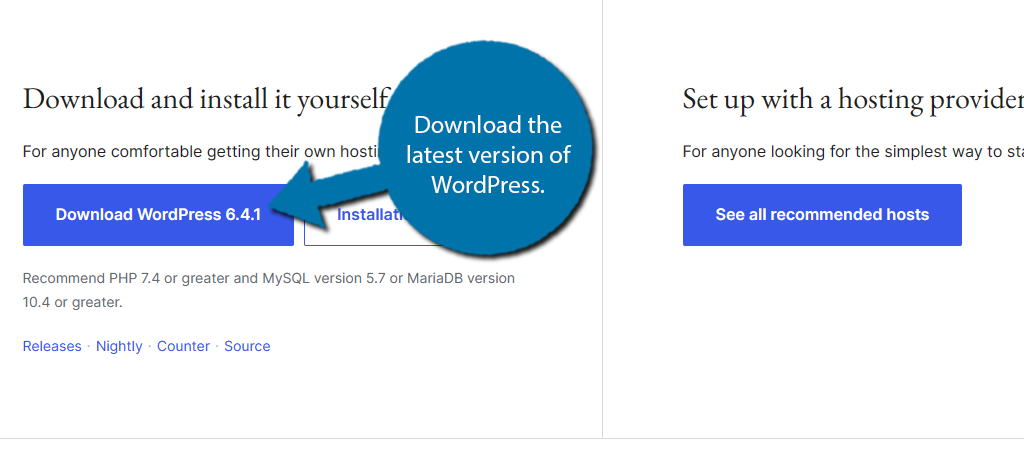
Once the download finishes, you should unzip the file. Both Windows and Mac have built-in options. We cannot upload the zipped files in the next steps, so you must take care of this now.
Step 2: Disable All Plugins On Your Site
Before we can use this file, we need to take a moment and disable every plugin on your site. Don’t worry, you can activate them once the site has been updated. To do this, click on Plugins and select the Installed Plugins option.
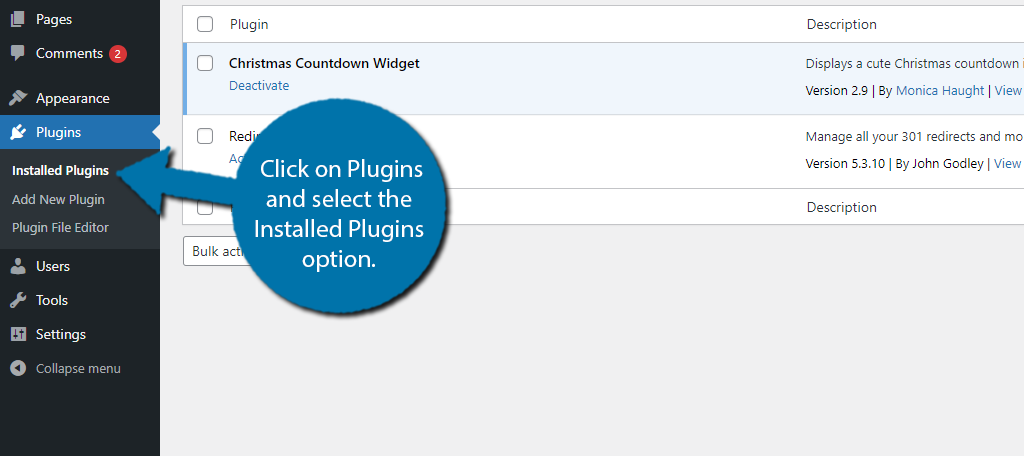
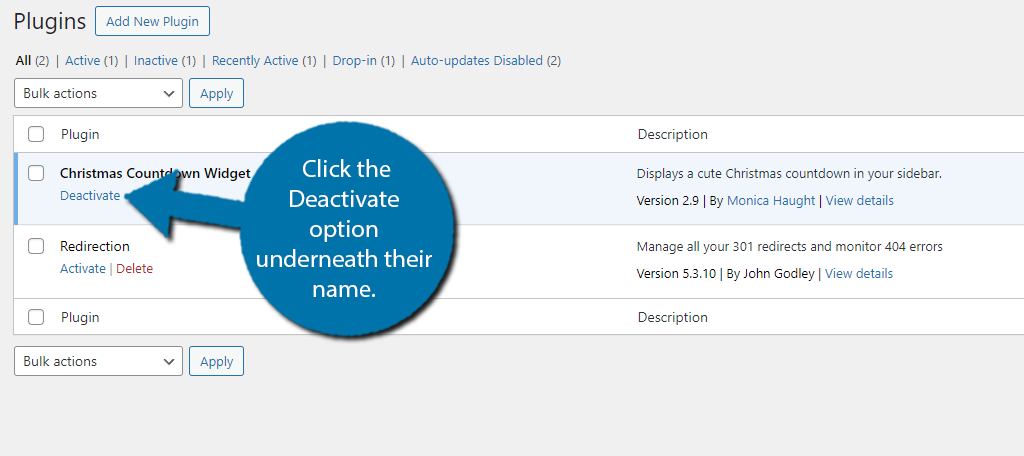
To deactivate plugins in WordPress, you have two options. The first is to individually deactivate each plugin by clicking the Deactivate option underneath their name.
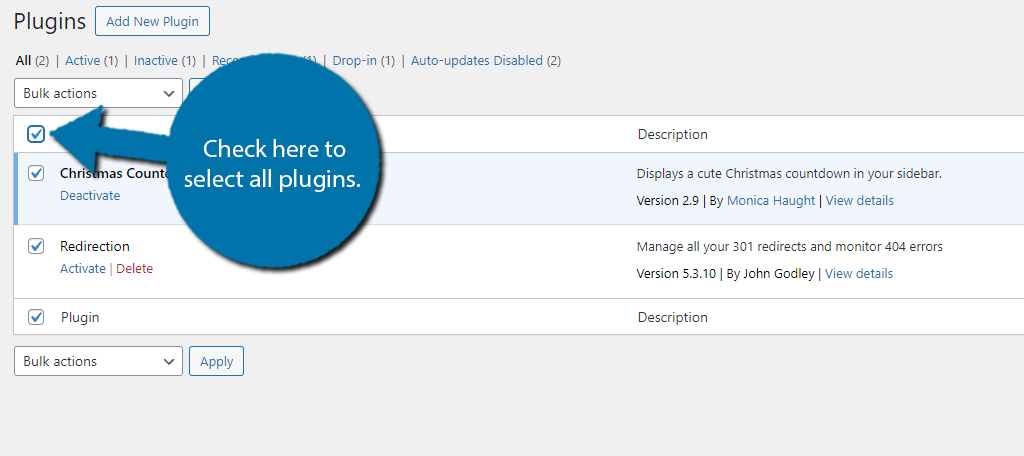
Alternatively, click the top checkbox next to “Plugin.” This will select all of your tools automatically. It’s useful if you use an exceptional number of plugins on your website.
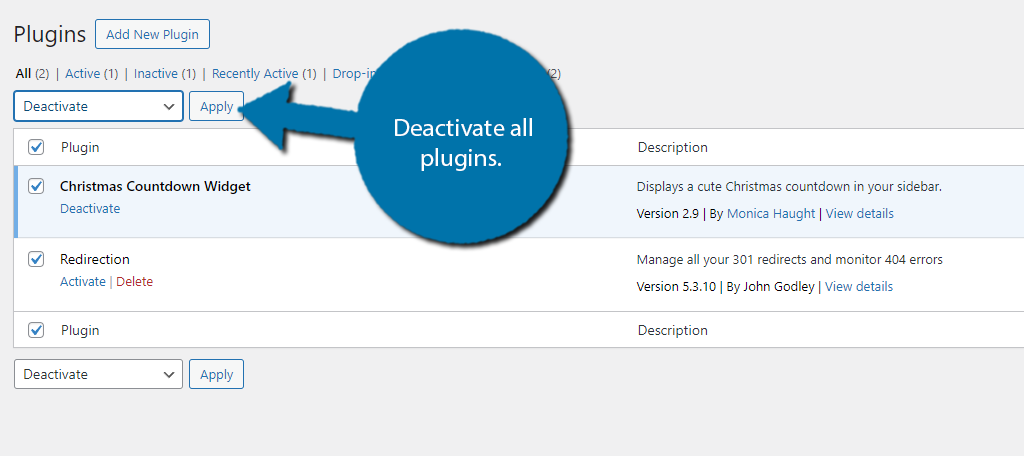
Change the bulk actions to “Deactivate” and click “Apply.” This will turn off all of your plugins en mass.
Step 3: Replace Files
Now, you’ll need to delete a couple of folders from your website. You can do this by using the File Manager. Then we will simply upload what we downloaded and unzipped in the first step.
Log into your hosting account and access the cPanel. From there, locate the Files section and click on the File Manager option. This contains every file on your web server. In this case, we are editing WordPress directly.
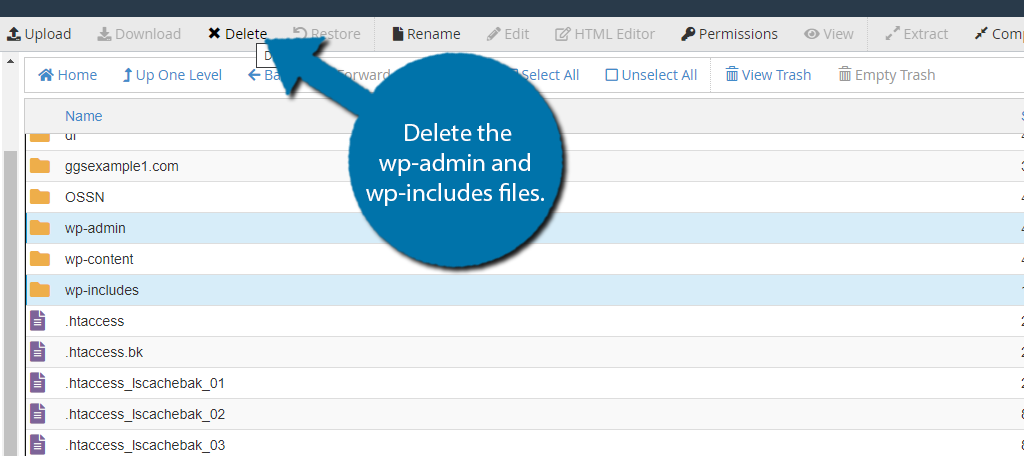
Access your website’s directory and delete the wp-includes and wp-admin folders.
If you haven’t unzipped WordPress yet, you’ll need to do that now. There are three folders in this file you’ll need for a manual update.
Upload the new wp-admin and wp-includes from your downloads folder to your website’s directory. Unfortunately, File Manager doesn’t let you bulk upload folders. Instead, you need to do this one by one.
Note: This step is easier if you connect to your server with FileZilla or another FTP program because you can bulk upload.
Now, upload the files within the wp-content directory. You will need to overwrite existing files in this directory. This is because the content folder will contain information about your site and you don’t want to delete any of the files that have been created over time.
The new files you’re uploading are part of the new version of WordPress and will not impact your site’s actual content.
Step 4: Edit the wp-config File
For this next part, you’ll need to know how to edit the wp-config.php file.
Compare wp-config-sample.php in the newly downloaded version of WordPress with your current wp-config.php file to see if new settings or adjustments have been introduced. If any are present, add them from the sample.php file to your working wp-config.php file.
You do not just want to copy the downloaded file and replace your existing wp-config.php file. It will impact your site.
Next, you will run the update from your WordPress website. Open a browser and go to “https://www.ggexample.com/wp-admin/upgrade.php” (replace “ggexample.com” with your domain). Your website may look different, especially if it’s a subdomain or stored in another directory other than your actual domain name.
The point is to add “/upgrade.php” behind the “/wp-admin” in your web browser.
Follow the instructions on the screen to finish the update installation.
Step 5: Reactivate Your Plugins
After the upgrade is complete, log into your WordPress website and enable your plugins by clicking the “Activate” link or selecting them all for a bulk activation like before.
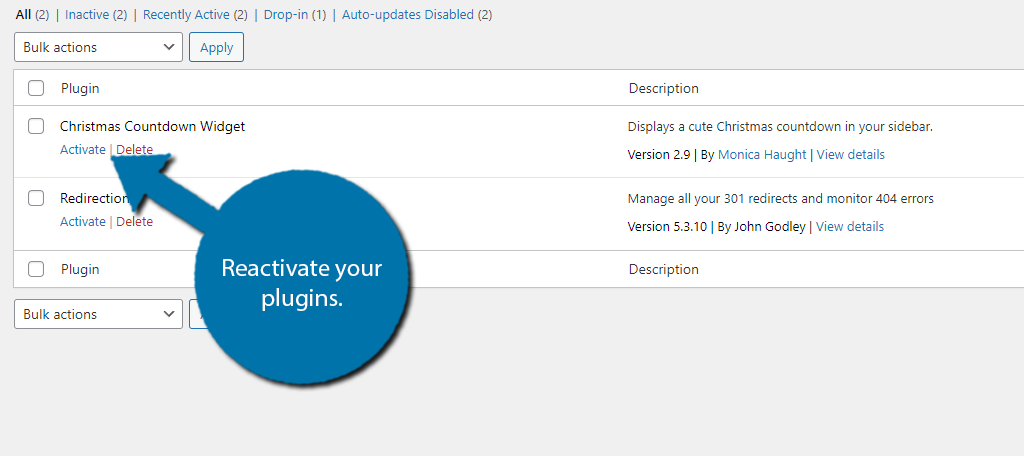
If you have problems after the manual update, you can always restore your site using the backup you created earlier.
Updating Plugins and Themes
WordPress core files only represent part of what you must update in WordPress. You also need to keep your plugins and theme updated. Luckily, this is very easy to do and there are a lot of ways to go about it, some of which we have already explored.
Here are four methods to update your plugins and theme in WordPress.
Method 1: Use The Companion Auto Update Plugin
WordPress has a great selection of plugins to choose from that can do just about everything. As such, it should not come as a surprise to learn that there are plugins that can automatically update other plugins.
There are plenty to choose from, but this method will focus on the Companion Auto Update plugin. Another great alternative is the Jetpack plugin.
Step 1: Install Companion Auto Update
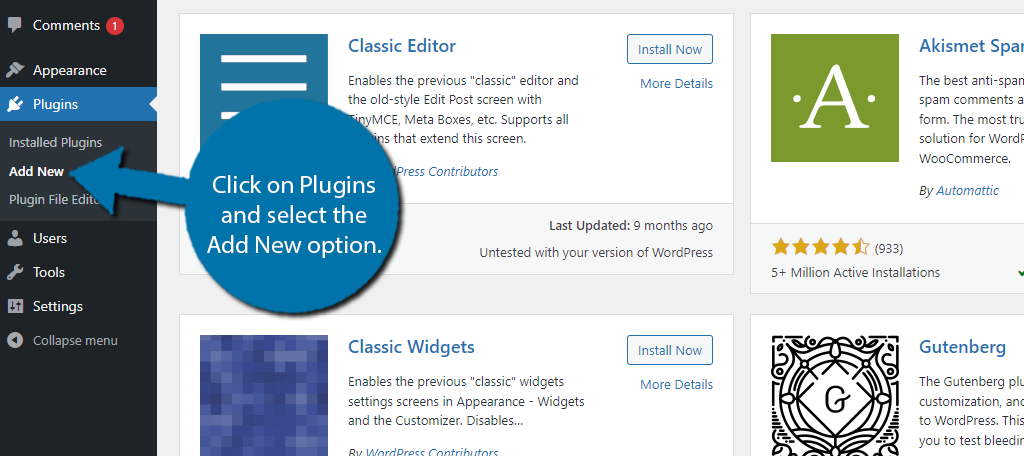
Let’s start by clicking on Plugins and selecting the Add New option on the left-hand admin panel.
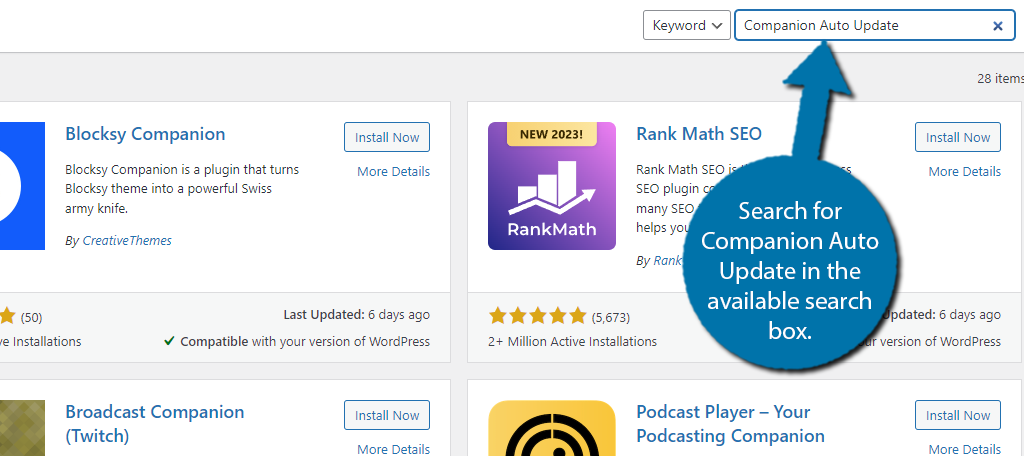
Search for Companion Auto Update in the available search box. This will pull up additional plugins that you may find helpful.
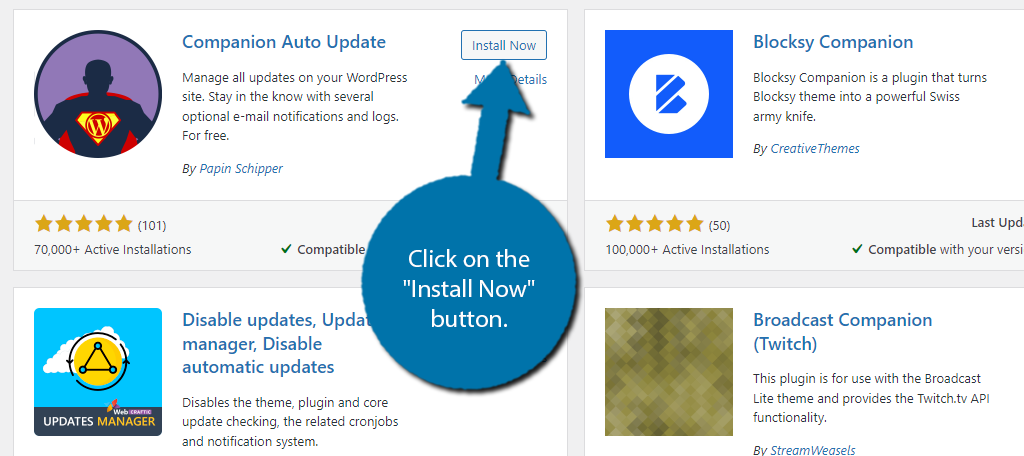
Scroll down until you find the Companion Auto Update plugin and click on the “Install Now” button and activate the plugin for use.
Note: The default settings of the plugin enable auto-updates for plugins upon activation. Thus, you don’t need the next step. However, there are other settings you can configure or disable, so keep following along.
Step 2: Enable Auto Updates For Plugins
Truth be told, this plugin can automate updates for anything in WordPress. This includes core WordPress files, themes, plugins, and other content. Thus, it is extremely versatile, but today we are just focusing on plugins.
On the left-hand admin panel, click on Tools and select the Auto Updater option.
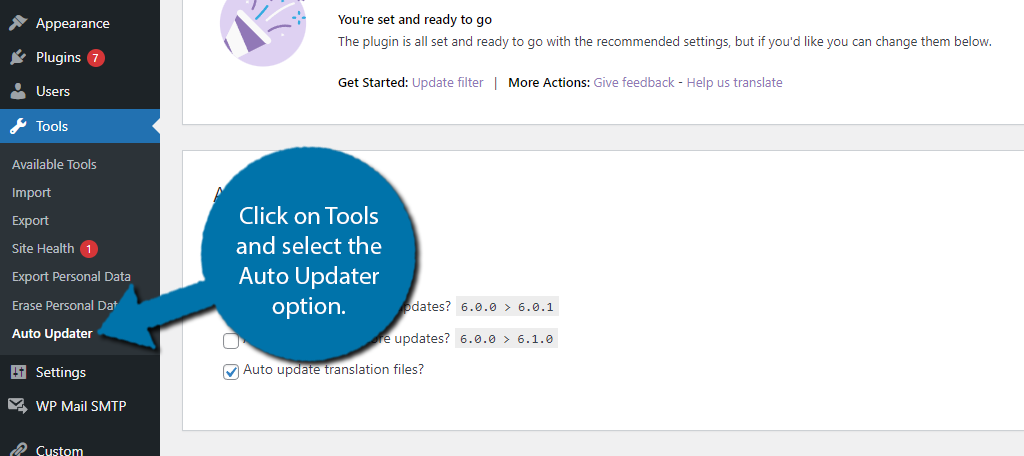
By default, the Companion Auto Update plugin will have four main components of WordPress selected for auto updates. These are:
- Plugins
- Themes
- Minor WordPress core files
- Translation materials
You can select or deselect any element you wish for automatic updates. However, I suggest leaving the selections as-is to provide the best experience for keeping your site functional.
You can also change email notifications upon updating the various elements. However, you want to be careful when setting these options. If you have a lot of plugins and themes, your inbox could be quickly flooded with update messages.
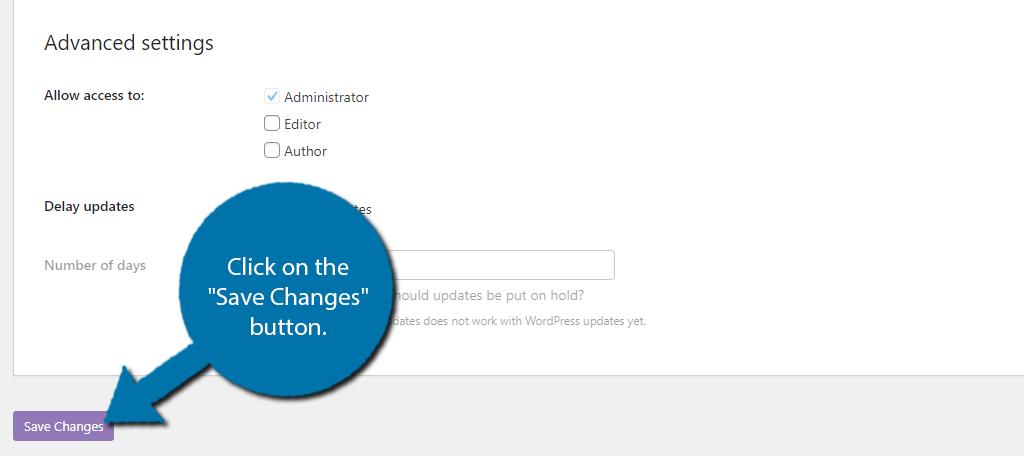
Once you’re done making your selections, click on the “Save Changes” button at the bottom.
Method 2: Using Code to Update All Plugins
Some might think it is a bit odd to install a plugin for the sole purpose of updating plugins. While that is the easiest route, another way to do it is by adding a few lines of code to WordPress to have the same result.
Luckily, adding this code is not difficult and just requires some simple copying and pasting. Thus, anyone can do it.
However, as always, when adding or editing code in WordPress, I strongly recommend creating a backup of your website before proceeding. This can help you recover from any simple mistakes that occur.
Step 1: Access the functions.php File
On the left-hand admin panel, click on Appearance and select the Theme Editor option.

In the top right corner, you should see your current WordPress theme. If for some reason this is not the case, use the drop-down menu to select your theme.
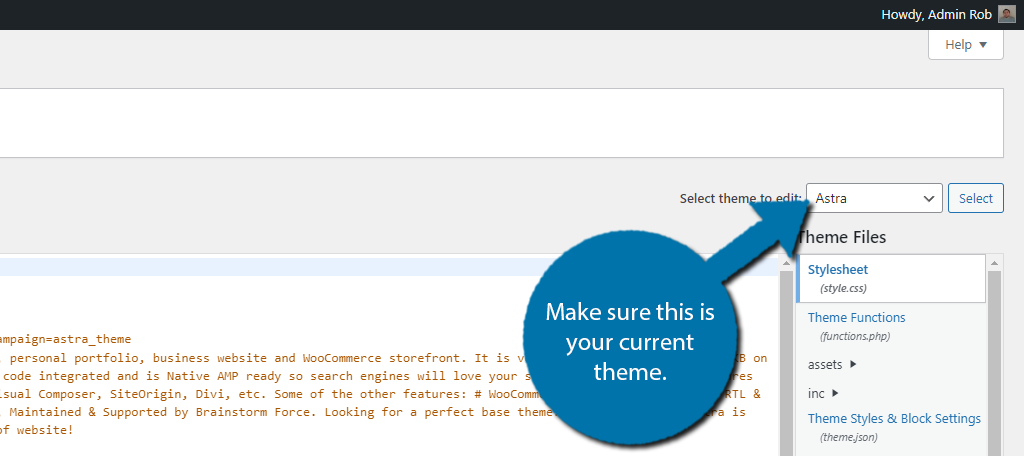
Under this, you will see a list of all of the files that your theme contains. Locate and select the functions.php file from the list on the right.
Step 2: Add Code
Add the following code to the functions.php file:
add_filter( 'auto_update_plugin', '__return_true');
Click the “Update File” button on the bottom of the page to finish.
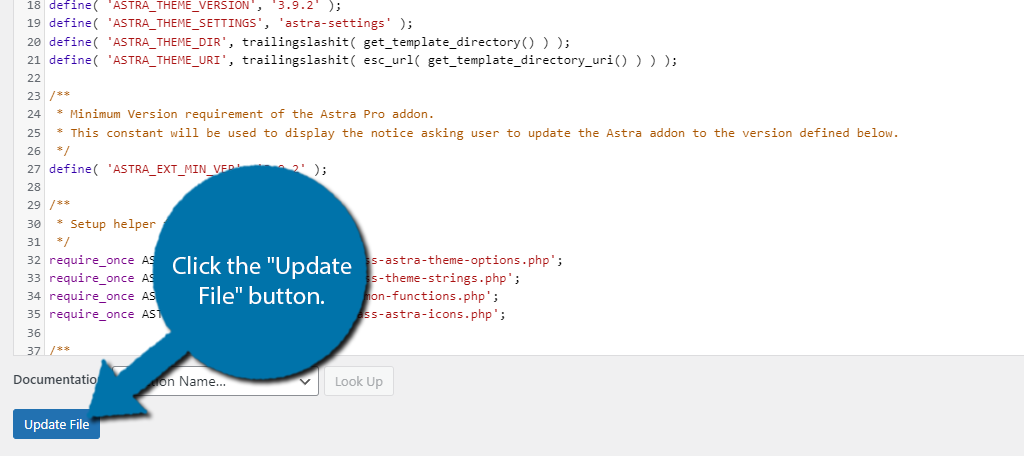
This will enable auto-updates for plugins you currently have installed in WordPress. If for any reason you ever change your theme, you will have to repeat this process as the code is stored in the theme files.
Method 3: Using Softaculous to Update Plugins
Softaculous is the go-to system in WordPress for installing applications or an entire CMS on your domain. It can also help you manage those installations. In this case, we can use it to manage your WordPress install to automatically update plugins.
It’s quick and easy, but only an option if your web host supports Softaculous (most do).
Step 1: Access Softaculous
Log into your web hosting account and click on the “cPanel” button.

Locate the Software section of the cPanel and click on the Softaculous App Installer.

Step 2: Enable Automatic Updates for Plugins
In Softaculous, click the “Installations” section of the page.

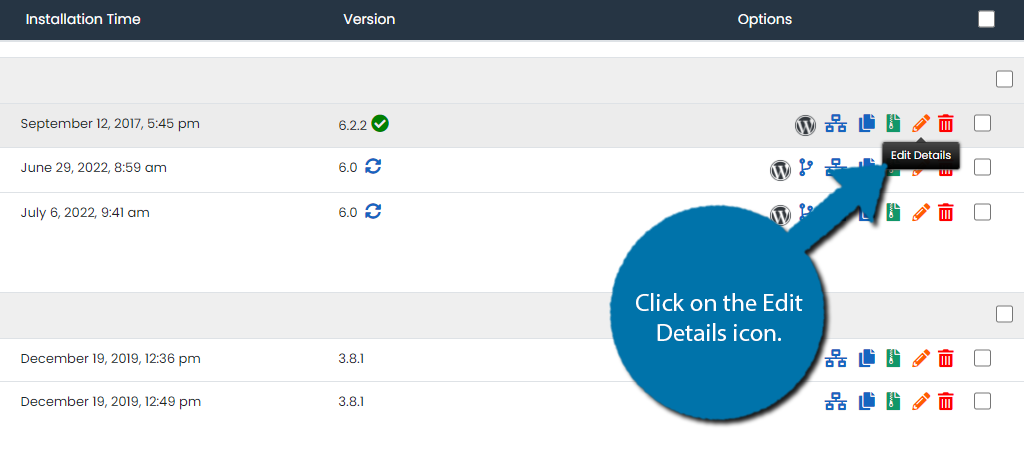
Here you will find a list of all of the installations managed by Softaculous. Locate your WordPress install and click on the Edit Details Icon (the pencil).
Here you will find all of the details related to your WordPress install. All you actually need to do is check the “Auto Upgrade WordPress Plugins” checkbox.
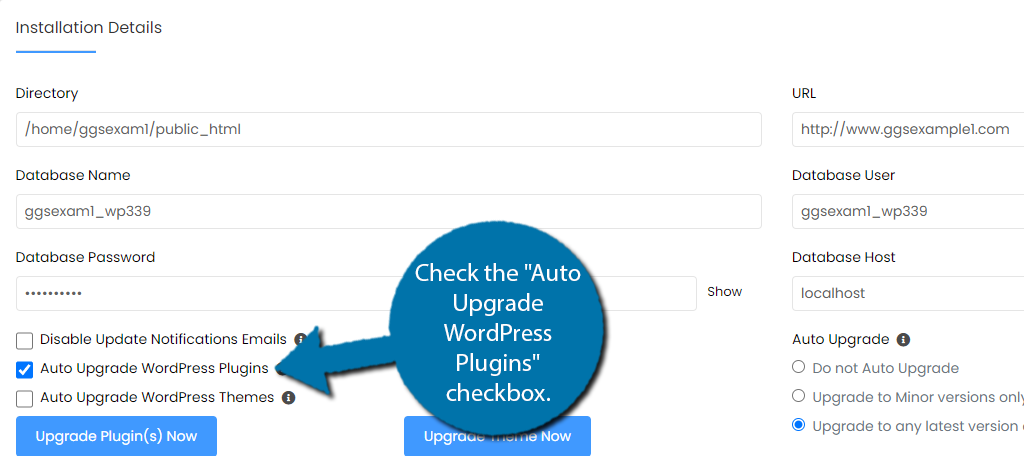
Note: You also have the option to enable auto-updates for your themes if you desire.
Scroll to the bottom of the page and click the “Save Installation Details” button.
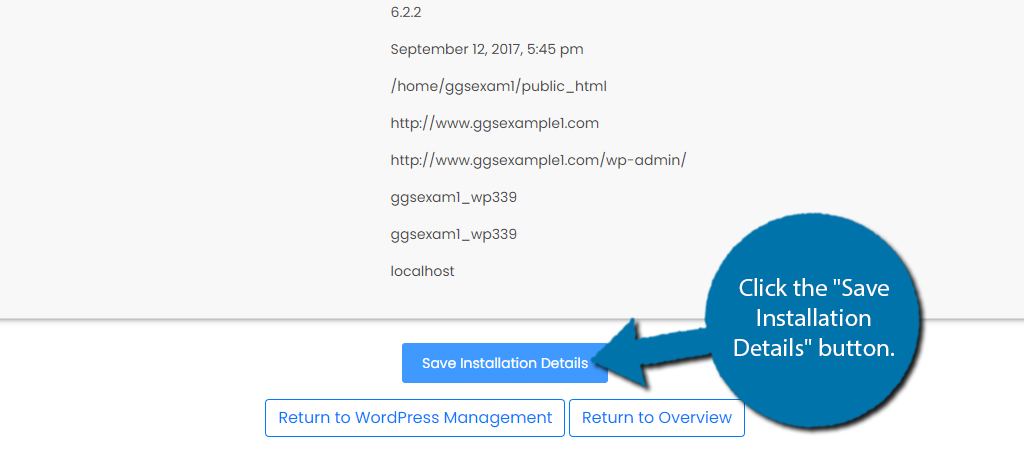
Softaculous will add the necessary coding to WordPress for automatic updates. Congratulations!
Method 4: Using the GreenGeeks Dashboard
Our customers have access to the easiest method on this list, as you can enable automatic updates directly from your GreenGeeks dashboard. Log into your web hosting account to begin.
Click on the “Manage” button next to the domain name you wish to enable auto updates on.

Click on the WordPress tab and select the Autoupdates option.

Here you can enable updates for all kinds of content like themes, WordPress core files, and what we are after, plugins. Simply check the “Auto Upgrade Plugins” checkbox and click on the “Save” button.

And that’s it. This will have all of the WordPress plugins you currently have installed receive updates automatically. If you ever want to disable this, just uncheck the box.
How to Roll Back Plugin and Theme Updates
Updating your plugins and theme is important, but it is not without risk. There is a very real chance that an update can break something on your website or cause a compatibility issue out of nowhere.
As such, there are situations where you may need to roll back an update to get your site working again. Luckily, this is easy to do.
Step 1: Install WP Rollback
Install and activate the “WP Rollback” plugin.
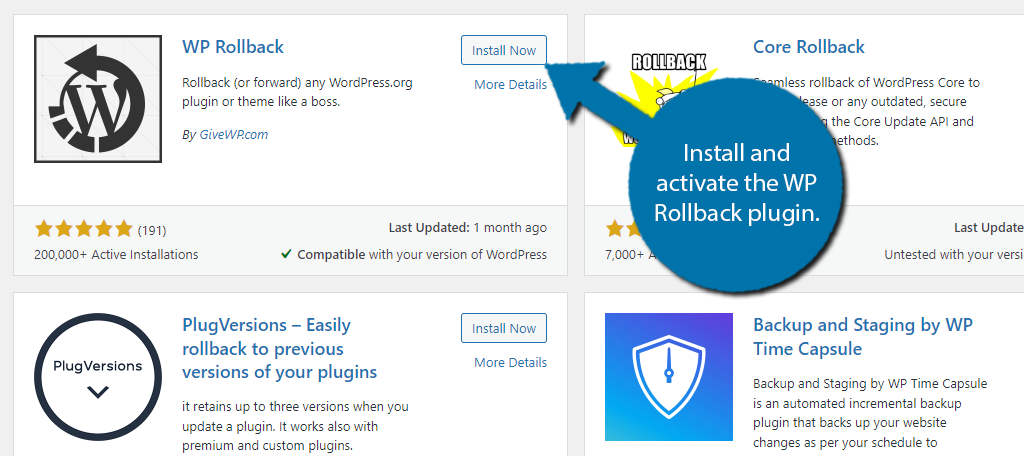
This is one of those plugins that doesn’t have a specific screen for settings or tools on the left admin panel. Instead, it builds the rollback feature directly into WordPress. As such, you can start right away.
Step 2: Roll Back Plugins in WordPress
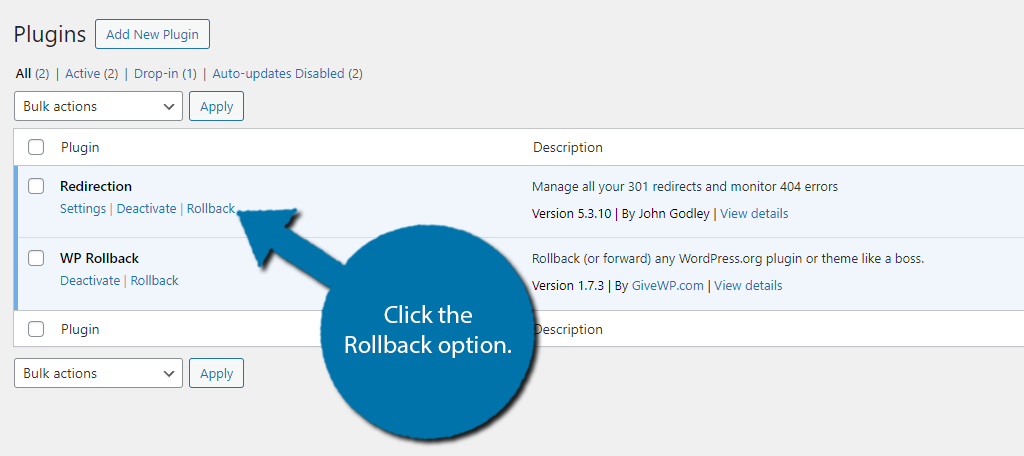
Start by going to the plugins area of your website. Here you would normally only see options to activate, deactivate, or access a plugin’s settings area, however, with WP Rollback activated, you will now see a Rollback option.
Click the Rollback option.
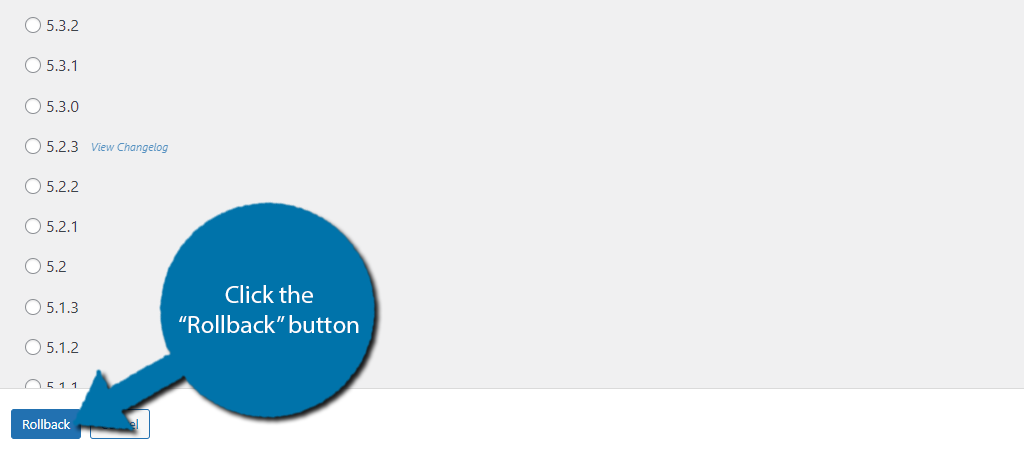
If there are previous versions available, you’ll see a list of them with radio buttons on the left. Select the version you want to use and click, “Rollback.”
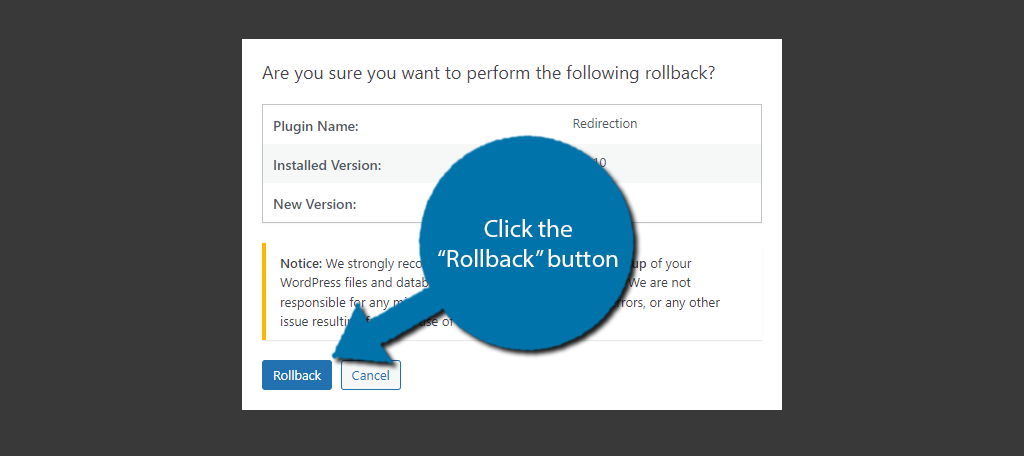
A confirmation window will appear displaying your current version and the one you’re about to use. It also states how testing the changes in a testing environment is ideal before making the actual rollback.
This is because going back too far may make the plugin incompatible with new versions of WordPress. For instance, there have been many changes to WordPress over the years and plugins need to accommodate them on a coding level.
A tool from way back may not work at all in a current WordPress environment.
When you’re ready, click the “Rollback” button on the window.
You’ll see the plugin update screen displaying the results. Click the link to “Activate Plugin.”
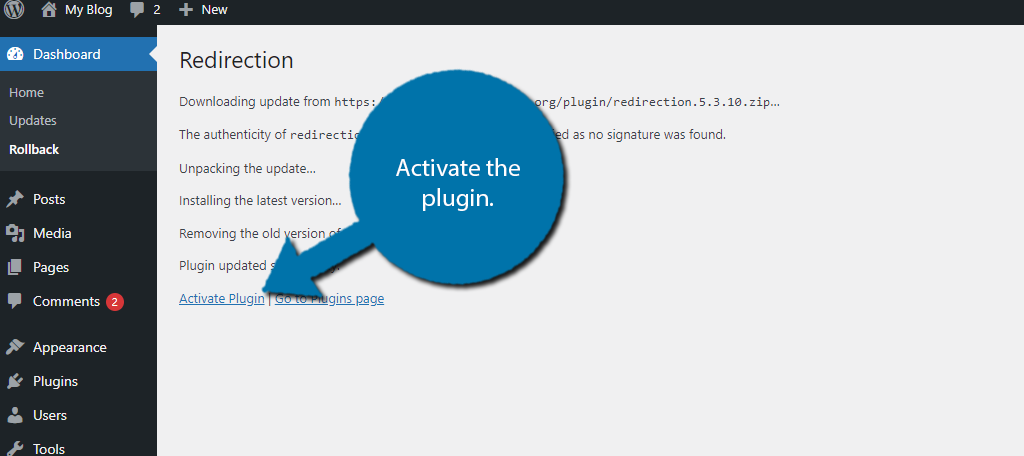
Your plugin has now reverted to an earlier version.
Just keep in mind that the update icon and messages will be visible until you update the plugin to a current version.
Note: Many plugins existed before Gutenberg did. If you roll back too far, you may lose all of the Gutenberg compatibility the plugin offers. This includes access to plugin-specific blocks. In some cases, you may even need to use the classic editor to do anything.
Step 3: Roll Back Themes in WordPress
Rolling back a theme is pretty much identical to doing it for a plugin. The difference is where you find the rollback option. In this case, click on Appearance and select the Themes option.

Click the “Theme Details” of the theme you want to roll back. You access this option simply by hovering your mouse over the theme.

Click the “Rollback” button on the bottom right.
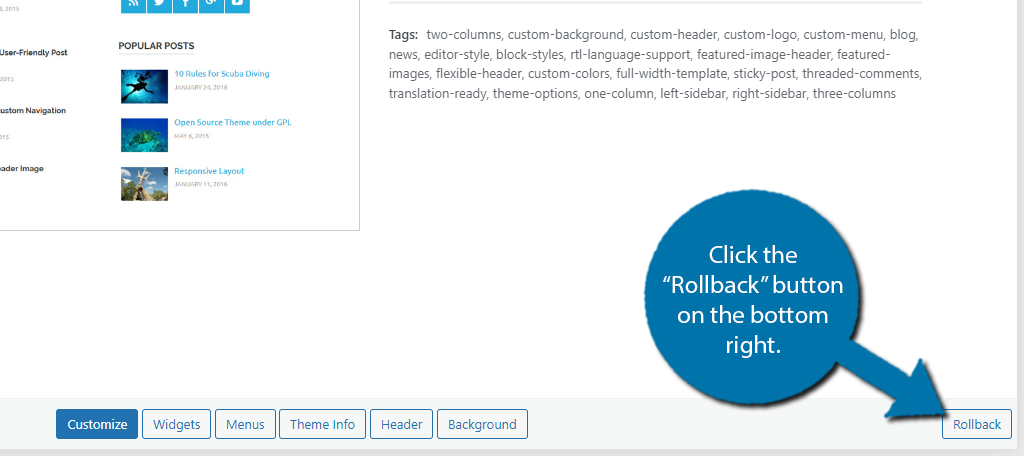
From here, the process is identical to the previous step for plugins. You will select the version of the theme you want to use, click on the “Rollback button, confirm that version, and activate the theme.
And that’s it. Just be aware that rolling back a theme is far more impactful than a plugin. It impacts everything on your site, and if you add any custom code to the theme directly, it will be overwritten. As such, you need to add it back.
Realistically, you should create a child theme to avoid the problem.
Keep Your Site Safe and Secure by Staying Up to Date
One of the best ways to keep hackers and bots out of your site is to make sure you update WordPress regularly. I would suggest using automatic systems as often as possible. This way, you won’t have to remember to upgrade when a new version comes out.
As this guide demonstrates, there are a lot of ways to update WordPress and its plugins and themes. Luckily, it is quite easy to do.
I hope you found this tutorial helpful for learning how to update WordPress core files, plugins, and themes.
Did you enable automatic updates on your site? Do you think the update process is easy in WordPress?

