
Newsletters are powerful marketing tools for sites and online stores to share what’s new. While there are several ways to add them, Substack is one of the best choices for WordPress.
WordPress is one of the most customizable platforms to build a website with, and naturally, that means there are several ways to show off your newsletter on the platform. And even better, they are all easy to add to your site.
Today, I will show four methods that you can use to showcase your Substack newsletters in WordPress.
What is Substack and Why Use it With WordPress?
Substack is a publishing platform for newsletter content. The platform is free to use and any content you create on it is owned by you.
While you can use Substack to deliver free content to readers, you can also monetize your newsletter with premium posts. This means that users will have to pay a subscription fee to access that content.
You’ll have to pay fees, of course, to use the service. The fees for Substack will cost you 2.9% + $0.30 for processing. And there is a 0.5% fee for recurring subscriptions (paying monthly). But these fees are taken out of subscriptions when people sign up to read your premium newsletter.
WordPress has a ton of great plugins when it comes to newsletters, so why should you use Substack?
Well in most cases, the vast majority of these services may start out free but only support a small subscriber list. Most sites quickly outgrow this, thus, they can start to cost you a lot. And perhaps more importantly, Substack is really easy to use.
As a publishing tool, it is a blank canvas that you can transform to meet your needs. In many cases, some of the other newsletter platforms and tools are often a bit tricky to use, but Substack is beginner-friendly and compatible with just about anything.
And that’s something it shares with WordPress, both platforms are free and easy to use, so they make a strong combo.
Note: This guide assumes you already have a Substack account and have content ready to share.
Method 1: Embedding the Substack Code in a Sidebar
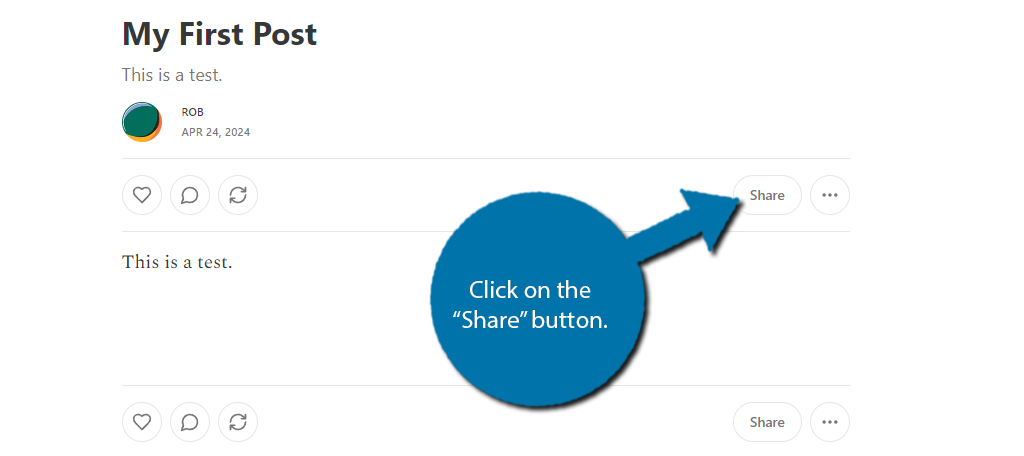
The first way to add Substack content in WordPress is to embed it. Every piece of content published on Substack has an embed code that you can find by clicking on the “Share” button and selecting the Embed option.
While you can embed this anywhere in WordPress, we’re going to focus on the sidebar area.
The sidebar area is something that is visible anywhere a visitor goes on your site, thus it is a great place to advertise a newsletter to your visitors. Luckily, this is easy as it just involves, copying and pasting a line of code from Substack.
Note: Some themes do not have a sidebar area. If you do not, you will need to use a different theme or install a plugin to add the sidebar.
Step 1: Get the Embed Link
Visit your Substack account and locate the content you wish to embed. Locate the “Share” button and click it.
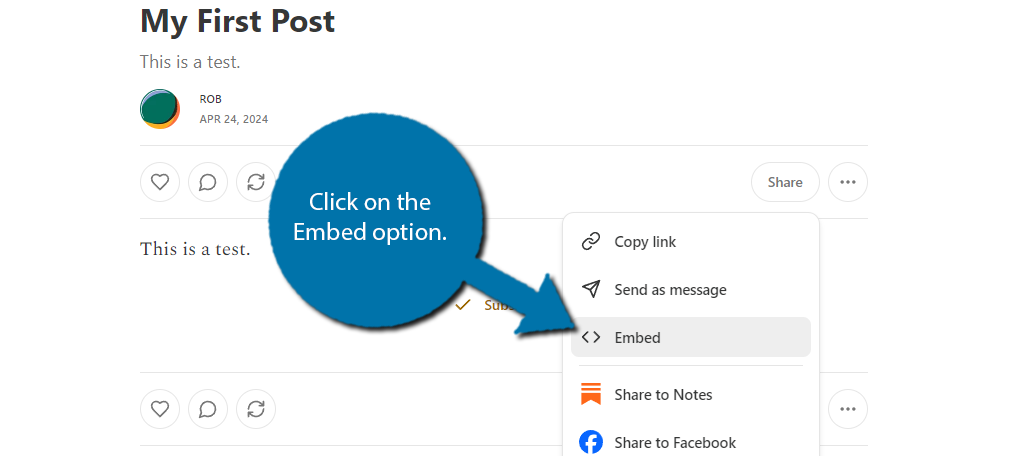
Locate the Embed option and click it.
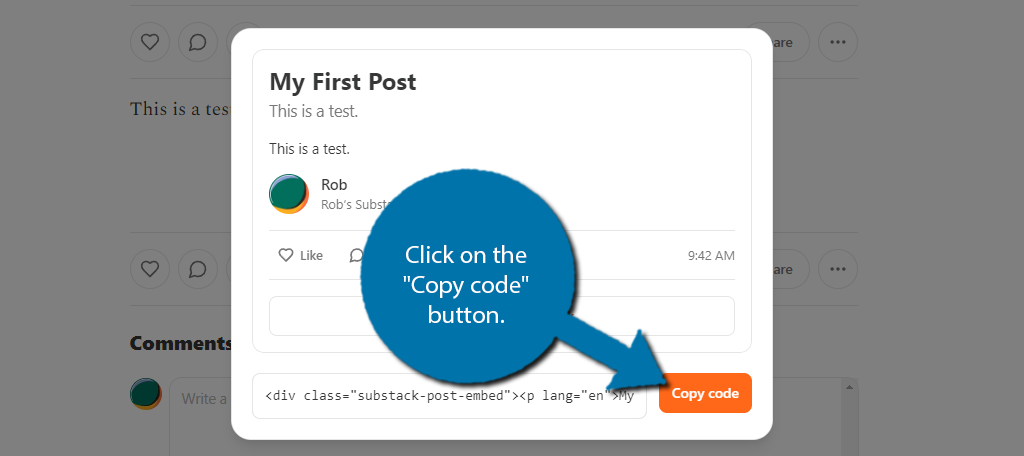
A small window will appear that contains the embed link at the bottom. Simply click on the “Copy code” button.
Step 2: Add the Embed Code in WordPress
Now that you have the code, all you need to do is paste it in the desired location in WordPress. Again, this will work in post and page content, but we are just doing it in the sidebar this time.
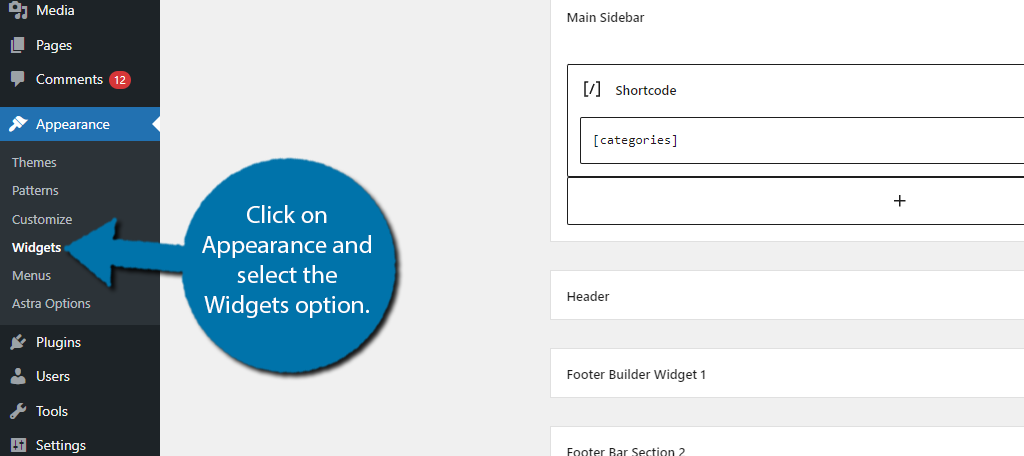
To find the sidebar area in WordPress, click on Appearance and select the Widgets option.

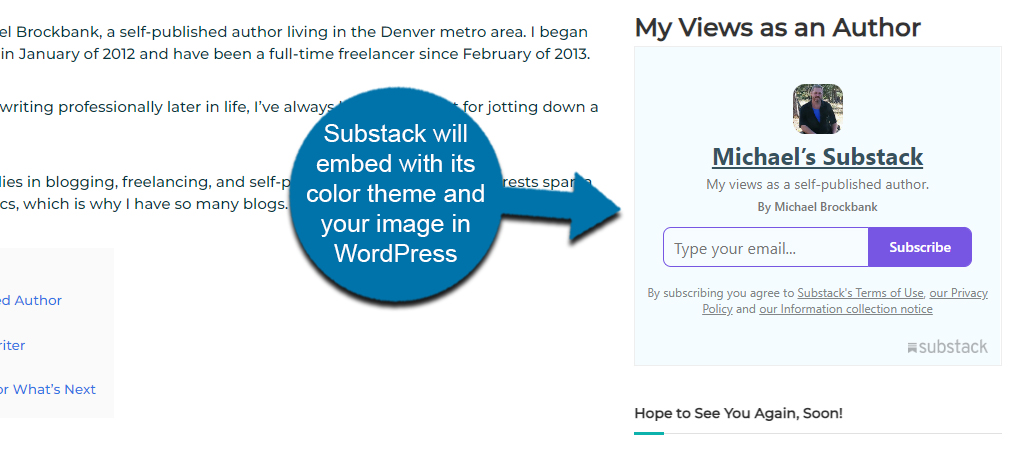
You do not need a special widget to do this. Simply add a Paragraph widget/block to the desired widget area and paste the embed link you copied in the previous step. The content will automatically appear.
Be sure to save the changes before you exit this area. You can visit your website to see it in action.
Method 2: Embedding the Substack in a Popup
One of the most common methods for showcasing newsletters is a popup. While popups can be extremely annoying for most users, they are also extremely effective in getting a user’s attention.
Similarly to the last method, you can embed your Substack content into a popup, but this will require you to install a popup builder plugin for WordPress. Luckily you have a lot of options to choose from.
It doesn’t matter what you pick, but for the sake of this tutorial, I will be using the Popup Anything plugin. It is easy to use and won’t cost you any money. We are not going to be using any of its creative features in this tutorial, but feel free to do so on your own.
Instead, we are creating a blank popup that just contains the embed code we obtained in the previous method.
Step 1: Create A Popup
Start off by installing and activating the plugin. Once that is done, click on Popup Anything and select the Add Popup option.
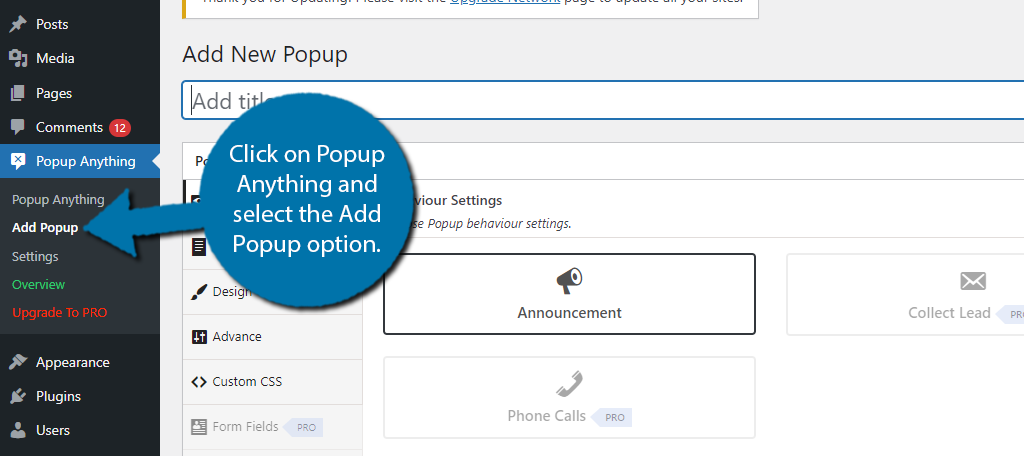
Simply add a title at the top. The free version of this plugin is very limited but it will work perfectly for what we need.
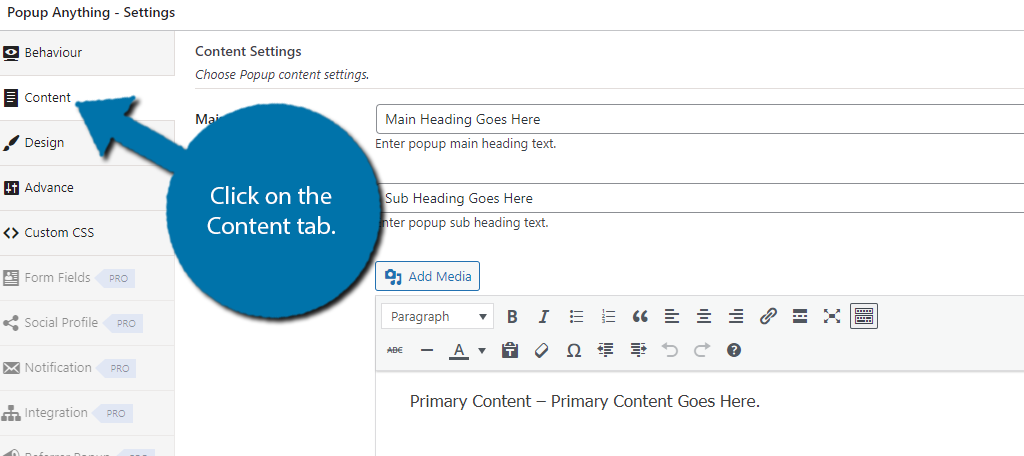
Click on the Content tab.
Step 2: Add the Embed Code
Here, we can customize what the popup says. This plugin utilizes the classic editor in WordPress. If you try to paste the code into the visual editor, it will not work, instead, click on the Text editor.
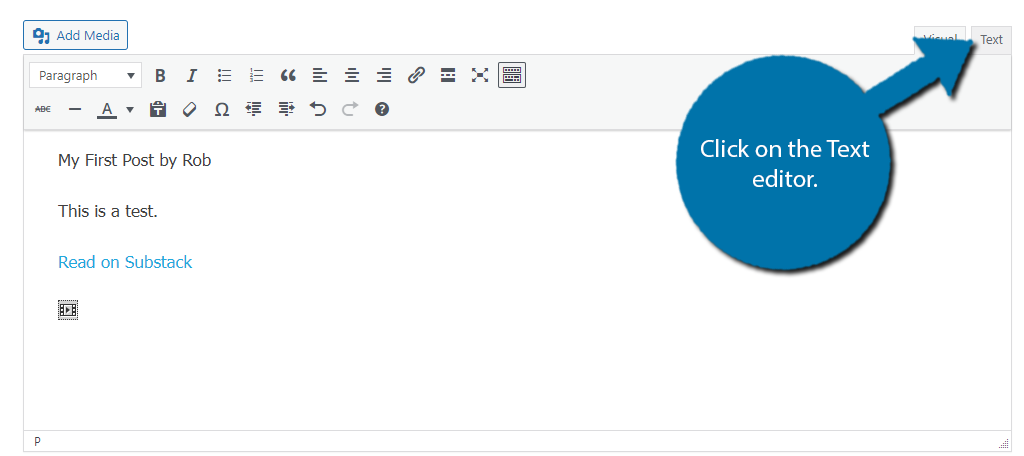
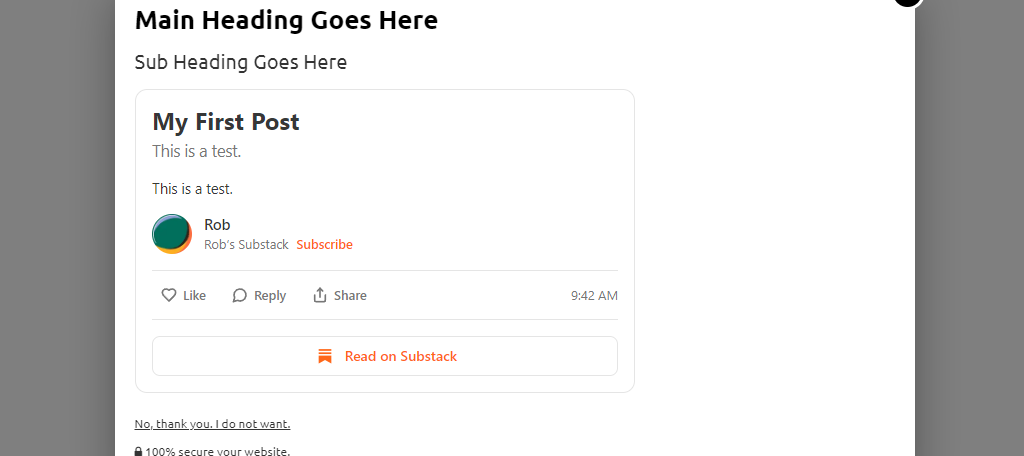
Simply paste the embed code in this location. If you switch to the visual editor after doing so, you’ll be able to see the Substack content itself. Also, don’t forget to update the headers to match the content.
Save the changes, and you can either use the preview option or view it on your actual website.
Method 3: Using a WordPress Button for Substack
One of the classic ways to link to content on other platforms is to use a button. In this case, all you would need to do is create a button that links to the Substack account or specific piece of content you want them to see.
Buttons may not be exceptionally flashy, but they get the job done and fit more naturally onto a page or post. While you can use a button builder plugin in WordPress, the default one in WordPress will be fine for this tutorial.
It’s also worth noting that buttons can be placed anywhere in WordPress and the process is identical. You can even save the button block as a Pattern to reuse it throughout your site. This will save you from recreating it from scratch every time.
Step 1: Create A Button
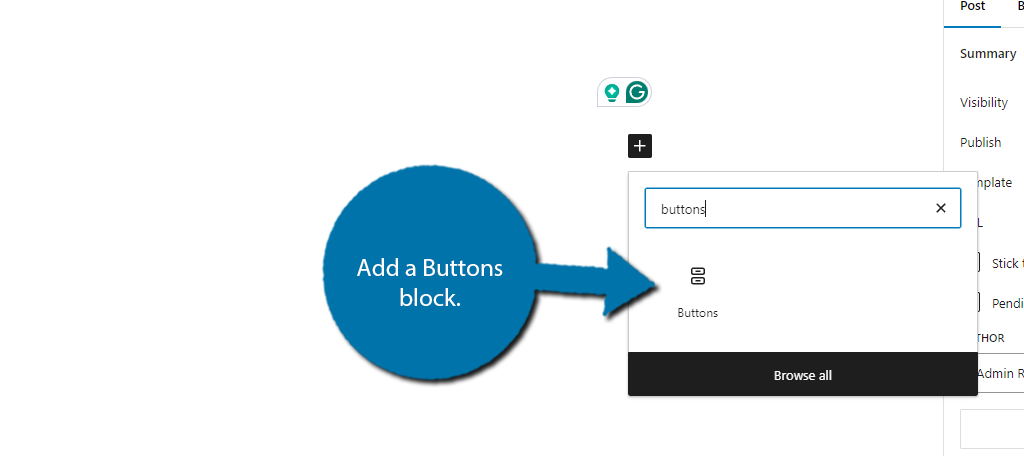
Making a button in WordPress is pretty simple. Start by going to the area where you want the button to appear. In my case, I will do it in a new post. Once there, add a Buttons block.
This will add a default button that does nothing to the editor, so now it is time to edit it. You can skip the editing process and just use the default button design if you wish. If so, feel free to skip to the next step, as I will cover a basic button design overview.
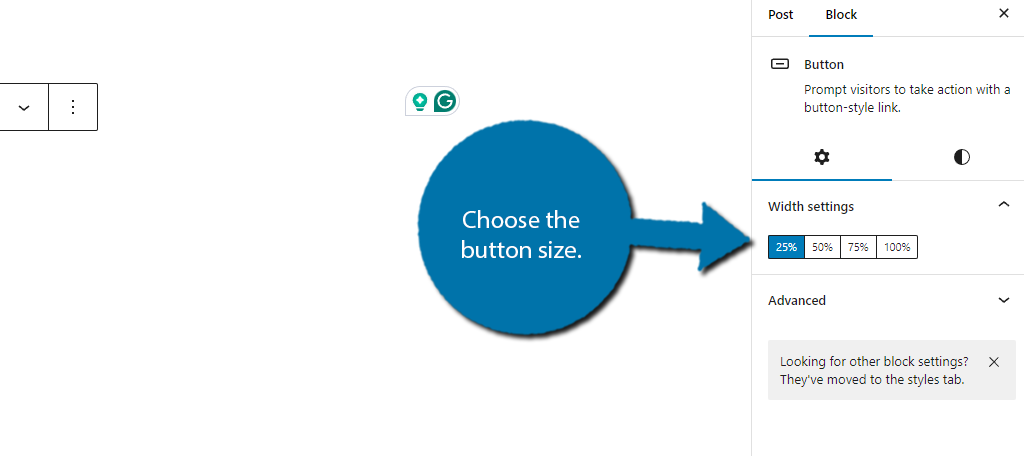
By selecting the Butttons block and checking the settings on the right-hand side, you can edit them freely. The first option is the width of the button. This will determine the button’s overall length.
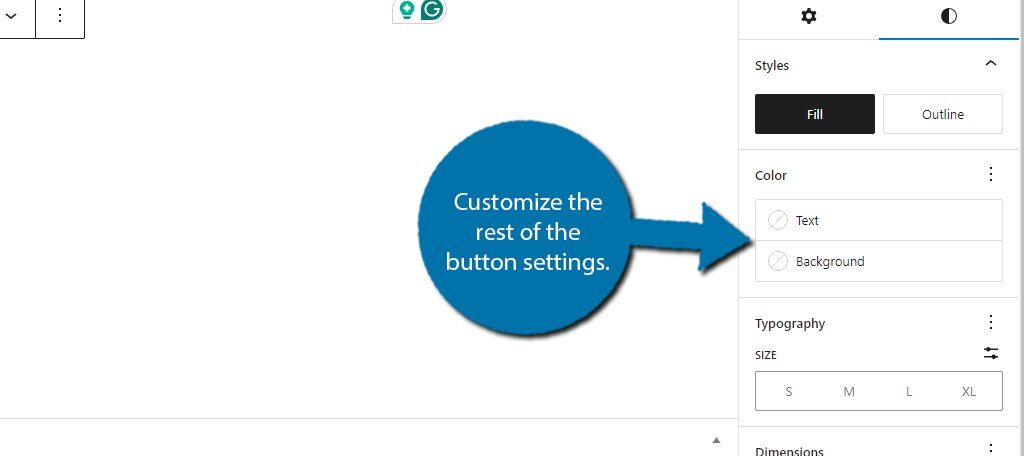
In the Style tab, you can change the color of the button, typography options, add padding to further customize the size of the button, and choose the border options. Simply go through the options until you are happy.
Note: There are some advanced options where you can add your own custom CSS to make the button better match the rest of your site.
Step 2: Link the Button to Substack
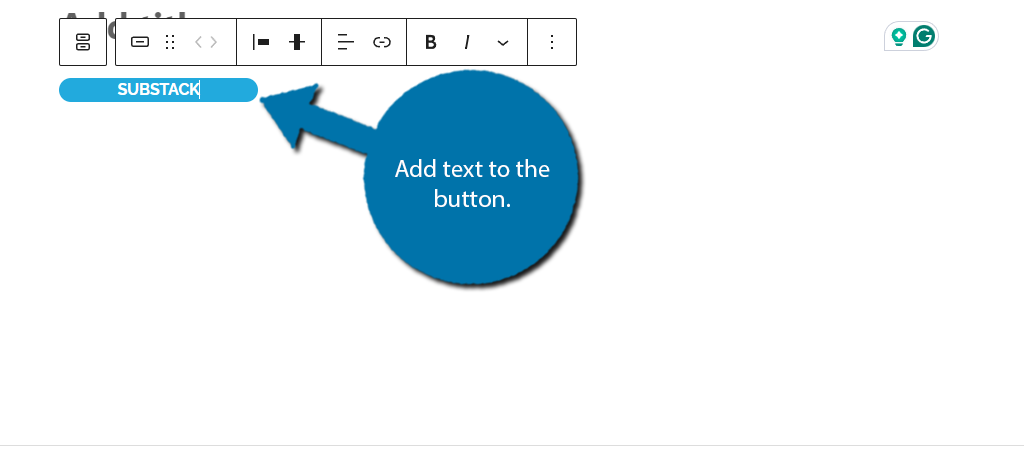
There are realistically only two things you need to do to the button. The first is to edit the text to tell users what the button does, and the second is to make sure it links to Substack. Both of these are insanely easy to do.
To edit the text of the button, simply click on the button itself within the editor, and type the text.
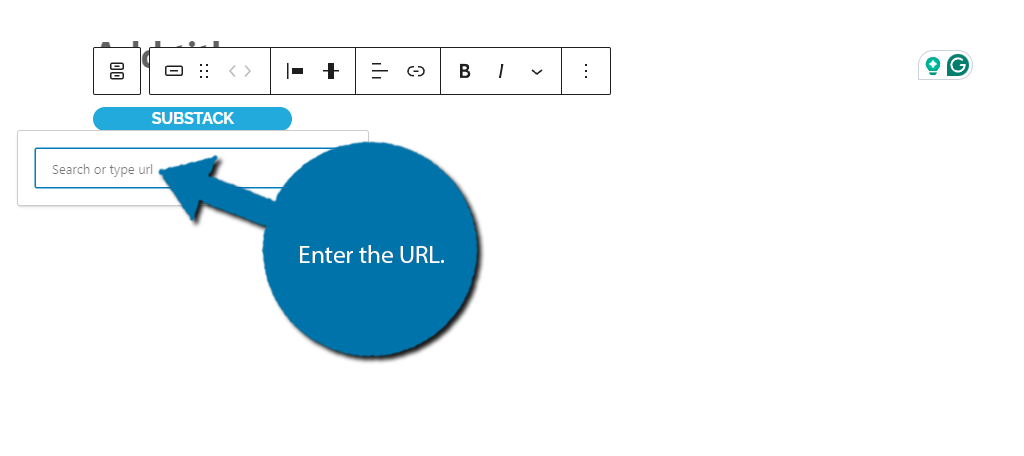
Now, to make a button link to a URL, simply click on the link option in the toolbar.
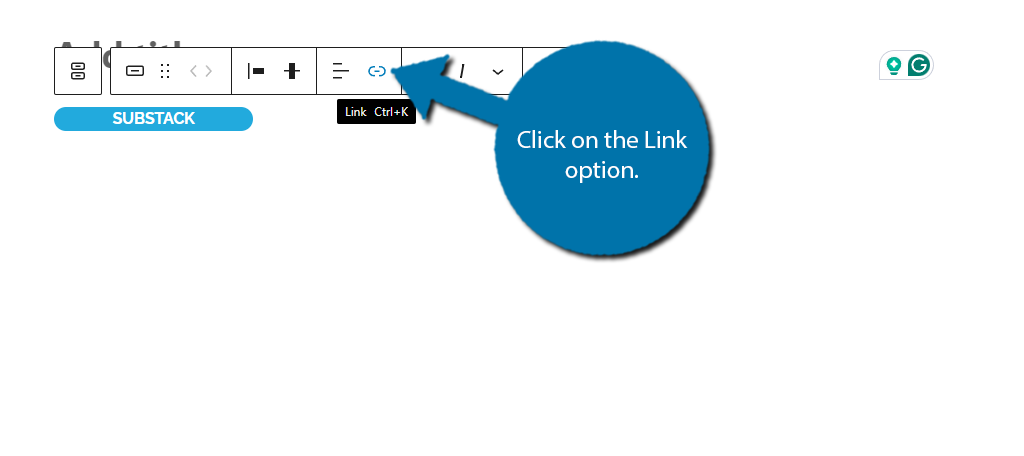
A small textbox will appear; enter the URL to your Substack.
And that’s really all there is to it. If you would like to learn how to save the button to reuse it elsewhere on your site, check out the next step.
Step 3: Save the Button As A Pattern (Optional)
Normally, you would have to remake the button every time you want to use it in a different area of WordPress, but the Pattern system in WordPress allows you to save blocks and reuse them on your site.
Thus, we can save this button as a pattern, and reuse it on other pages, posts, or widgets.
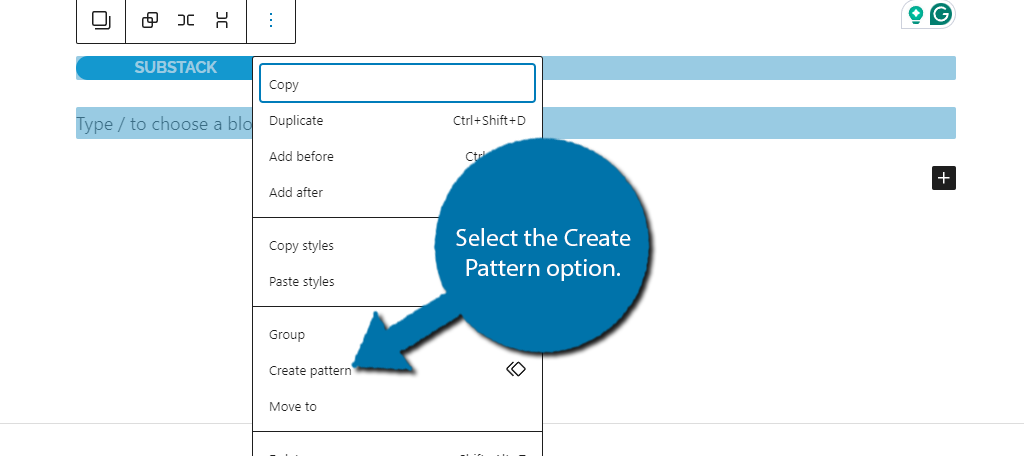
To do so, highlight the button and a paragraph block (it can be blank) and click on the three vertical dots in the toolbar. Then, select the Create Pattern option.
Enter a name for it and click on the “Create” button. Once you do, the pattern will be saved and you can use it anywhere in WordPress. To add the pattern, click on the “+” button, select the Pattern tab, and choose the Pattern you want to use.

This will place it in that content with all of the previous settings you chose. Just remember to update it if you made any changes.
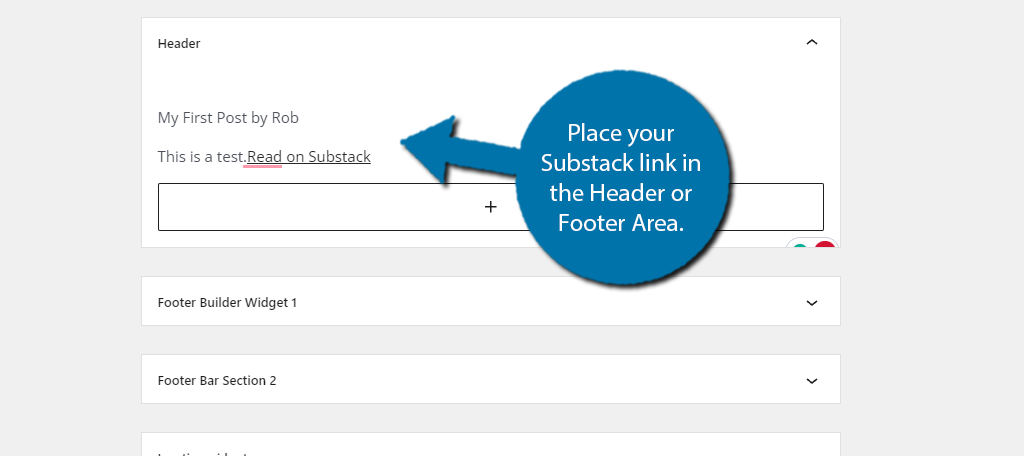
Method 4: Linking in the Footer or Header Areas
Another great way to show off your Substack newsletter in WordPress is to place it on your site’s Footer or Header area. This is very similar to the sidebar method, but instead, you place it in the Footer or Header widget area.
Also, it is important to highlight that not every theme has these widget areas. If your theme does not, your only option is to find a new theme, or use a different method. Luckily, most modern themes have these areas.
Step 1: Locate the Header or Footer Area
The first step is to verify this widget area exists. To locate them, click on Appearance and select the Widgets Area.
Take a look at your widget areas and see if there is a Header or Footer area. Some themes may call it Main Header or Main Footer, if there are multiple widget areas. As long as the area exists, you are good to go.
Step 2: Link to Substack
You can now paste the embed link into the widget area to make your Substack newsletter appear. Alternatively, you can also add the Substack button you cre4ated in the previous method by choosing to use that pattern.
Regardless of how you do it, simply add the link to Substack in this widget area.
And that’s really it. This can be a great placement for your Newsletter link, but it really depends on your site structure.
A Text Link Might Be Better, Though
Depending on your theme, the header and footer areas may be susceptible to issues when embedding large blocks of information. In this case, the Substack embed might be too large for those areas of WordPress.
As such, it’s probably a better idea if you create a simple text link to your Substack newsletter from the header or footer locations.
In many instances, a text link simply looks cleaner and won’t disrupt the layout of your site.
FAQs Regarding Substack Newsletters
You may still have a few questions regarding Substack, so here are some of the most frequently asked questions.
The answer is different for everyone, but the general rule of thumb is when you have an audience size that makes it worthwhile to do so. Some will suggest using the “pledge” feature to test the waters with your current audience to see if they’d be willing to pay a bit extra.
There is no best option per se, but there is a lot of data that suggests Popups are one of the best ways to grab a user’s attention. Thus, they are one of the best ways to tell users about your newsletters.
A regular Newsletter plugin is typically limited to working in WordPress, but Substack can go beyond this. Similar to how you can embed it in WordPress, the same is true for Facebook, and other social media networks.
No. I’m not sure where this idea came from, but email marketing remains one of the best methods to reach customers. For each dollar you spend on email marketing, you’ll typically see a $40 ROI.
Popups can drive users away from your site, especially if they popup immediately. One of the best techniques is to create exit-intent popups. These appear when a user tries to leave the page but do require a dedicated plugin to create.
Make a blog. Seriously, write a blog about why you made a newsletter, what the newsletter will include, and any benefits users will receive from signing up for it. It’s a great way to not only promote it, but also create content for the site.
Yes. Previously this was not allowed, but that policy has been changed, and you can now safely include affiliate links in Substack content. It is a great way to further monetize your content.
Create Your Newsletter with Substack Today
As you can see there are several ways to integrate your Substack content into WordPress. And you can utilize multiple methods if you want, like having a popup option, but also including a button on a page.
Just remember that you cannot monetize your Substack content without purchasing a premium plan. Doing so may be very beneficial depending on the type of content you are producing.
In any case, I hope you found this tutorial helpful in integrating Substack with WordPress.
Which methods did you use to display your Substack content in WordPress? Do you use a different tool for Newsletters?
