Releasing content consistently is not just the key to keeping your visitors happy, but it is essential for any SEO strategy. WordPress has a built-in scheduling system to help, however, sometimes you may run into the missed schedule error.
This error will make it so scheduled posts do not get released on time, or even worse, at all. This can be a serious problem if you are planning a vacation and have content ready for release while you are away.
Today, I will demonstrate how to fix the missed schedule error in WordPress.
Why Does the Missed Schedule Error Occur in WordPress?
While the error itself is easy to understand, finding out what causes it can be vexing.
One of the primary reasons you may be experiencing this error is that something is interfering with your website’s cron jobs.
A cron job is a task that is used to schedule other tasks in WordPress. Due to their usefulness, they are widely used in WordPress. However, they can also cause issues.
The two most likely culprits are your web hosting environment or a plugin. Either one of these may be causing the missed schedule content error. The other issue many websites run into is having an incorrect time zone.
Thus, if you notice that your scheduled posts are not going live at the time you set them to by an hour or so, you probably just need to adjust the time in WordPress from the Settings menu.
None of these issues are hard to fix, so let’s begin.
How to Fix the Missed Schedule Error in WordPress
There are numerous reasons that this error may occur, thus the first way to fix this is to make sure WordPress is set up correctly. This won’t just fix the error, but it will improve your website as a whole.
If that doesn’t work, the easiest way to fix when a post missed the schedule in WordPress is to use a plugin.
Method 1: Correctly Configure WordPress
Use the Proper Time Zone
Surprisingly, a lot of people make the mistake of not setting their WordPress site to the proper time zone. This information can be easily accessed in the settings and takes about 30 seconds to change.
On the left-hand admin panel, click on Settings and select the General option.
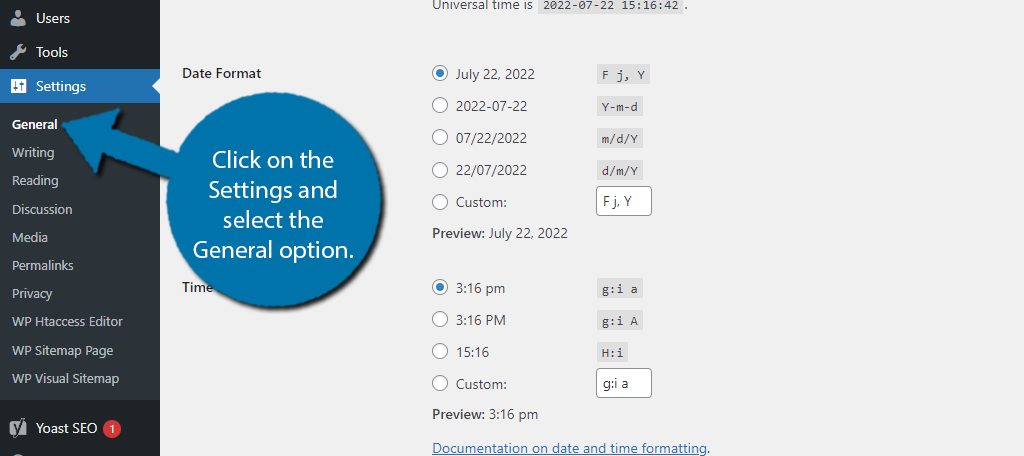
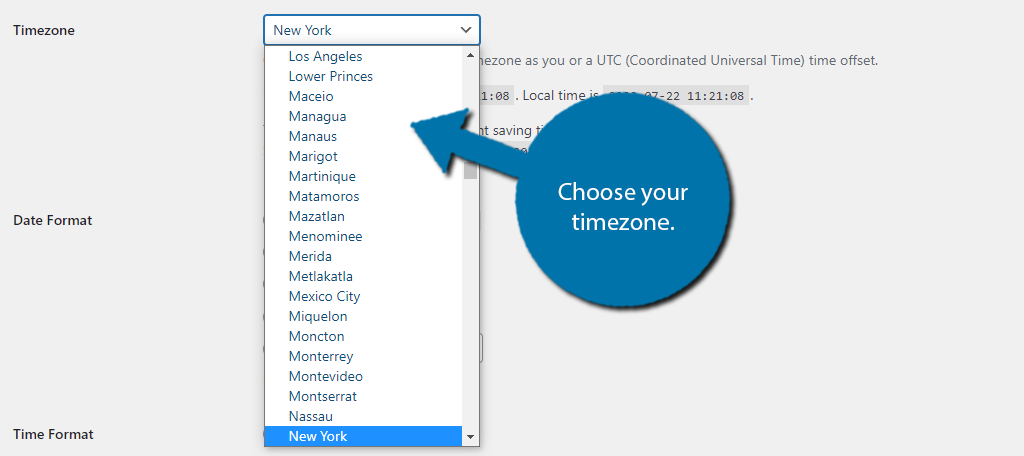
Scroll down and you will see the “Timezone” option. This is a drop-down box that allows you to select the proper time zone.
There are two ways to select the correct time. The first is to find your region (America, Europe, Asia, etc.) and select the major city.
So, for instance, if you live on the east coast of the US, you could select New York and the time will be EST.
The other way is to select the UTC time. You can do a quick Google search to figure out what your time is in UTC if necessary.
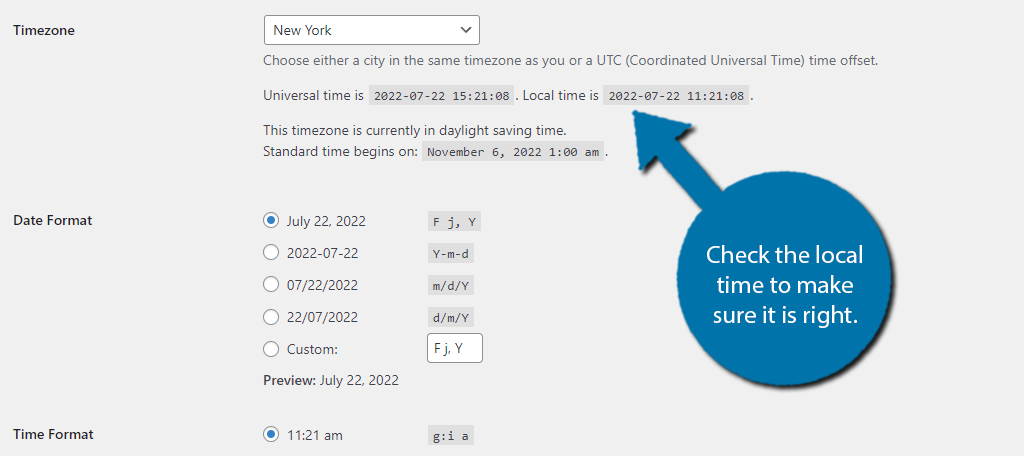
Once you choose the time zone, you can verify it is correct by checking the local time below this box.
Save the changes and you won’t have to worry about the time anymore.
Increase the Memory Limit
By default, WordPress won’t have a large memory limit. This can be changed at any time. For reference, this is somewhat of a security feature. A low memory limit prevents hackers from importing large files.
However, some websites need more memory to perform all of their intended functions.
In this case, if your website is running a lot of tasks at any given time, it is possible for the cron jobs to not publish your posts.
Thus, just increasing the memory limit is a simple solution. To do so, log into your hosting account and access the cPanel.
Once, inside, click on the File Manager option and locate your website’s root folder. Once there, locate the wp-config file.
Right-click on the file and select the Edit option. All you actually need to do is copy and paste the following line into the file:
define('WP_MEMORY_LIMIT', '256M');
Save the changes and that will give your site a bigger memory limit. In this example, I increased the memory to 256 MB.
This can also help solve a lot of common WordPress errors.
Clear Your Cache
Every website should have a caching plugin installed. They can help dramatically speed up your website. However, sometimes your website may need to have the cache cleared to solve other issues.
This is one of those times.
Now, how you go about this is entirely dependent on your plugin. Thus, I can’t really give you detailed instructions. The good news is that basically, every caching plugin makes clearing the cache very easy.
In fact, most of them have a dedicated button in their settings. You just need to find it.
For instance, Autoptimize has a function on the top of the WordPress admin screen to clear its cache from any page in the back end.
Refer to your plugin’s documentation to find out how to clear its cache.
Method 2: Install Scheduled Post Trigger
WordPress has a variety of amazing plugins that can help you solve errors. This is no exception.
The Scheduled Post Trigger plugin is one of the best solutions to the problem. All you need to do is install it. Every time visitors access your website, the plugin will check to see if there are any scheduled posts that are not published past their date.
If so, the plugin will automatically publish them. It’s truly that easy. There are no settings to configure as everything is automatic.
Just remember that it takes a visitor to load your website for the plugin to do its thing.
This means it’s probably not the best solution for new websites or beginner bloggers. Still, it’s something to consider, especially since it works immediately upon installation.
Method 3: Install Missed Scheduled Posts Publisher
Of course, there are multiple plugins to choose from. Another one to consider is the Missed Scheduled Posts Publisher.
This plugin is quite similar to the last one, but instead of needing a visitor to access the site, this plugin will automatically check for scheduled posts that are past their time every 15 minutes.
Again, there are no settings to configure. All you need to do is install and activate the plugin.
Method 4: Set up Cron Jobs in cPanel
Another solution to this issue is to set up server-based Cron Jobs. By default, WordPress uses its own cron job system, WP-Cron, and to be fair, it works most of the time. However, there are performance problems.
And those problems can cause this error to occur.
One of the key differences between WP-Cron and Cron is that the WordPress one only executes when a visitor visits the website. That’s just not good enough, which makes setting up cron jobs from the cPanel the best option.
Luckily, you can set up cron jobs in the cPanel without taking too much effort.
According to many experts, using the server-based cron is superior to WordPress in terms of performance and functionality.
Though, it may not make much of a difference in performance if your site doesn’t have a lot of features and functions running in the background.
Have A Consistent Release Schedule
While it can be frustrating to have a schedule fall apart due to an error, releasing a post consistently is very important on WordPress.
Not only does this ensure there is fresh content for visitors to enjoy, but search engines love it. In fact, once the engine gets used to your release schedule, it will eventually start checking regularly.
This means your content is indexed by sites like Google at a much faster pace.
Thus, it’s a great way to boost your SEO. Being inconsistent can really damage your brand, so make sure to stay on top of it.
Fix the Missed Schedule Error in WordPress Today
Making sure your audience gets a consistent stream of new content is important for every single website. Scheduling posts in WordPress can help you deliver content in a timely manner, but errors can arise.
Don’t panic, because as this guide demonstrates, fixing the problem is quite trivial. What’s important is being proactive about the problem. Don’t let errors go unfixed. Correct them immediately.
Was your WordPress website set up for the correct timezone? Which plugin did you use to solve the publishing failed error in WordPress?


