One of the most common errors WordPress websites run into would be exceeding the memory limit. This occurs when a website tries to upload a file that is larger than the allowable limit or if plugins are tapping too many resources.
This can happen when trying to upload a custom theme, plugin, video files, and so on. It can also occur while trying to write a post and sometimes will throw a JSON error.
It is very normal because, by default, the limit is not very big. Luckily, like most things in WordPress, you can customize the value to match your needs.
And when it comes to the memory limit, there are several ways to go about it, and picking one just comes down to which you prefer.
Today, I will demonstrate four ways to increase the memory limit in WordPress.
Why Is There a Memory Limit in WordPress?
You may be wondering why exactly there is an upload limit in the first place and there are two simple answers.
Security and physical limitations.
Essentially, if this limit is too large, it makes it easy for nefarious actors to upload a file containing all kinds of malware and other similar content to a website. As such, the default value is only 32 MB.
There is also the physical limitation associated with web hosting. The truth is that every web server has a set amount of RAM that it can use. That value varies from web host to web host and depends on the plan you sign up for.
For this reason, some web hosts may remove the ability for you to increase the memory limit in a limited hosting plan. This is very true in shared hosting environments. Just think about it, what if every user on that server decided to increase the memory limit?
Well, you would run into a situation where each site on that server uses a lot of memory all at once, which would exceed the RAM that the server has installed. Thus, it would cause an error for each customer. That’s the reason web hosts often limit the value.
Luckily, you can change it if your web plan supports it.
How to Increase the Memory Limit of WordPress
Before we begin, I need to stress that your ability to increase your memory limit depends on your hosting environment. In some cases, a web host will limit your memory depending on the plan you have.
If a method below does not work for you, it is probably because of the web host. In that situation, you have two options.
The first is to contact your web host and see if it is possible to increase the memory limit for your site. The second is to just switch to a better web host that does not limit your usage.
Note: Since many of these methods do require you to edit some code, it is recommended to make a backup of your site. This ensures that if something does go wrong, you can use the backup to restore the site.
Method 1: Editing the wp-config File
The most common way site owners increase the memory limit is by editing the wp-config file. Using the wp_memory_limit variable, we can quickly change the memory limit to the desired value. Again, your web host may block this.
Thus, you need to be aware of any account limitations on your web hosting plan. Simply contact your web host for more information.
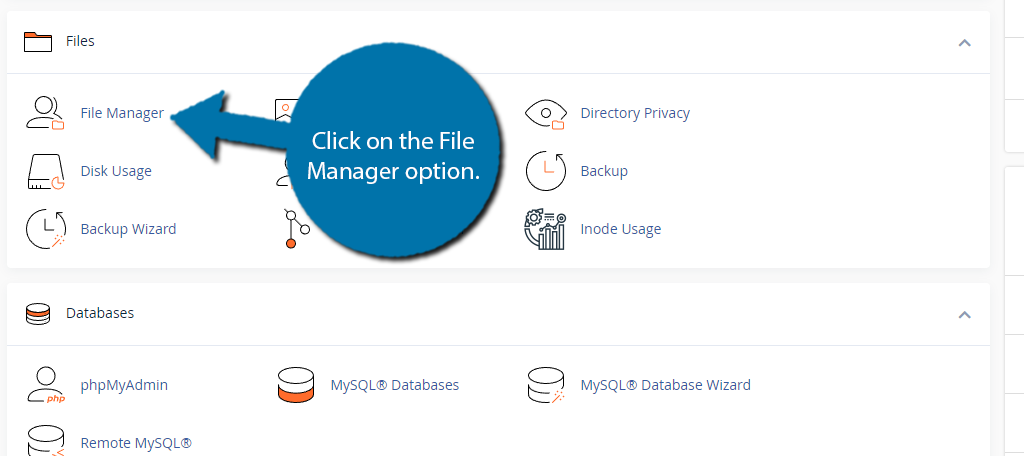
To do this, visit the cPanel and locate the Files section. Click on the File Manager option.
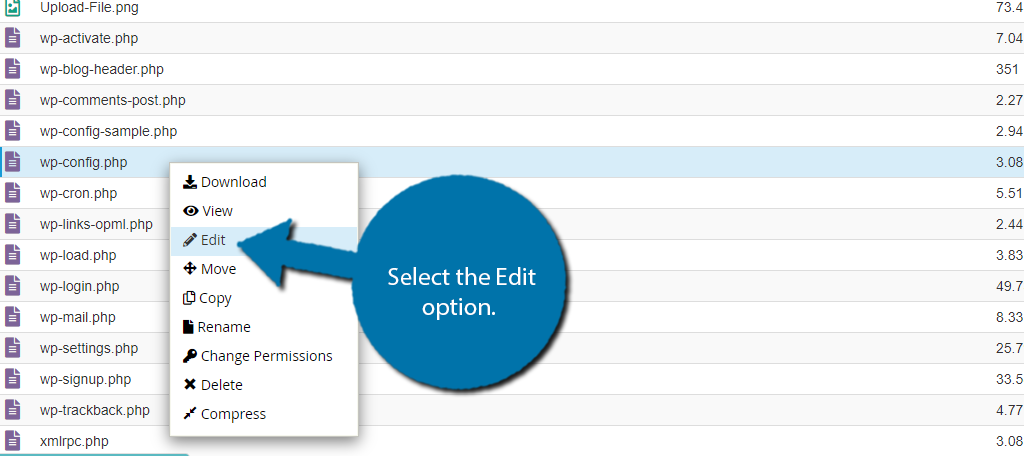
Enter the public_html directory and locate the wp-config file. Right-click on it and select the Edit option.
A small window will appear reminding you that editing code can cause errors. For this reason, you should back up your website before proceeding. After this, you will be directly in the file itself.
You now need to locate the line that corresponds to your memory limit. By default, it should look something like this:
define( 'WP_MEMORY_LIMIT', '32M' );
That said, the “32” value may be different. Many web hosts have begun changing this value to 64, but it should be easy to find. If you need help, use CTRL+ F to search for “define” to quickly go through the code.
Once you find it, simply change the “32” value to the new memory limit you want to use.
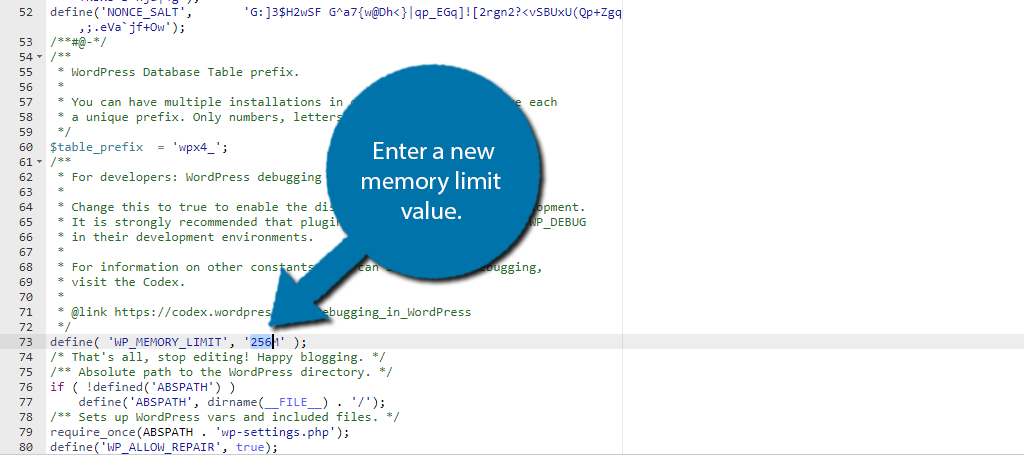
After you edit that line, be sure to save the changes to apply them to your site. Once you do that, you can go back to your site and verify the memory limit has been increased by uploading a larger file.
Method 2: Using A Plugin
Like most things in WordPress, several plugins can alter the memory limit. Essentially, these plugins make changes to the code for you. One such tool is the WP Tools plugin.
This plugin is designed to help you change the values of your WordPress install like the memory limit, upload limit, and more. It is worth pointing out that increasing the memory is limited to 128 MB for the free version of this plugin.
Since most sites work fine at the default 32 MB, it is not a big deal. But be aware, if you are looking for more than 128 MB, you would need the Pro version of this plugin. With that said, using the plugin is extremely simple and takes less than a minute.
Start by installing the WP Tools plugin and activate it for use.
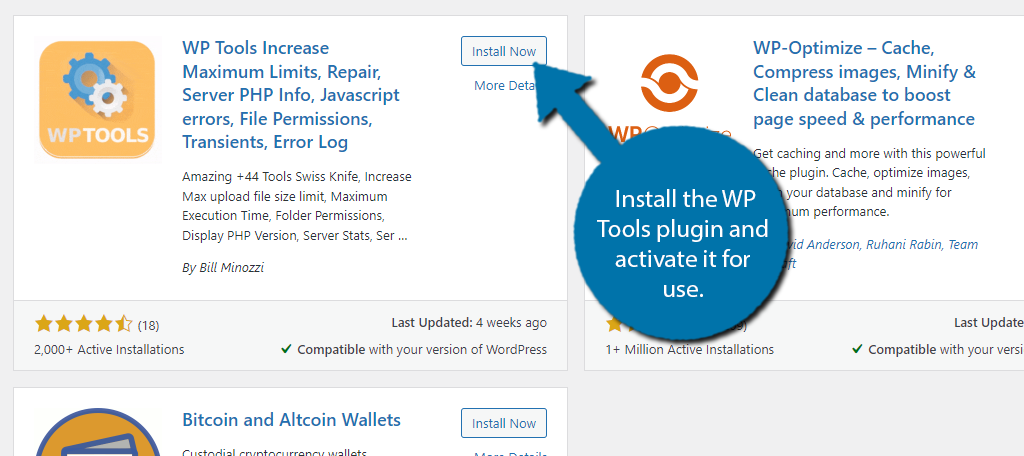
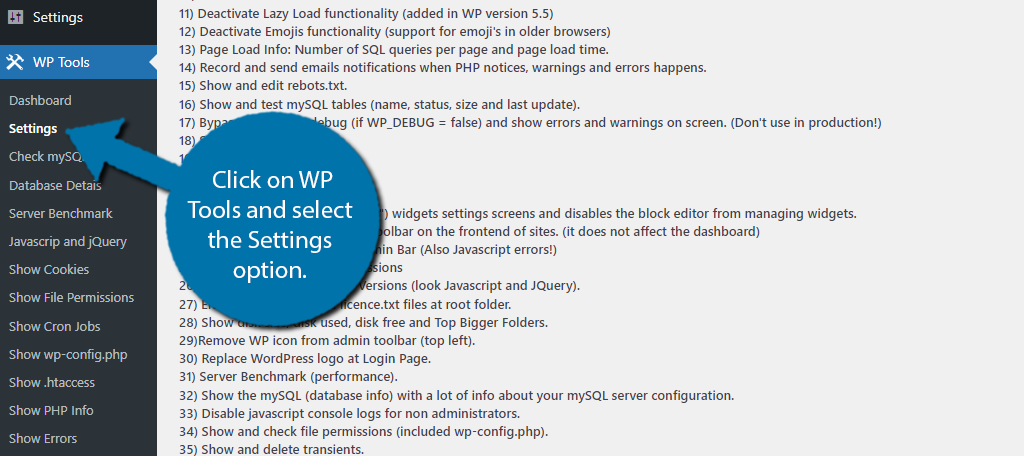
This plugin offers a lot of options, but we are only looking at the memory limit option today. To find it, click on WP Tools and select the Settings option.
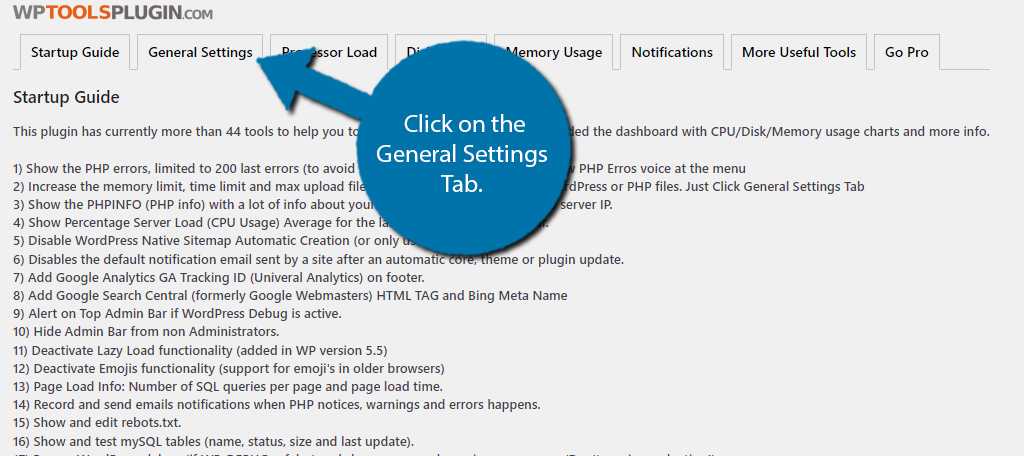
The plugin separates its settings across several tabs. Click on the General Settings Tab.
The very first option is to increase the memory limit in WordPress. You will see your current limit listed underneath the option. The free version will only allow you to change it to 128 MB. As you can see, this is smaller than what I set it to using code.
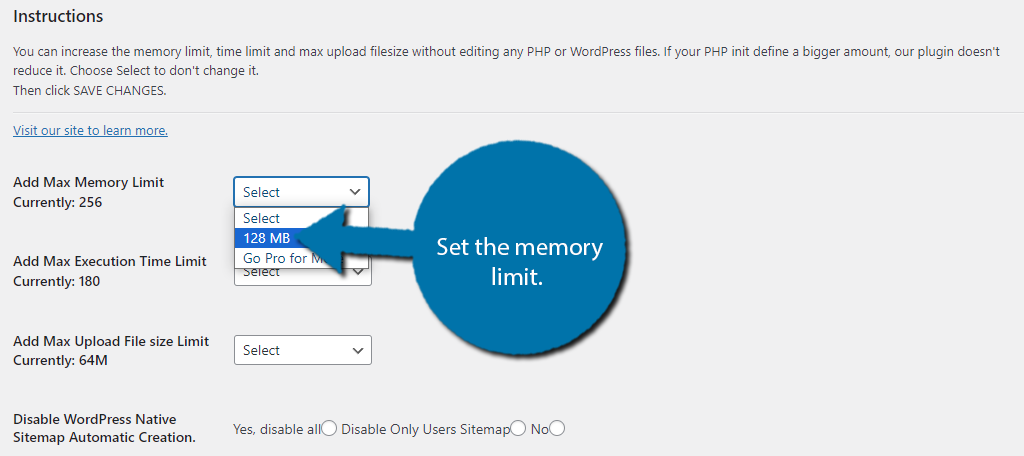
Scroll down to the bottom and save the changes. You can then verify if it worked correctly. If not, your web host is probably limiting your memory allotment.
It’s worth pointing out that plugins are typically limiting when it comes to memory, which is why using a coding method is superior.
Method 3: Editing the .htaccess File
The wp-config file is not the only option that exists when it comes to increasing the memory limit in WordPress. That said, it is the simplest one. Another option would be to edit the .htaccess file to increase the memory limit.
The reason that the .htaccess file is “harder” is because there is a chance the file does not exist in your directory. In this scenario, you can follow our guide to generate the file for your use.
Start by going to your cPanel, locating the Files section, and entering the File Manager. From there, enter the public_html directory and locate the .htaccess file. Right-click on it and select the Edit option.
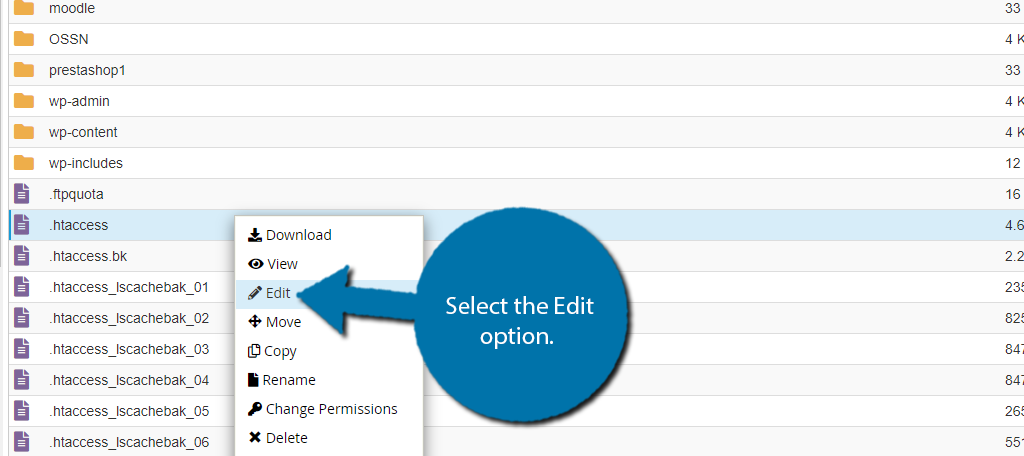
A small window will appear reminding you that editing code can cause errors. As such, you should take a moment and ensure you have a backup of your site. That way you can restore the site if an error occurs.
Unlike the wp-config file, the .htaccess file does not have the line of code already in it. Instead, you need to add it from scratch. To do this simply, scroll to the bottom of the file and paste the following line:
php_value memory_limit 256M
This line of code will make the memory limit 256 MB. You can adjust that value to meet your needs.
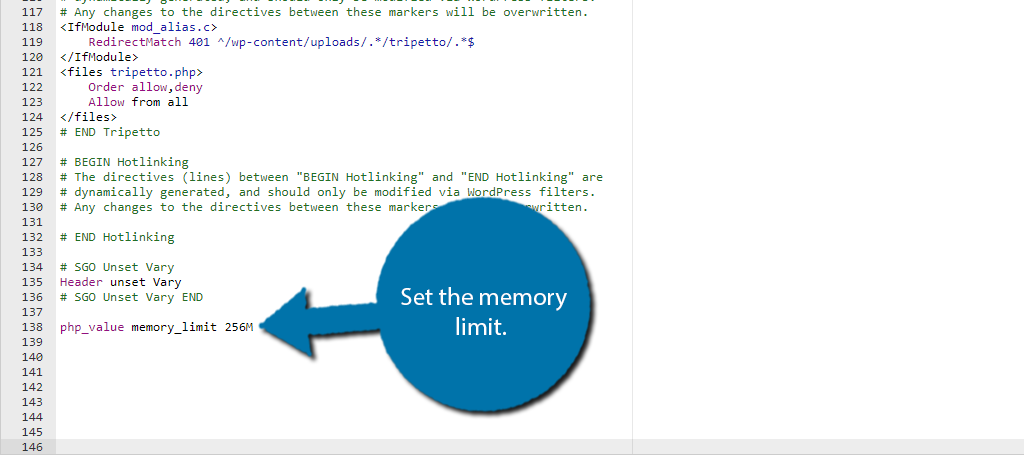
Be sure to save the changes in the file to apply them. You can then go back to your website to verify everything is working as intended. Again, if your web host is limiting the memory on your account, this will not work.
Method 4: Using the PHP Selector
The fourth method we will cover will be using the Select PHP Version tool in cPanel. This is probably slightly easier than method 1, but there’s a lot more room for error as if you mistakenly change something in this area, it’s not as obvious to correct.
Visit your cPanel, locate the Software section, and click on the Select PHP Version option.
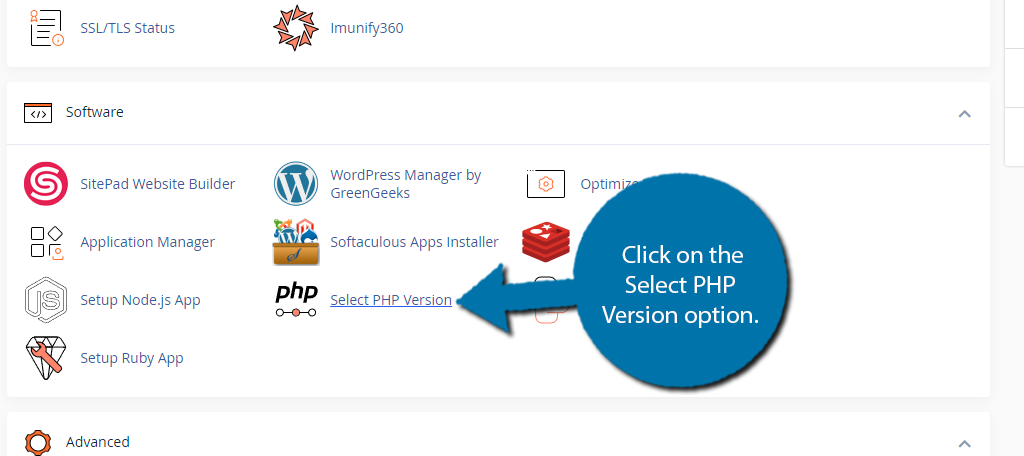
This area is used to select your PHP version and any extensions you may need but ignore all of it. Instead, click on the Options tab.

Scroll down to the memory_limit option. You can use the option here to select your memory limit. The values will vary depending on your web hosting environment.
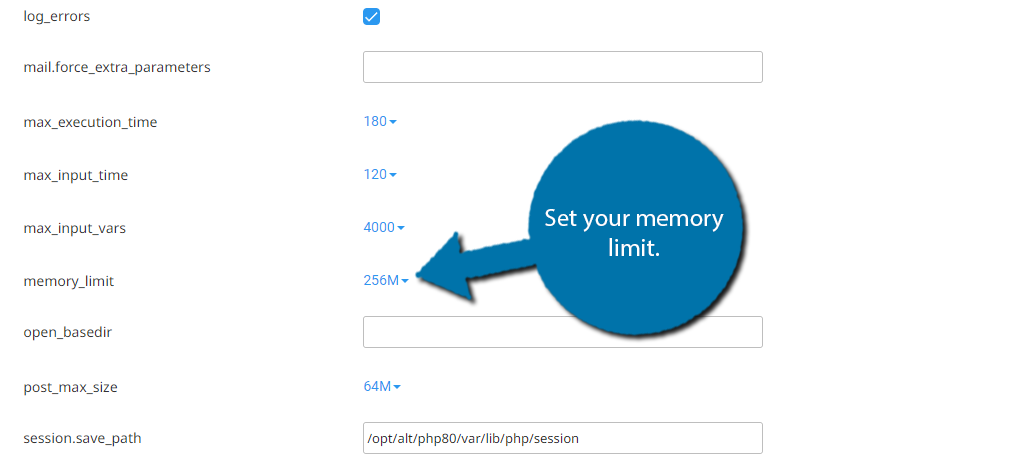
And that’s all there is to it. If this option is not available, or there are no options above what you currently have, your web host has most likely set a maximum you can use. You’ll need to contact them for additional options.
Method 5: Upgrade Your Hosting Account
If I have not made it abundantly clear by this point, let me say it again. Your web host may be restricting your memory limit as part of an account plan. If this is the case, you need to consider upgrading to a new plan or switching to web hosts.
Web servers have physical limitations when it comes to memory allotment. If a server does not have enough RAM, the value you enter does not matter. As such, you need to be aware of this limitation and choose your web hosting plan accordingly.
This is especially true for shared hosting environments. While shared hosting is cheaper, being on the same server as other websites means that each of those sites needs to have resources for itself.
If the limitations didn’t exist, it would be possible for one of your virtual neighbors to use all of the resources on the web server for their site, and eventually cause your site and all of the others to stop working.
Be sure to contact your web host for detailed information regarding your memory limit and see if you can increase it.
What Causes PHP Memory Problems?
PHP memory errors are encountered when a website has exceeded the memory limit in WordPress. Essentially, the site is using too many resource-intensive applications or features.
Generally speaking, the biggest culprits that can cause this to occur are plugins and custom scripts.
You have probably heard that if you have too many plugins, your website will slow down.But what many people don’t realize is why this is. The truth is each plugin utilizes resources from your server.
The more you have installed, the more resources your website will need to sustain them. Thus, if you install a lot of resource-hungry plugins, you are going to reach the memory limit. This is becoming an issue as plugins continue to get more complex.
In fact, this is why many web hosts are changing the default memory limit value from 32 MB to 64 MB.
For this reason, experienced WordPress developers will often opt to code many things into WordPress instead of relying on plugins that may use more resources than they really need. That said, these scripts still consume resources.
As such, they are just as capable of causing the error as plugins, but experienced developers can get more mileage out of their scripts.
How Much Memory Should You Limit for WordPress?
One thing I have not mentioned is what you should set your memory limit to in WordPress. And that is because it depends on your hosting environment. Cheaper plans have fewer resources, thus, you need to match what is possible for your plan.
My recommendation would be 128 MB. Generally, speaking this is more than enough for 99% of websites. You will never encounter a memory limit error unless something goes very wrong on your site, or you are using very unoptimized plugins.
You may be wondering, why not just set it really high to be safe?
Remember how I mentioned scripts could be the reason you run into this error? If you were to raise the limit very high, you might never notice that an unoptimized script is causing your website to slow down.
If something is using a lot of resources, it generally slows your website down. Thus, to keep your website fast, it should be as lean as possible, which makes a lower memory limit a great way to identify problems on your site.
Increase Your Memory Limit Today
As you can see, there are several ways to go about increasing the memory limit in WordPress. Each method will provide the same result, but some are easier than others. My recommendation is method 1.
It is easier to do than the other coding methods because the line already exists in the file, and you simply need to change the number to the desired value. As such, there is less of a chance you will make a mistake.
I hope you found this tutorial helpful for increasing the memory limit in WordPress.
Do you think WordPress should have the memory limit built into the settings? What is your memory limit?

