
Showing off products in a single image can be tricky, as many rely on other elements within a room or space to show their true value. That’s where adding hotspots to your images in WordPress comes into play.
With it, you can create interactive images to highlight specific products in a single space. Of course, they are not limited to just products. Simply put, an image hotspot allows you to make an image interactive with markers in an image.
For example, if you took a photo of a historical area, you could turn it into an image hotspot and highlight what every historical monument is and when it was created. The possibilities are endless and there are plenty of ways to make one in WordPress.
Today, I will demonstrate how to create an image hotspot within WordPress using the Image Hotspot plugin.
How Can I Use Image Hotspots In WordPress?
The number of possibilities you have when creating an image hotspot is endless. It really comes down to how what kind of site you are running and your creativity. Here are a few ways they are commonly utilized.
Product Placement
Many online stores will take the time to build a demo room that has a series of products they sell in full display. This allows customers to see how they look in a more realistic environment.
For example, let’s say you were selling a bedroom set. You would create a mock bedroom containing everything you are selling. This could include the bed, blanket set, pillows, nightstand, lamp, bureau set, and even the pajamas someone might be wearing.
This is extremely common today as many users want to see what the product looks like in action, and it is far more effective and practical to show an entire set together. Otherwise, you would need to focus specifically on one product in each image.
And just to be clear, you should make sure you are still taking images of each product individually.
Maps
Let’s say you run a travel or tourism site. A common use for image hotspots is to apply them to a map. This allows you to add descriptions of every major location, or even a video showing what that resort or attraction offers.
A great example of this would be Google Maps itself. When you explore Google Maps, each business has its own map marker that includes all of the information for that business with a link to its website.
Similarly, you can create maps that focus on attractions that you want to highlight for tourists or that are included in a vacation plan. This is more practical than relying on Google Maps because you have complete control over what they see.
Real Estate
Are you trying to show off a house to potential buyers but can’t show off the house in person? Well, creating a virtual tour using an image hotspot is one of the best options available.
You would take pictures throughout the house and then fill out the information. Then, explain the dimensions of the room, any designs that stand out, appliances that are included, and so on.
You may also want to provide a video tour to accompany this and use the image hotspot to provide the finer details of what the potential buyer or renter is looking at. This also can work on a map to show off nearby attractions, schools, and whatnot.
Identification
Many blogs may cover news subjects that use pictures of multiple individuals. For a reader unfamiliar with the story, subject, or people involved, some images may not be very helpful. As such, it is common for users to be able to hover over an image to identify the person.
A great example of this is actually on Facebook. Users can tag friends and family in photos so users know exactly who they are looking at. The same principle can be applied to your website with an image hotspot.
This can be a great asset for identifying politicians, celebrities, suspects, and so on, so many news blogs will find a lot of use.
Another great use is when you are looking at natural disasters like a hurricane or fires. You can use the hotspot to identify the before and after with dates to help users spot the severity of the destruction.
Accessibility
Many users have some form of visual impairment that can make looking at images challenging or impossible. As such, many websites are taking steps to make their website as accessible as possible, and an image hotspot can help with that.
For example, 8% of the male population in the United States suffer from some form of color blindness. As such, they have trouble making out certain items in an image. Adding an image hotspot where they can view a tooltip describing the color can help.
In other cases, you can even add a handicap symbol that users can click on to be brought to a page describing accessibility options.
How to Create Image Hotspots in WordPress
WordPress has a variety of plugins that can help you create image hotspots for your site. A free and easy option you can use is the Image Hotspot plugin. This allows you to create an image hotspot out of any image.
You can add all kinds of markers to the image that contain text, images, video, or audio content for users to enjoy. It can even include links, so you can send users straight to a product page if they like what they see.
While the plugin is free, it’s worth noting that it has a limitation that only permits you to add 6 markers to an image. As such, if you want to add more, you will need to upgrade to the Pro edition of the tool.
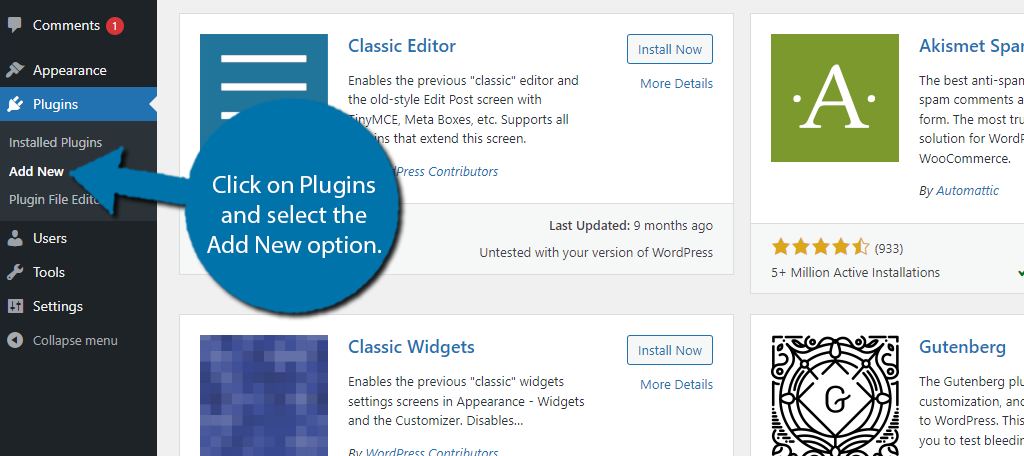
Step 1: Install Image Hotspot
Let’s start by clicking on Plugins and selecting the Add New option on the left-hand admin panel.
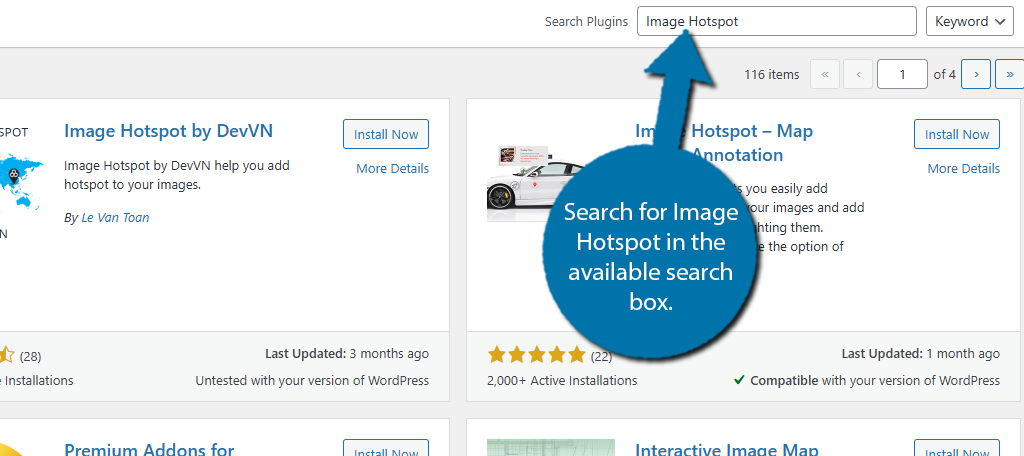
Search for Image Hotspot in the available search box. This will pull up additional plugins that you may find helpful.
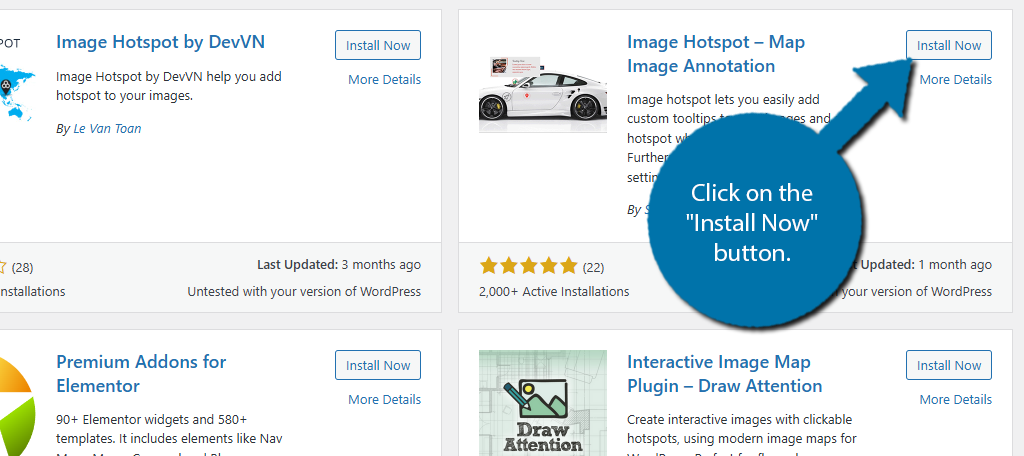
Find the Image Hotspot plugin, click on the “Install Now” button, and activate the plugin for use.
Step 2: Add An Image
With the plugin activated, you are ready to start using it. There are no settings that you need to worry about if you are using the free version, but if you decide to upgrade, there are a few you may want to look at, but we are not covering that.
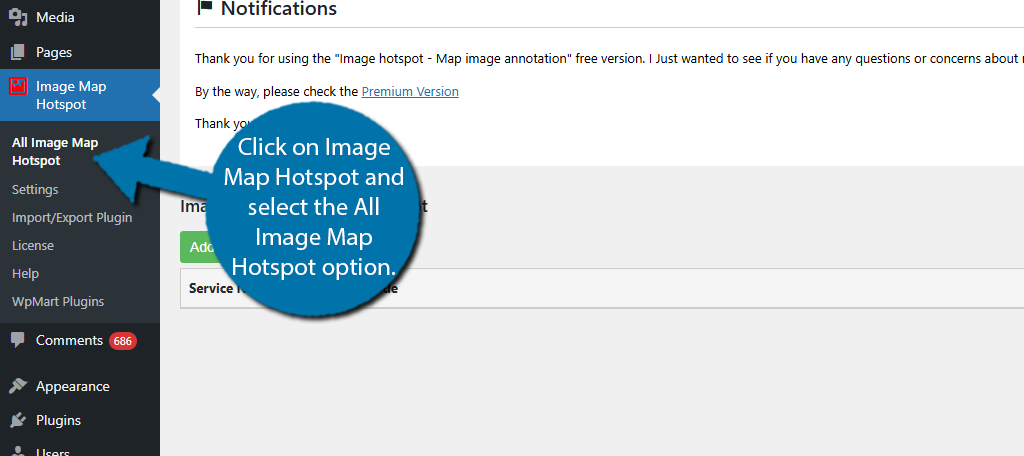
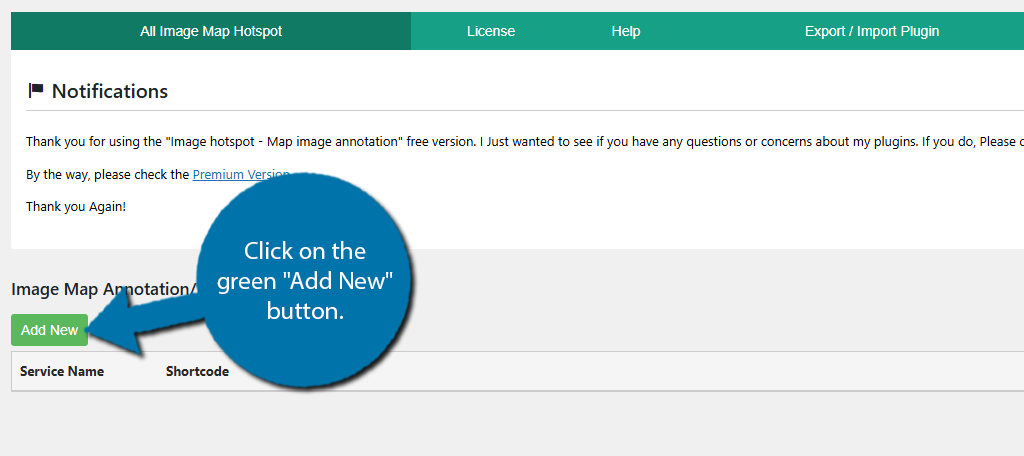
Instead, the first step is to add an image. To do this, click on Image Map Hotspot and select the All Image Map Hotspot option.
Once here, you will see a full list of the image hotspots you have already created. If this is your first time using the plugin, it will be blank. Let’s change that by clicking on the green “Add New” button.
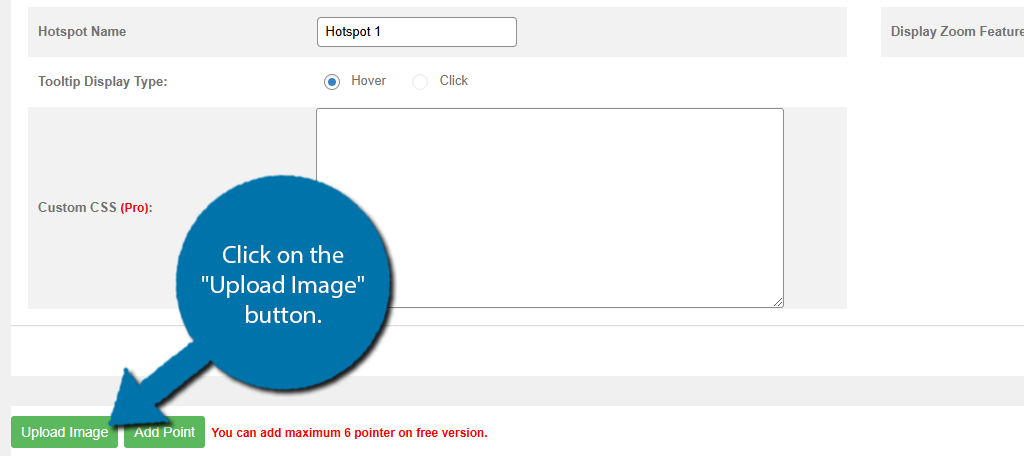
Here is where you will be adding hotspots to the image you add, but let’s ignore that for now since we don’t have an image yet. To fix this, scroll down to the bottom and click on the “Upload Image” button.
You can now freely select any image that is currently in your media library. Alternatively, you can also upload a new one to use. Once you have, click on the “Select” button on the bottom right of the media library window.
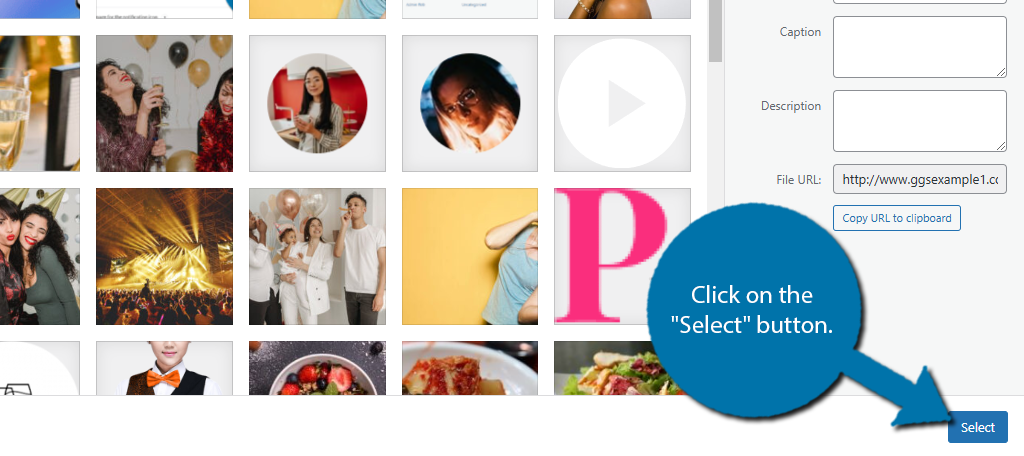
And that’s it. The image will now be viewable inside of the plugin. You can now begin adding hotspots to your image.
Step 3: Adding Hotspots to Images
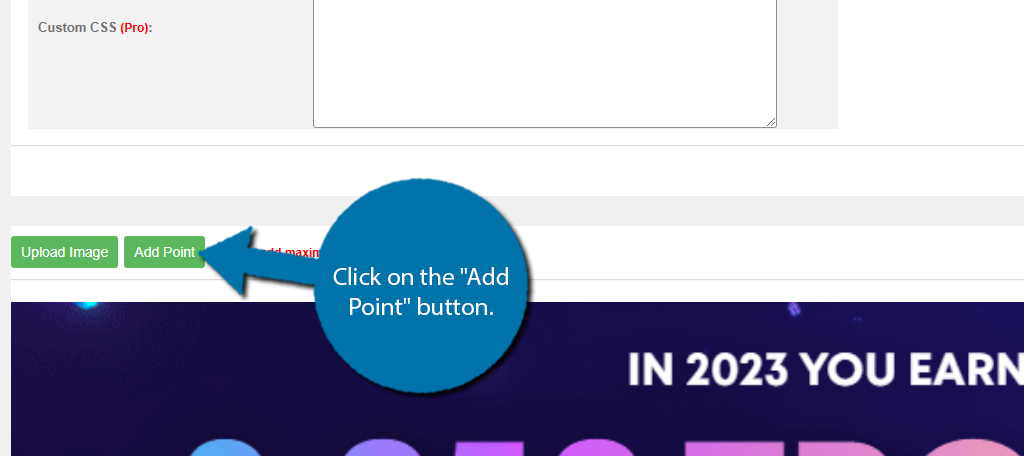
Adding hotspots is incredibly simple with this plugin. Just as a reminder, the free version of the plugin allows you to add only 6 hotspots. To begin adding hotspots, click on the “Add Point” button.
This will open a small window with options to customize the marker you add. The first option is for the font, which you only have one option for in the free version, so let’s move on to the next one, the marker icon.
Click on the “+” option next to the Icons selection to open the icons library.
There are hundreds of icons that you can choose from. It has major company logos such as Amazon, to more generic markers like a house or binoculars. Simply pick the icon you want to use.
Below this is the hover icon option. This works identically to the icon selection. The icon will change to this when someone hovers over it, so be sure to pick one that makes sense. Alternatively, if you do not pick one, it will not appear, which is an option.
Continuing, you will find options to customize the color of the marker. It is important to pick a color that stands out against the image you selected. Thus, if you pick a red image, do not pick a red marker.
There are also some size options to configure the marker. Be sure to size it appropriately. You can edit the marker at any time, so feel free to place it, see how it looks, and go back to edit it.
Click on the “Save” button when you are done.
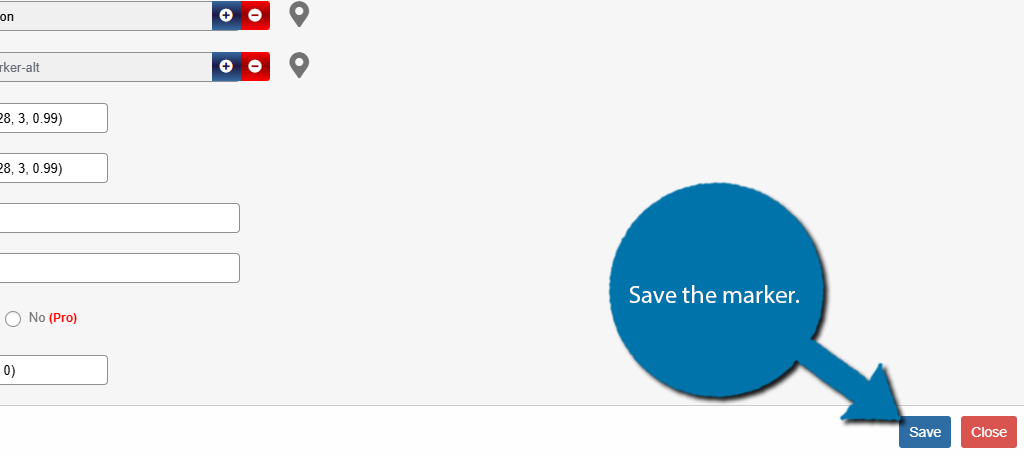
The marker will now appear on the top left of the image. Simply drag it to the desired location.
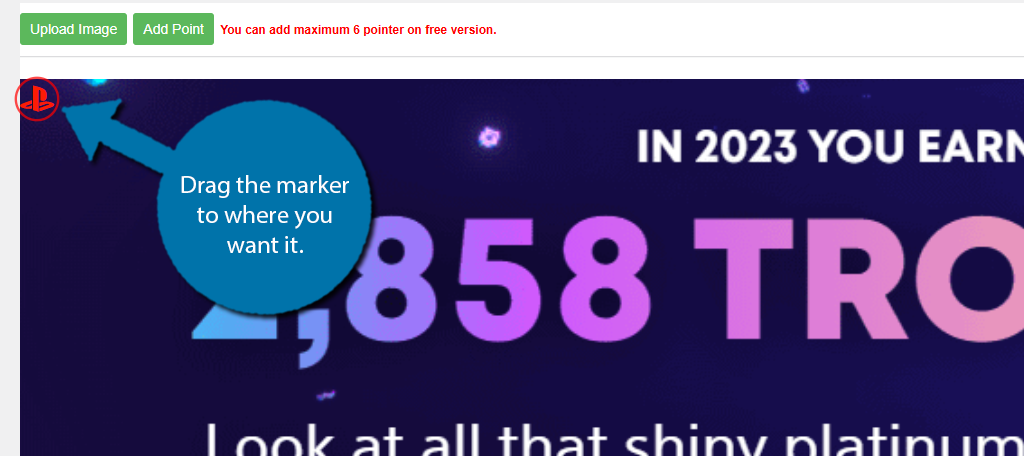
You can now begin adding as many markers as you want to the image (up to 6 on the free version). You can now begin editing what they will say when clicked in the next step.
Step 4: Adding Hotspot Content
Adding content to the marker you just created is very simple. Hover over the marker and click on the edit option. You can also click on the trashcan to delete the marker.
Note: You are still free to drag the marker to another location after editing it.

This will open a familiar window we used to edit the marker’s appearance. This time, click on the Content tab at the top.
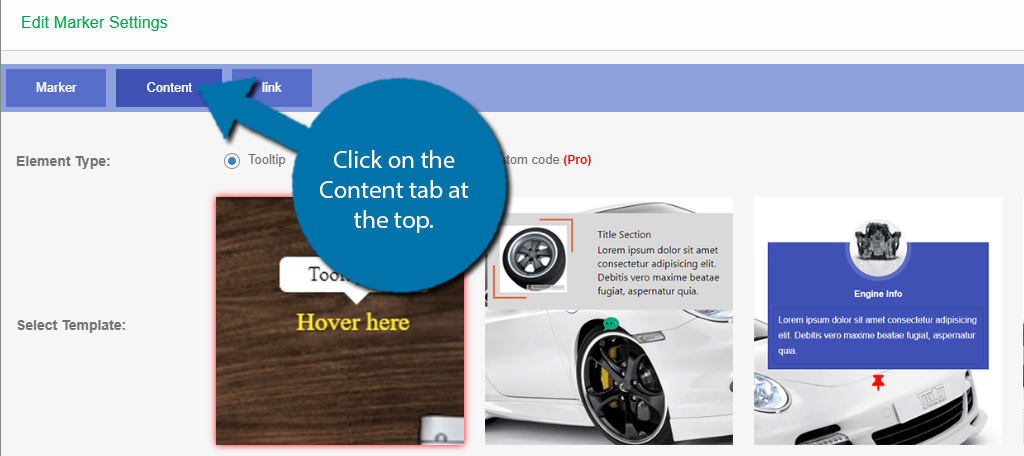
The free version of the plugin only supports adding tooltips to the markers, but if you upgrade to the Pro version, you can also add your own code to customize it the way you want.
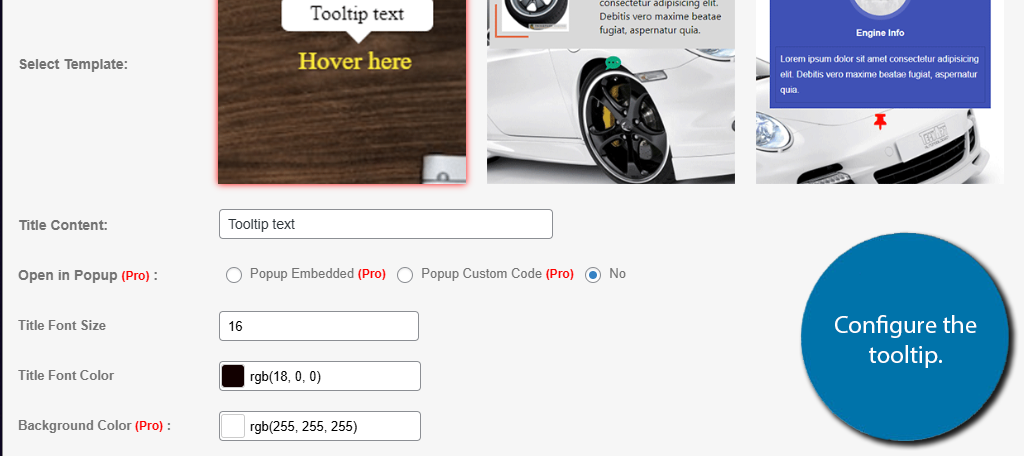
You will then have the option to choose a template design for the tooltip. However, the free version only has one option you can use. The rest are locked behind the Pro version.
Next, you need to enter the text content to add to the tooltip. You are free to enter as much as you want, but it is a good practice to be brief and concise. You’ll also find text options below that control the font size and color.
If you click on the Link tab, you can use it to create a link for the text you added. For example, if you were highlighting a product in the image, you could link the product name to the product page.
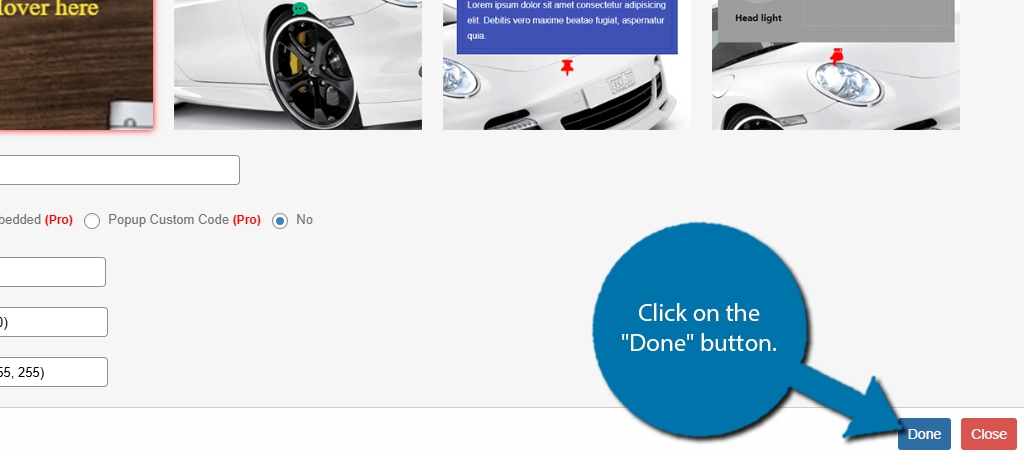
When you are finished, click on the “Done” button at the bottom.
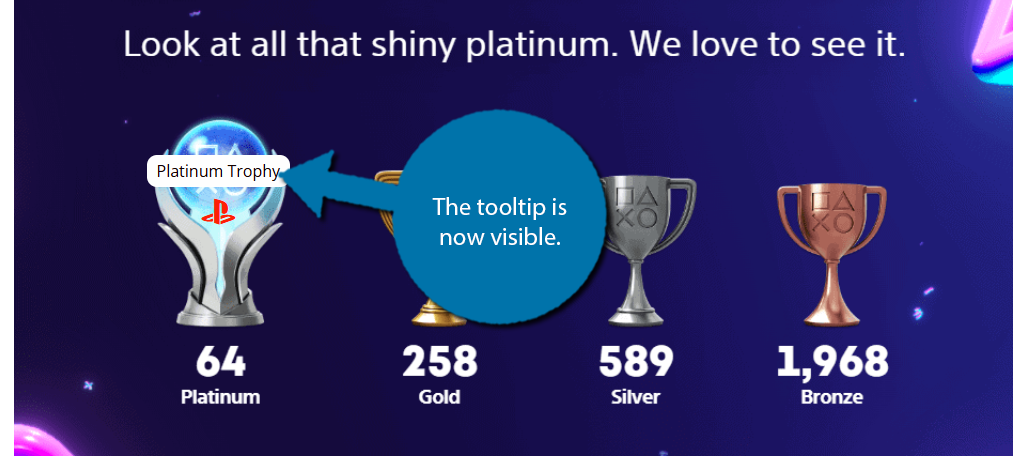
It is important to note that you cannot view the tooltip in this window. The tooltip is only viewable when placed on a page.
Step 5: Placing the Image Hotspot
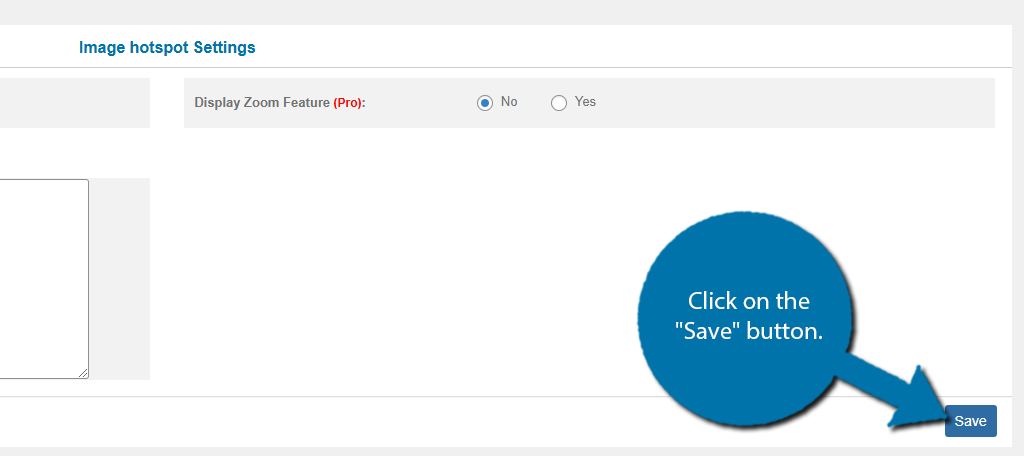
With all of this done, it is now time to place the image hotspot on a post or page. This plugin makes it simple by utilizing shortcodes. As such, you can add them to your posts, pages, or even the widget area by using a Shortcode block.
To do this, click on the “Save” button.
Below this button, you should now see a shortcode. Copy this shortcode.
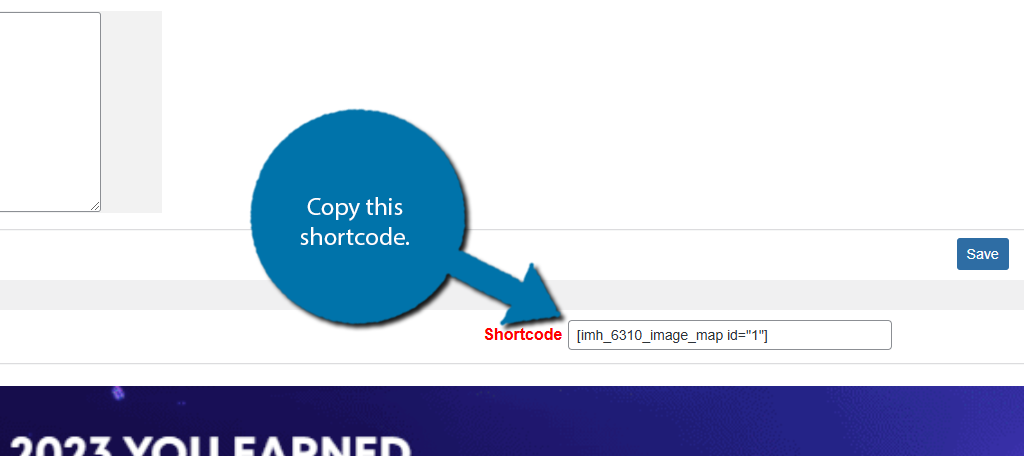
Now, go to the post or page where you want to add the image hotspot. Add a Shortcode block and paste the shortcode you just copied into it. Save the changes and view the page or just use the preview option.
If you hover over your marker, you will see the tool tip appear.
And that’s it. You can make as many image hotspots as you want, but each is limited to just 6 markers. It will be worth upgrading if think it can help boost your store sales. And with that, you know everything that the free version of the Image Hotspot plugin can do.
Consider Using SeedProd
If you are looking for more options for adding hotspots to your images, the SeedProd plugin might be right for you. It is a complete page builder that has image hotspot functionality. It is far more robust than what we covered, however, it is not free.
Feature-wise, it offers a drag-and-drop page builder with robust design options, and it includes templates that you can use to get a head start. Focusing on the image hotspot, you can create custom markers and add them to your images.
You can control the size, font, color and everything else related to the marker and content. More importantly, you can edit them in real-time and see the changes as you progress. This is far more convenient than having to use the shortcode to check it out each time.
SeedProd is an excellent page builder, so if you are looking for a more robust option and don’t mind paying, this is a great option.
Start Using Image Hotspots in WordPress Today
As you can see, it is rather easy to add image hotspots in WordPress with the Image Hotspot plugin. Doing so gives you access to an infinite number of possibilities that depend entirely on your creativity and needs.
It is important to be mindful that sometimes a marker on your images can be distracting, so use them sparingly on images that make the most sense. Listen closely to feedback to ensure your audience enjoys the addition of hotspots.
How easy did you find it to add image hotspots in WordPress? How do you plan to make use of your hotspots?
