Since the end of 2017, Google has flagged websites that do not have an SSL installed on them. This naturally forced many websites to add an SSL certificate to their website. However, this led many websites to discover that there are many common SSL errors they can run into. Thus, I have put this guide on how to fix SSL issues in WordPress together.
Here you will find the most common errors when you install an SSL certificate on your WordPress website. Luckily, none of these are particularly difficult to resolve, so there is no need to panic if you have run into one.
Today, I will show you how you can easily fix the SSL issues in the WordPress website when you install an SSL certificate.
Why Should You Start Using SSL?
Simply stated, SSL is an encryption method that secures the connections between your browser and your WordPress hosting server. If not installed properly, or it doesn’t match, then most of the modern browsers will show a warning to the user stating that they should not connect to the website.
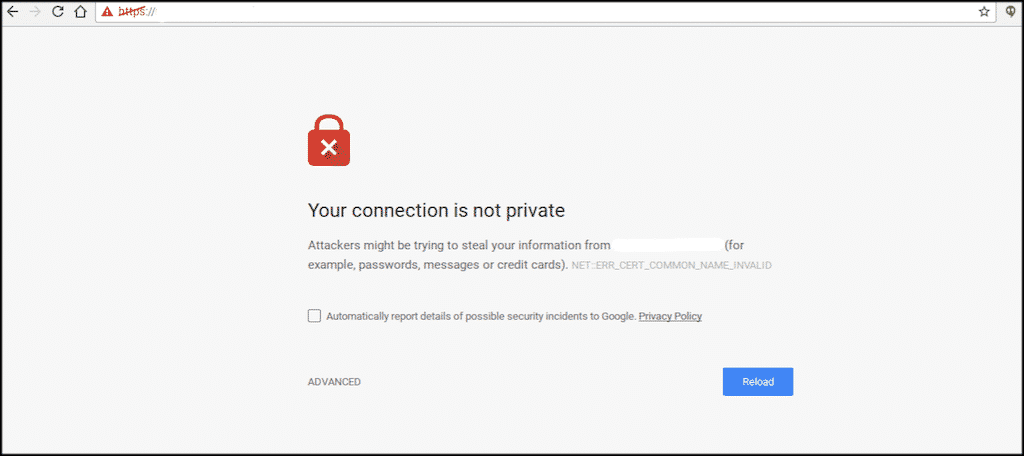
If visitors receive this message, they most likely will not proceed. Thus, it is imperative to learn how to fix this privacy error. And that’s where an SSL certificate comes into play, it tells the browser your website is safe and secure.
There are also other reasons you want to have a WordPress SSL certificate installed on your website. Sure, Google marks the site as “secure,” but SSL certificates also allow you to take payments and personal information over your website. This is ideal for someone who has an online store, or someone who is taking payments through their website for a service.
Google has also stated that websites that have the SSL/HTTPS protocol will also have more weight in overall listings and searches. Considering all of this, it is definitely ideal for you to install an SSL certificate on your WordPress website.
Once installed, you may run into some WordPress SSL issues. Fear not, most of these issues are very common. Let’s take a look at some quick and easy ways how to fix an SSL error.
5 Solutions to the Most Common SSL Errors
1. Fixing Mixed Content Errors
Arguably the most common error you will see when installing a WordPress SSL certificate is the mixed content warning.
The WordPress mixed content warning shows immediately after you have installed the SSL and while it may look like a big problem, there are actually a few different ways you can take care of this issue.
Fix Using a Plugin
The first way to do this, and perhaps the easiest way for most, is to install a WordPress plugin to help you get the work done. The Really Simple SSL plugin is a great one to install and configure so that all mixed content warnings are taken off your website.
After you have installed and activated the plugin visit the Settings SSL section of your website and review all the configuration settings. Really Simple SSL does work out of the box and will automatically fix your mixed content errors.
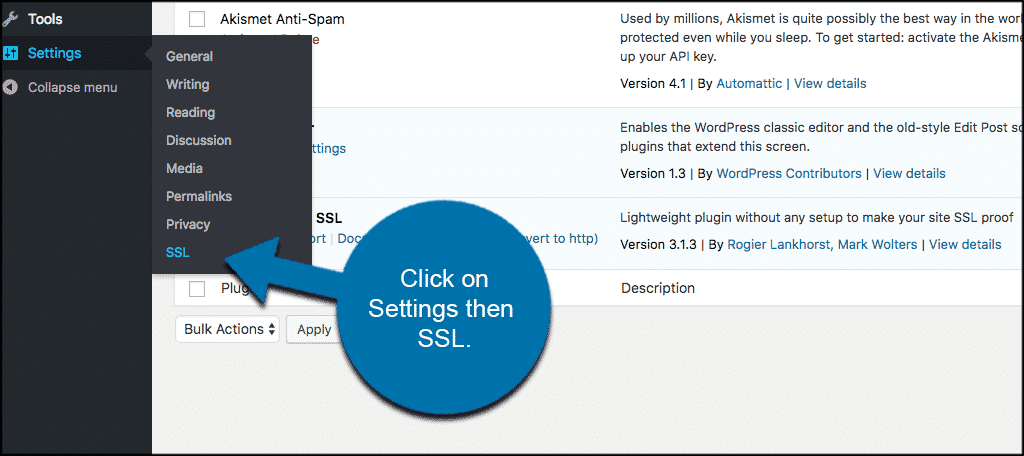
Note: This plugin is really good at fixing errors related to SSL. It is not just limited to the mixed content error. It will automatically fix most SSL issues in WordPress. Thus, this is by far the easiest way to resolve these types of issues.
Fixing Mixed Content Errors Manually
Fixing WordPress mixed content errors manually requires some actual manual troubleshooting. While this may take a little more time to fix SSL issues in WordPress it is better for overall website performance.
The most overlooked step in this process is making sure that you are using the HTTPS protocol inside your WordPress website settings. If not, don’t worry, changing WordPress from HTTP to HTTPS is easy.
Once the WordPress SSL is installed, head to the general settings area of your website and make that change.
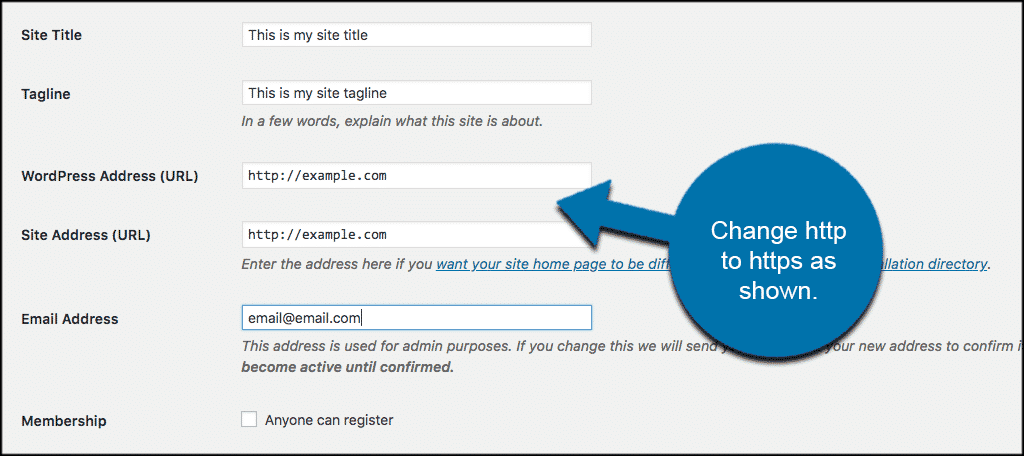
You see the above screenshot shows HTTP, the shot below shows the change to HTTPS. All you do is add the “s” and save. You will be automatically logged out of the site and WordPress will prompt you to log back in for your changes to take place.
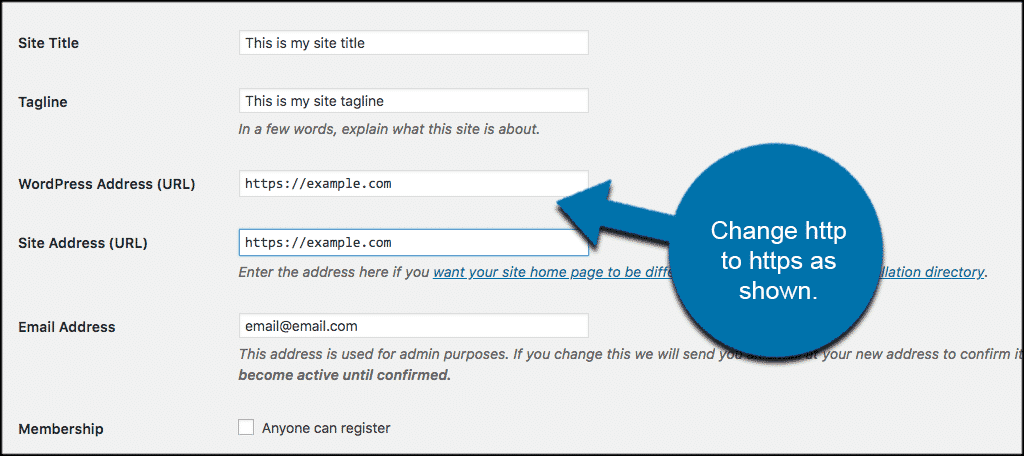
Once this is done you will need to go through your website manually and find old HTTP URLs in your WordPress database and replace them with the new HTTPS URLs.
The easiest and most efficient way to do this is to install and activate the Better Search Replace plugin. Once activated, visit the settings page for the plugin by going to Tools > Better Search Replace.
Add the current HTTP website URL in the “Search field” and then add the website URL with HTTPS in the “Replace field.”
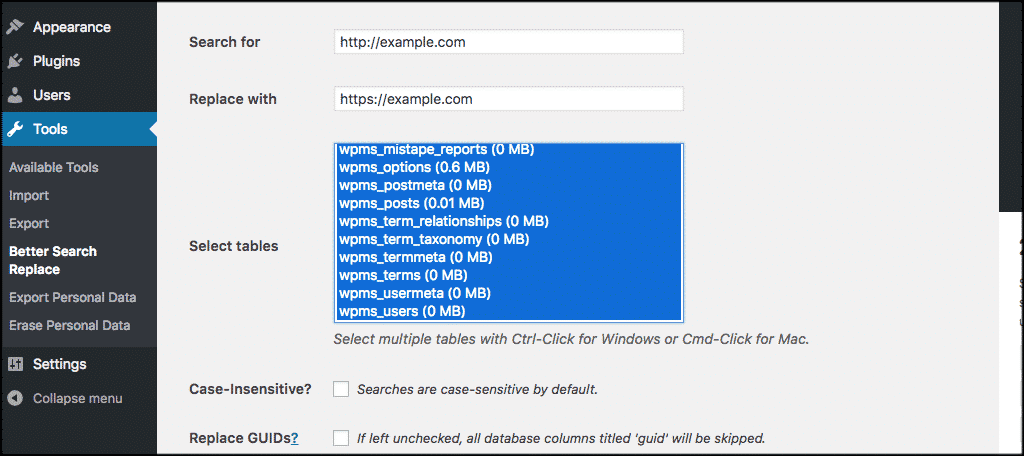
You can read even more about replacing mixed content in this tutorial.
2. Fixing the Too Many Redirects Errors
To get this done you will need to place a little code inside your wp-config.php file. Don’t worry, the code is written out below for you and if done correctly will fix the too many redirects error you may be getting after a WordPress SSL installation.
WordPress does indeed allow you to enforce HTTPS for the admin area by entering the following line of code into your wp-config.php file:
define('FORCE_SSL_ADMIN', true);
That being said, there are some scenarios where this alone would actually cause the “too many redirects” error to occur. If this is the case for you it is an easy fix. Go ahead and add the following code to your wp-config.php file:
define('FORCE_SSL_ADMIN', true);
//in some setups HTTP_X_FORWARDED_PROTO might contain
//a comma-separated list e.g. http,https
//so check for https existence
if (strpos($_SERVER['HTTP_X_FORWARDED_PROTO'], 'https') !== false)
$_SERVER['HTTPS']='on';
3. Fix HTTP to HTTPS Redirect
WordPress does not automatically redirect HTTP requests to HTTPS unless you go tell it to do so. A plugin like Really Simple SSL (described above) would actually take care of all the redirects for you.
However, you can also setup manual redirects by adding the following code into your .htaccess file:
RewriteEngine On
RewriteCond %{HTTPS} off
RewriteRule ^(.*)$ https://%{HTTP_HOST}%{REQUEST_URI} [L,R=301]
Moving your site WordPress website to SSL/HTTPS may seem like a major task at first but it actually can be handled fairly easily.
4. Fix Name Mismatch Error
The name mismatch error occurs when the domain name in the SSL certificate does not match the browser URL. And typically, this only occurs if you purchase one from a third-party seller.
This causes the browser to think that the SSL certificate was made for another website, which means it will not work for yours.
This will generally occur if you do not purchase an SSL certificate that supports “with” and “without www”. The reason is that this is important is because the URL may be entered differently.
For example, take example.com and www.example.com. These will lead you to the same place, but if your SSL certificate did not support both, you will run into this error.
To fix this, simply add the following lines of code to a custom .htaccess file:
RewriteEngine on
RewriteCond %{HTTPS} on
RewriteCond %{HTTP_HOST} !^www\.
RewriteRule ^(.*)$ https://www.%{HTTP_HOST}/$1 [R=301,L]
5. Using WP CLI to Update Old URLs
WP CLI allows you to issue commands via the command line. It is found within the cPanel for your web hosting account. This is one of the quickest ways to update your site’s URLs, but since it changes your database, create a backup before continuing.
You will need to install WP CLI using the Terminal option. But because it is already installed for accounts at GreenGeeks, We will not be covering that in this guide.
Once you have WP CLI open, you can begin entering commands. Be sure to double-check any commands you enter to avoid any syntax errors, or worse, entering a command with the wrong file.
For this process, we are going to use the search and replace command:
wp search-replace [OLD_URL] [NEW_URL] --all-tables
This command will simply locate all instances of the old URL and replace each one with the new URL you enter. Using this command, you can quickly update any URLs on your site. Just note that if you use a page builder, you may need to use a specific command.
For example, Elementor is one of the most popular page builders you can use in WordPress. It has its own database that the above command will not work on. As such, you would need to use this command:
wp elementor replace_urls [OLD-URL] [NEW-URL]
Refer to the documentation your specific page builder provides, as they should contain the WP CLI commands you can use.
Why is My SSL Not Working?
If none of the above SSL errors are plaguing your website, you might need to check the certification installation itself. It is possible that the process was not completed on the servers hosting your website. If this is the case, you may need to delete it and start again.
If your web host provided a free SSL certificate, you can follow their guide or contact a support team for additional help.
Fix SSL Issues in WordPress to Stay Secure
An SSL certificate has essentially become mandatory for any website that wants to rank highly on Google, which is just about everyone. The good news is that your website will be a lot safer and as a result, make your customers feel safer. Thus, it is a win-win situation.
Consider using other security measures like WordFence to keep your website secure. Trust me, you do not want to be the website that got someone’s personal information stolen. Not many websites can come back from that.
What are some other resources you have found that help moving to SSL easier? Did you find it easy to fix WordPress SSL errors?

After manually updating my htaccess file with some recommendations by the Really Simple SSL plugins, I checked my ‘site health’ page. I’m still being told that there is an issue with:
“Your .htaccess file does not contain all recommended security headers.
Content Security Policy: Upgrade Insecure Requests”
Finding any information about this is not very forthcoming, save for this is only a Really Simple SSL pro feature that I don’t have access to, and can’t do manually? Is there a ways to fix this, or is it something that is safe to ignore?
Please contact our support team and have them look into this for you.