When it comes to customizing WordPress there are a lot of options, and the footer area may possess the most on the platform. It is located at the bottom of the screen and is often the most customized location.
By default, you will usually see a “Powered by WordPress” message, which is usually the first thing anyone changes about it. And eventually, you can transform it into a sprawling area with links to anywhere on your site.
In fact, this is one of the more common areas to see links to an About Us or Careers page. And like most things in WordPress, there are a variety of ways to go about customizing the footer area.
Today, I will attempt to cover just about anything you should be aware of.
What Is A Footer in WordPress?
A footer is a static content display that appears at the bottom of your website regardless of what page or post a visitor is on. The footer design is dictated by the theme you install, thus, they are not universal in appearance by default.
The footer is also part of the core WordPress files and is aptly named footer.php. This file allows you to customize every aspect of the footer area in WordPress, but that is just one method of doing so.
Other methods include using the theme customizer, a page-building tool, or various plugins. Simply put, when it comes to changing the footer area in WordPress, you have a ton of options.
What Kind of Content Goes Into the Footer Area?
Before you start editing the footer, you should be aware of how this area is typically used.
Why is that important? Well, if a user goes to sites A, B, and C and can find the exact same info in the footer area, where do you think they will look on site D?
Over the years, the footer area has become somewhat standardized and universal.
In fact, take a minute to view a few websites run by major organizations and see if you notice any trends.
Here are a few of the things you may have found:
Privacy & Contact Information
On almost every website, you will see multiple links that include pages like Privacy, Terms & Services, About Us, Contact Us, and other similar content. That’s because the footer is at the bottom of the page.
Thus, when a user scrolls down to the bottom, they may have questions.
Since the footer appears on every post or page, it’s ideal to store this kind of info. Especially since you are legally required to have a Privacy page in some regions. Failure to do so can lead to compliance and legal issues.
Careers
Another common element in the footer is the Careers page, which is where potential employees will find a job application. This is probably the most normalized location for them to appear.
Seriously, just about every website puts the careers link in this location. Thus, if you don’t, it can confuse potential job seekers. Not having a steady flow of employees can really hurt a business, so, visibility is key.
Email Subscription Sign Up
While websites will typically place email subscription or newsletter opt-ins throughout their website, you can usually find them in the footer area. What’s more important, this link usually contains a way for customers to opt out.
Yes, I know, you don’t want to make it easy to opt out of anything. But if users feel like they can’t leave a subscription, they are less likely to join it in the first place. Thus, having it in an exact position is ideal.
Social Media Links
What do you want users to do when they finish reading your content or find a deal they love? That’s right, you want them to share it on social media! And adding those buttons to your footer area is the best option.
Again, they will appear at the bottom of the website. Thus, they become visible as the user scrolls down through the post on virtually every piece of content you have.
Popular Content
A lot of themes will place new posts, popular posts, posts by categories, archives, and other variations of this idea in the footer area. In fact, you can also place them in the sidebar or other widget areas.
The idea here is when a user scrolls down to the bottom, they are done with that content. And that means they are going to leave your website. By displaying content at the bottom, they may decide to click on another instead of leaving.
This is one of the biggest reasons why WordPress themes have the ability to show “Related Posts” by default just above the footer section.
Affiliate Programs
Many businesses offer an affiliate or reward program to customers. The idea here is that you offer a reward for users to shop on your platform, or to get their friends to shop on it.
The footer has become the most common place to store this link because it will always appear.
How to Edit the Footer Area in WordPress
So, there are a ton of ways to edit the footer area in WordPress. And which method you use really depends on what you are trying to accomplish and what your theme will allow.
Thus, you need to keep in mind that each method has its advantages and disadvantages. It really comes down to preference and availability, but overall no matter which method you use, the process is still pretty easy.
For simplicity, these methods are listed in order of difficulty.
Method 1: Using the Widget Area
Each WordPress theme comes with several widget areas, and the most common include a sidebar area and a footer area. Both of these are customizable and users are free to add any kind of widget to these areas.
Thus, by just using the widgets, it’s possible to create a unique footer area in WordPress.
However, before you begin, it’s important to understand that not every theme will give you the same areas. There are many themes that do not have a footer widget area.
If your theme is one of them, this method is not for you.
Step 1: Enter the Widget Area
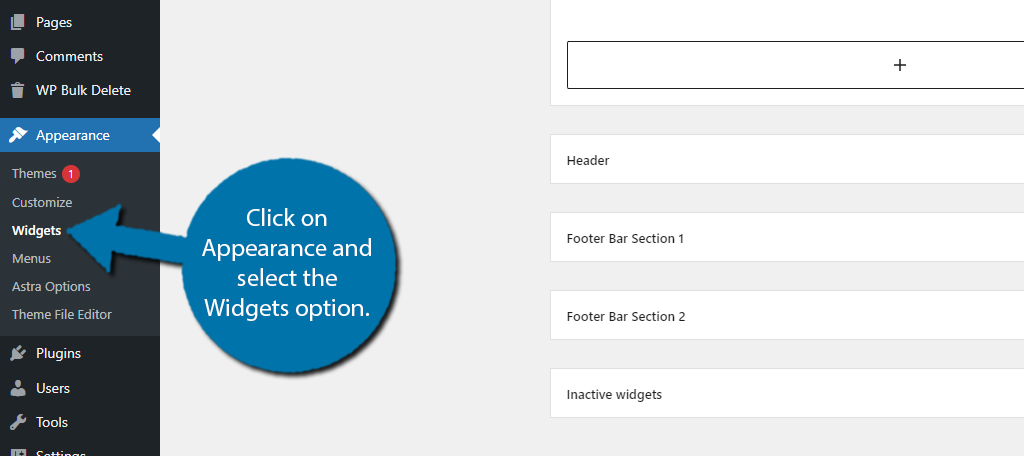
First, you need to access the widget area. To do so, click on Appearance and select the Widgets option.
Step 2: Locate the Footer Widget Area
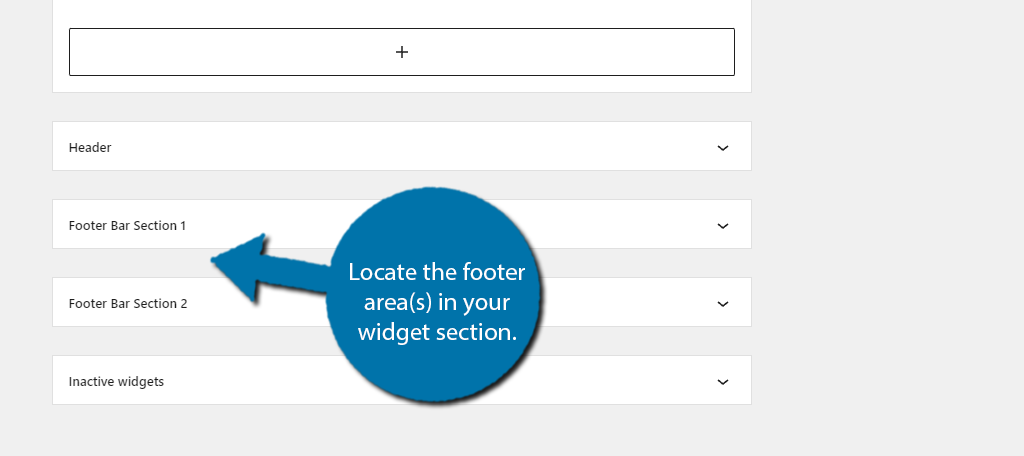
Now, every theme is different, so what you’re looking for can change. In the majority of cases, the footer widget area is simply called the Footer. However, things can get more complicated.
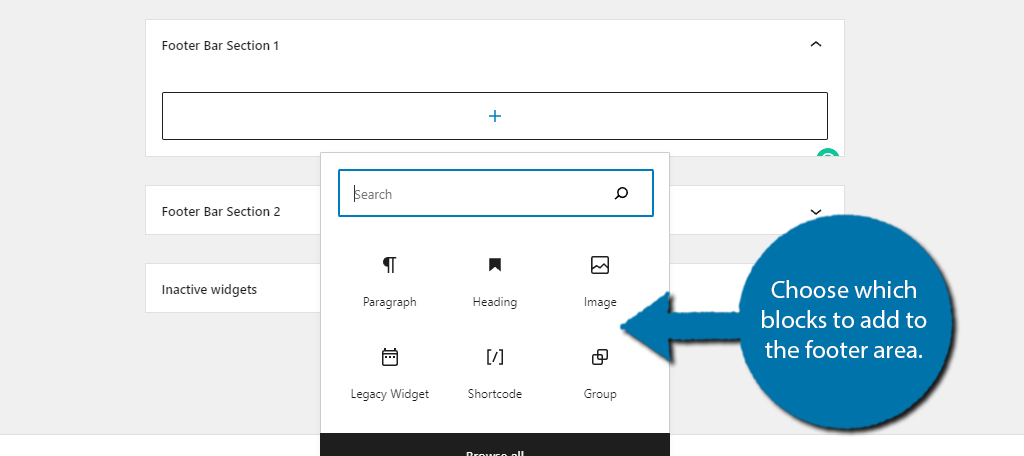
In the case of the Astra theme, you can see that I have two footer areas called Footer Bar Section 1 & 2. This gives me far more customization than a normal footer area, but it’s also a bit more complicated.
In any event, locate the footer area(s) in your widget section.
Step 3: Customize the Widget Area
To actually edit the widget footer area in WordPress, you just need to place a widget into that area. And when it comes to widgets, WordPress has no shortage.
In fact, the new block-based widget area isn’t limited to widgets as you can insert any block into it. This makes it pretty similar to editing a page or post. However, there is something that is very different.
The sizing options.
Let’s say you want to add a similar posts section in your footer, you would want to include the thumbnails of those posts. If you don’t size them properly, they can look really bad. Sadly, sizing is once again theme-dependent.
Therefore, you will need to consult your theme’s documentation to find the best results.
To actually add widgets, click on the widget space and click on the “+” button. You should see the familiar block menu from Gutenberg. From there, just select the block you want to use.
Method 2: Using Plugins
The best way to customize WordPress is with plugins. And as you might expect, there are plenty of plugins dedicated to the footer area of WordPress. You simply need to find the tool that fits your needs.
Now, with that said, some of the most useful plugins for your footer area may not necessarily be just for the footer. For instance, if you wanted to add a photo gallery in the footer, you would use a gallery plugin. This particular tool can also be used anywhere in WordPress.
These types of plugins often have blocks that work perfectly in the footer area, so, don’t just look for plugins that mention the “footer.”
Here are a few plugins you might find useful when it comes to customizing your footer area:
Elementor Header & Footer Builder
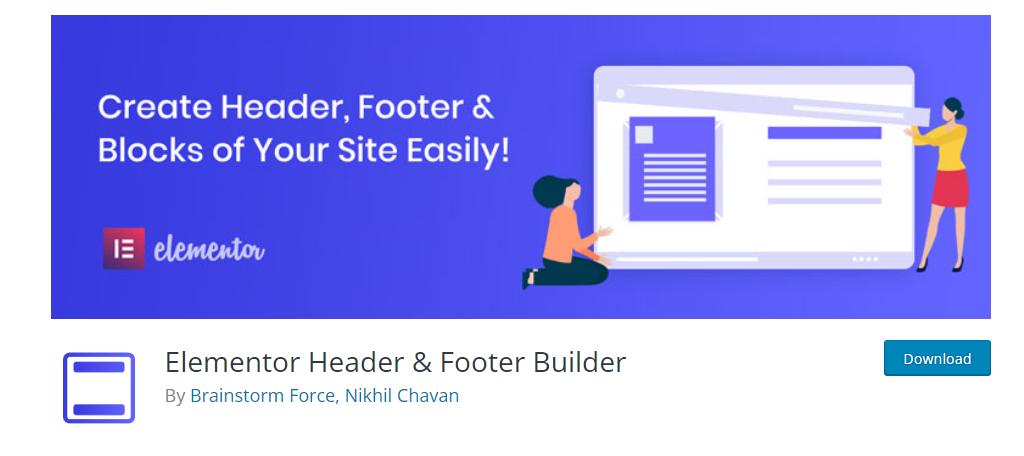
If you’re one of the millions of website owners that already use Elementor Page Builder, then installing the Elementor Header & Footer Builder is a no-brainer. It allows you to use the Elementor toolset to construct your own custom footer.
And it’s completely free to use if you already have Elementor.
This plugin allows you to build headers, blocks, and a variety of other elements using the Elementor tools. These are far more robust and easy to use compared to the default WordPress editors.
Thus, you will have more options. And a lot of things that would normally require code or additional plugins are built into the tool. If you are really looking for the most robust way to customize the footer area, this is the plugin to use.
WPCode – Insert Headers and Footers + Custom Code Snippets
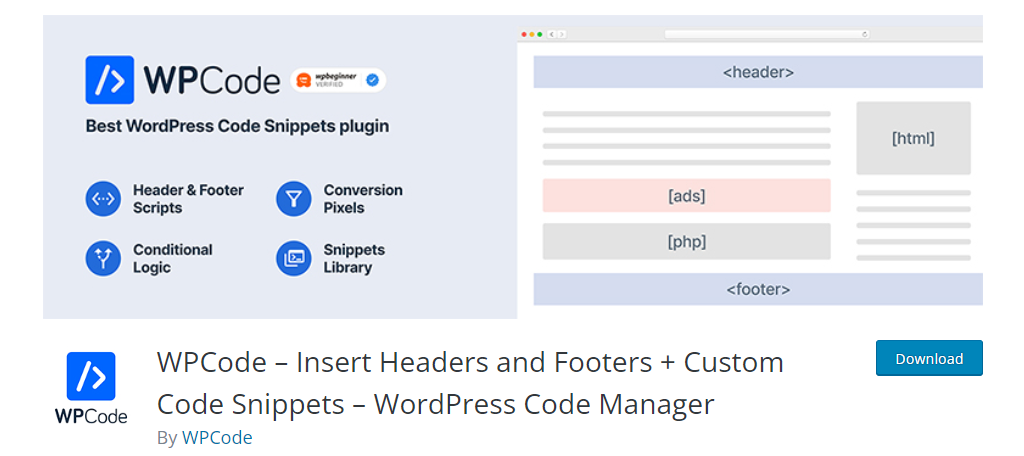
For some users directly editing files is intimidating, but with the WPCode plugin, you can insert code into those files in a much more streamlined process. This can help mitigate the risk of breaking your site.
Essentially, you just access the area you want to add to (header or footer) and enter the code.
If that sounds easy, that’s because it really is. There’s not much else to say except that this tool (and others like it) still require you to know the basics of coding in PHP to fully utilize.
Footer Mega Grid Columns – For Legacy / Classic / Old Widget Screen
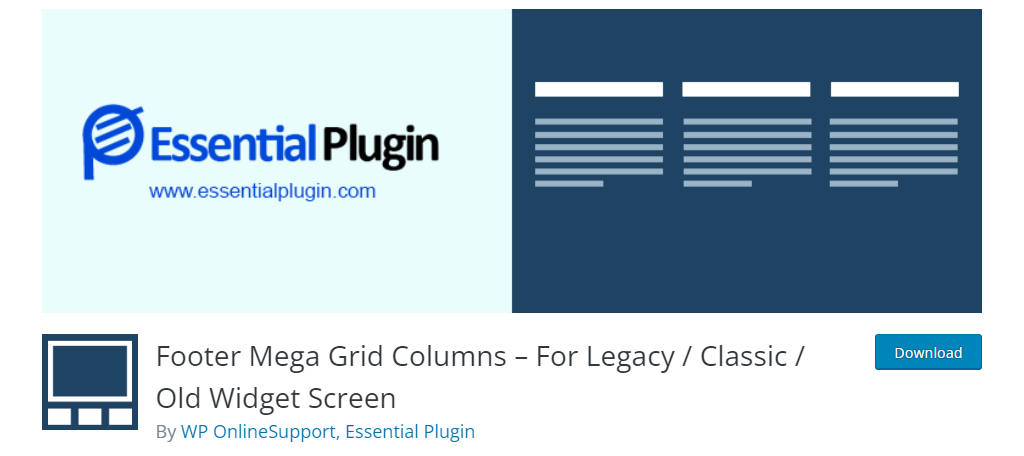
If you try to add a lot of information into the footer area, it can be very hard to read everything. That’s where the Footer Mega Grid Columns plugin comes in. It will allow you to columnize your footer section.
These neat columns can have their width customized to better suit your information.
One downside of this plugin is that you will need to add a line of code to your theme, but it is just a quick copy-and-paste job. So, it’s nothing difficult. After that, you will be able to access it in the widget area.
Each column will appear as its own widget and you can customize each one to fit your needs. It’s also worth pointing out that this plugin only works with the older widget area in WordPress.
Slider, Gallery, and Carousel by MetaSlider – Responsive WordPress Plugin
The MetaSlider is a great addition to any website because you can add them anywhere using a shortcode. Thus, to use it in a footer area, you could just add a shortcode block to the footer to use it there.
So, what does the plugin actually add?
Well, you can use it to add a slider, gallery, or carousel. It’s great if you want to add something like a rotating review slider or even a post slider. And it’s built to be responsive, so, you don’t need to worry about mobile users.
Method 3: Using the Theme Customizer
The theme customizer allows you to customize various elements of your site and this often includes the footer. However, the options in the theme customizer are completely dependent on your theme.
Many themes do not allow you to edit the footer, while others do. And even when you can edit the footer, the options available to you may be limited or missing elements you may want to add.
For this reason, the theme customizer isn’t the greatest option. But sometimes the customization options are superb, so, it’s worth covering it even if many may not be able to enjoy the benefits.
Step 1: Locate the Theme Customizer
For reference, this guide will be using the Free Astra theme as it allows users to edit the footer area in several ways. The only difference will be the options you view within the customizer itself.
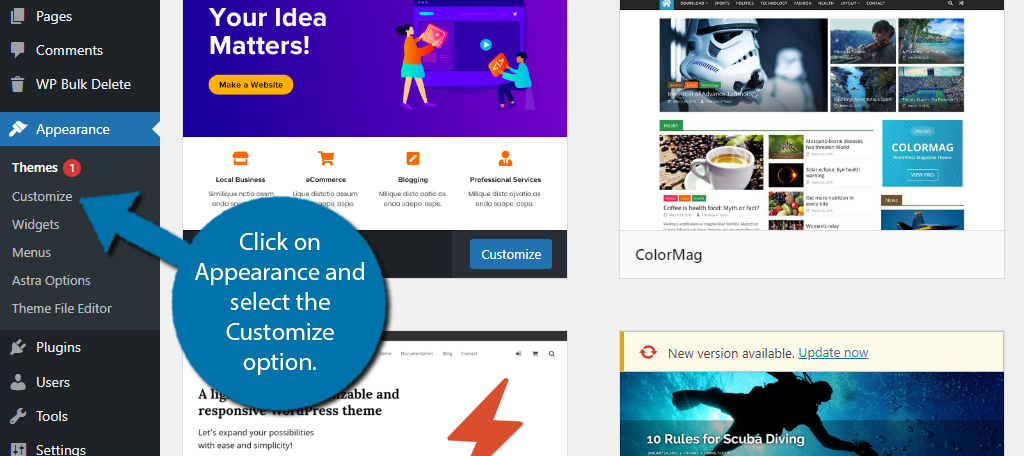
To do this, click on Appearance and select the Customize option.
Step 2: Locate The Footer Section
Alright, so, the theme customizer is once again, different for every theme. This includes the naming convention. Most themes will have a Footer option. In the case of this theme, it is called Footer Builder, so, be aware that it can be named differently.
As long as it has “footer” in the name, it is probably the right place.
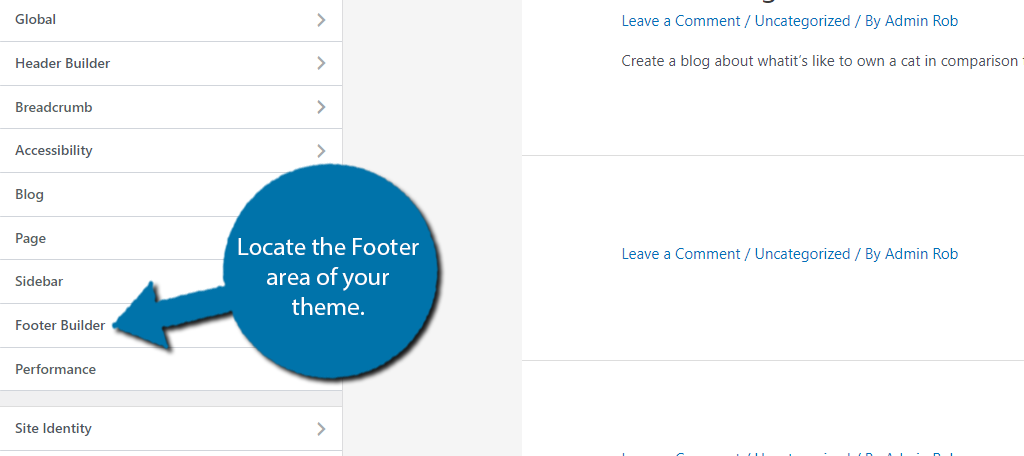
If you don’t see a footer option, this theme customizer will not work for you.
Step 3: Customize the Footer Area
Again, I can’t stress this enough, every theme is different. Some things will have a variety of options you can configure and some will not. In the case of the Astra theme, the options are simply not there.
Instead, you need to click on the actual footer area to customize it.
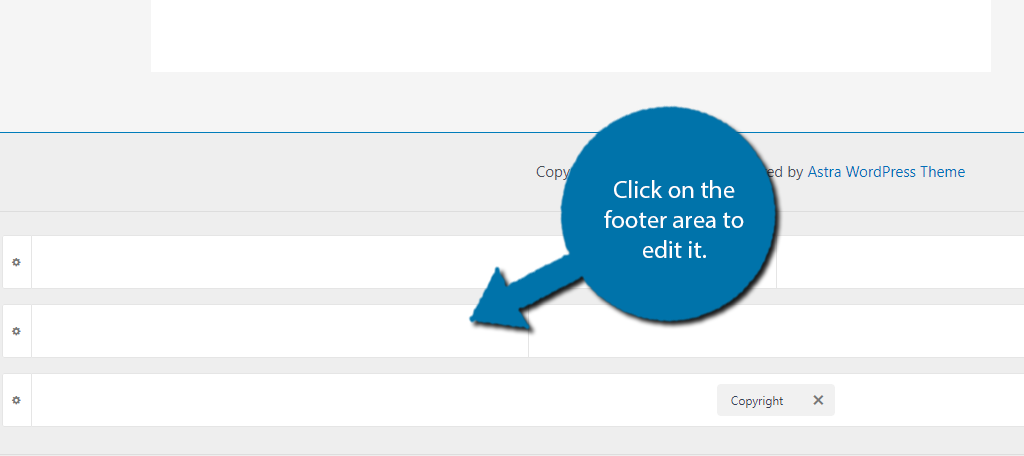
This will pull up a small box that contains all of the customizable elements you can add to the footer area.
Now, I won’t explain what these are because they are unique to my theme. But in most cases, they will include an option to add a widget.
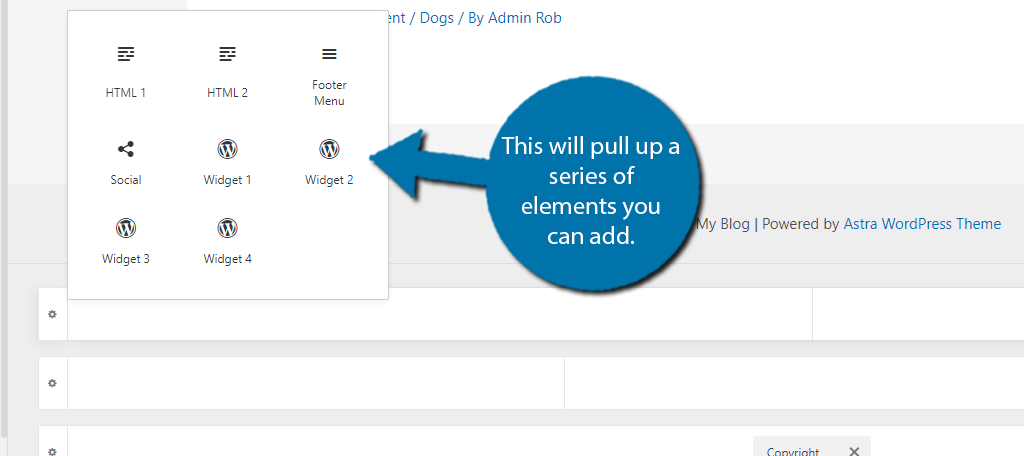
If you add a widget, it is essentially adding an entire widget area! And you can add widgets to it just like in Method 1. Of course, other themes will include different customization options.
These can include things like configuring the color (sometimes it is a global theme option), changing font, and much more. For this reason, you should really explore a theme before committing to it.
Discovering it is lacking a vital feature later on can create a lot of headaches if you switch themes over it.
Method 4: Manually Editing the footer.php
Now, this method isn’t like the others. It will work for every theme in WordPress and provide you with the most customization possible. The reason it is last on this list is that it is also the most difficult (at least in a relative sense).
This is because you are manually editing the footer.php file. If you don’t have the proper PHP coding knowledge, it can be difficult to achieve a high-quality result. And worse, you could potentially cause an error on your website.
That’s why it’s highly recommended to back up your WordPress install before editing any code, no matter where it is located.
Obviously, I can’t tell you how to code your footer, as this still depends on your theme and what you actually want that code to do. What I can tell you is that you need to know how and where to actually edit the file.
Learning PHP
As you can imagine, the most important aspect of this is to actually know the PHP language. You won’t be able to do anything if you do not have that knowledge. The good news is that there are a lot of resources to utilize.
While there are a ton of resources to choose from, perhaps the official PHP documentation is the best option.
It walks you through every aspect of the PHP language with explanations and examples. And the information is coming straight from the source, so, it’s up to date.
Of course, this is just one of many ways to learn the language.
Many people prefer watching video content and having someone walk them through the code. In those cases, there are a variety of excellent video guides on YouTube.
You could also sign up for a PHP course. This can give you access to an expert who can help answer basic questions faster than a Google search would turn up.
In any event, learning PHP lets you do way more than just editing the footer. The value in learning it is massive if you plan to stay in the WordPress environment.
Where to Find the Footer.php File
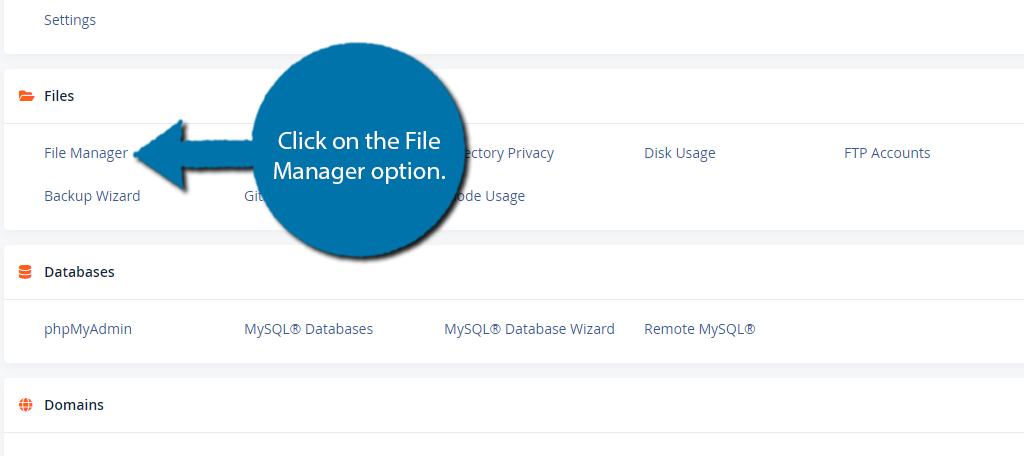
Finding the footer.php file is quite simple. Every theme contains one. Start off by logging into your cPanel account.
Once inside, locate and click on the File Manager option.
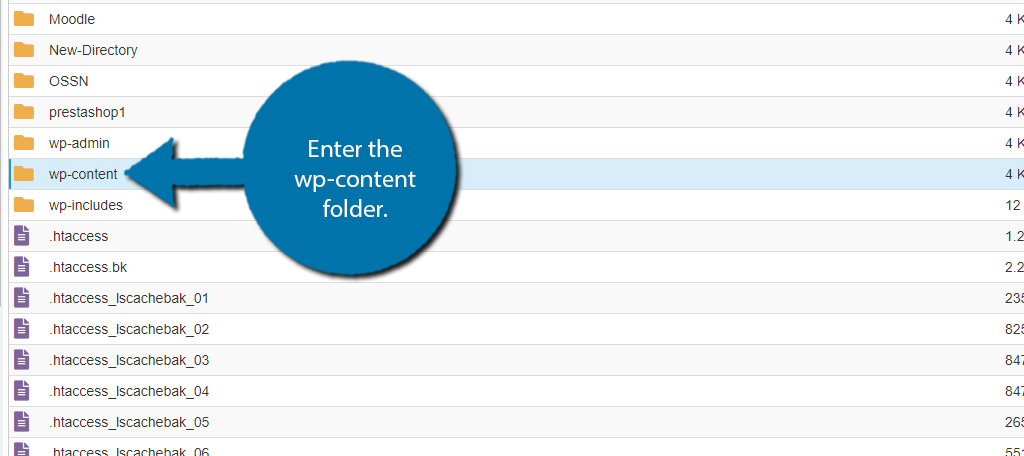
Select the public_html directory and then enter the wp-content folder.
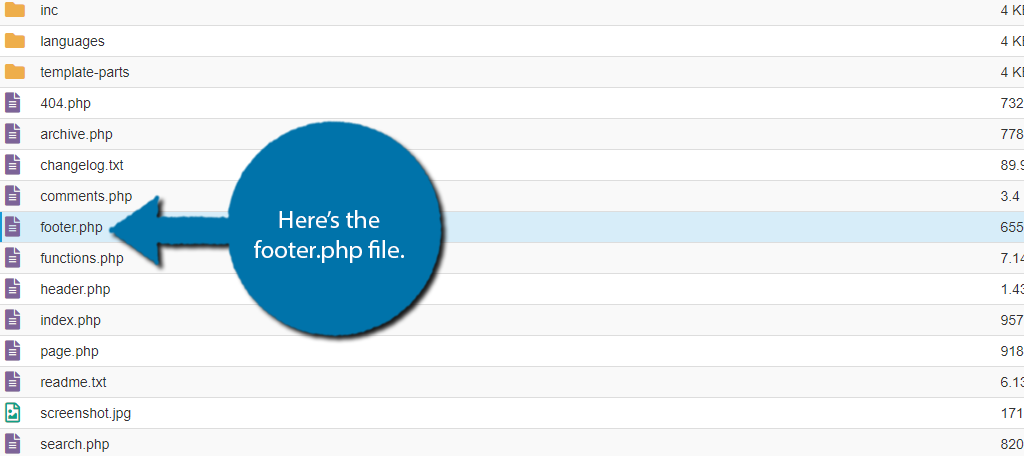
Enter the themes folder and choose the theme you are currently using. Once inside, you should be able to spot the foooter.php file.
Now, this is just one way to do it. You could also use an FTP client, like FileZilla, to also access the file. There is also a theme editor in WordPress that allows you to access the file directly in WordPress.
Note: It’s also possible to make these changes using a child theme.
How to Delete Powered By WordPress Credits in the Footer
One of the first things you should do when you install WordPress is to take a minute and remove the WordPress branding. While you are using WordPress to build your website, you want to advertise your content, not their platform.
And one of the things you need to do is to remove the “Powered By WordPress” message in the footer area.
Now, before we begin I need to emphasize that this guide is not a one size fits all solution. You see each WordPress theme is unique and what will work on one theme may not work on another.
That said, I am confident these solutions will work on the majority of WordPress themes.
Method 1: Using the Theme Customizer
This can be extremely easy to do from the theme customizer. Though, it can also be impossible. As I mentioned above, not every theme offers the same customizable areas.
For example, the Twenty Twenty-One theme does not have a footer section in the theme customizer. Whereas the ColorMag theme does but doesn’t give you the option to remove the powered-by WordPress message.
These situations can apply to just about any theme. That being said, many do support this method, so, it’s worth mentioning here.
If the option doesn’t exist in your theme, you must edit the footer.php file as shown in Method 2 below.
If your theme supports it, you should see the Copyright option. Click on it and you should see the powered-by message.
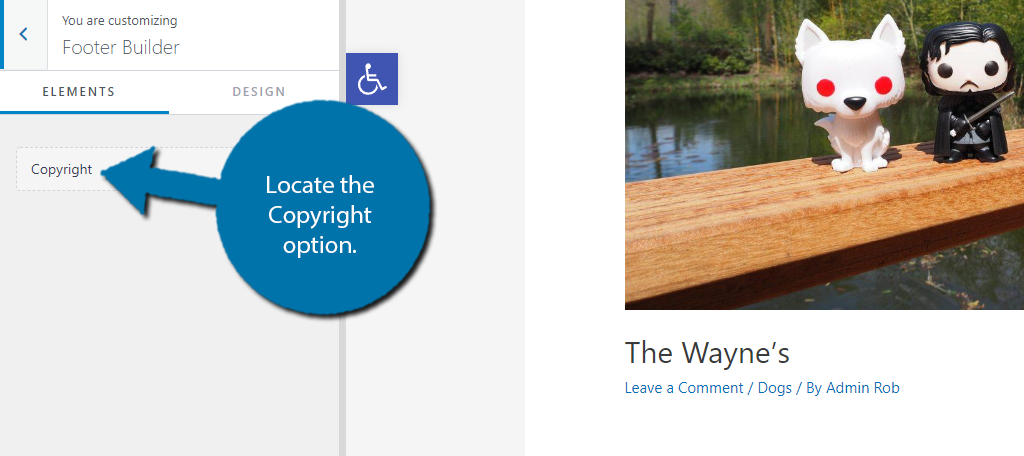
This is the message that puts that pesky “powered-by” message. You’ll be able to directly edit the text, replacing it with something else, like a sponsor., Or, you can delete it entirely.
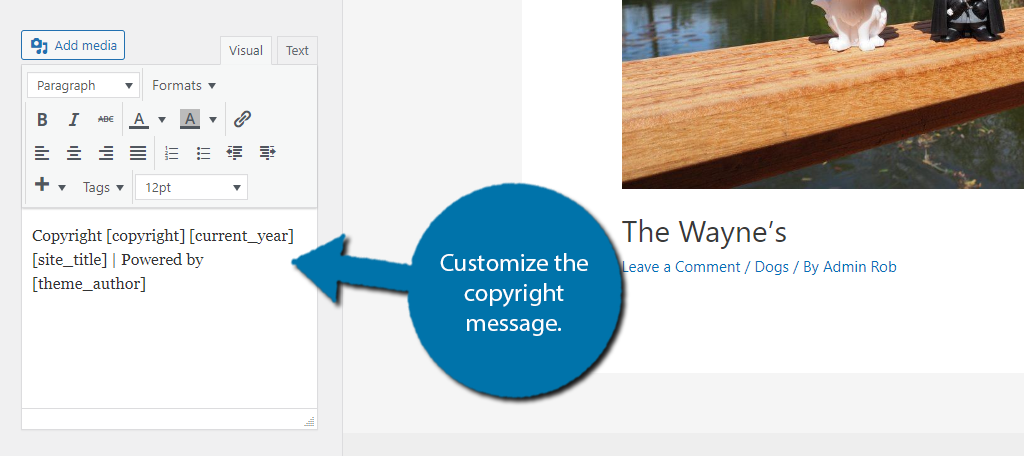
You can see the changes in real-time to verify it is working. If the option does not exist, then again, see Method 2 below.
Method 2: Using the footer.php File
Although the next method may seem intimidating to some, it’s actually quite easy and doesn’t require extensive knowledge of PHP or CSS coding.
When the theme doesn’t support editing the footer of the website, you can do so by editing the file directly.
Accessing this file can be done easily if you know how to use FileZilla, but it can also be done from the WordPress admin panel.
Step 1: Select Your Theme
WordPress allows you to edit any file in your theme by using the Theme Editor. However, you may have multiple themes selected, so the first step is to actually select the theme you are currently using in that editor.
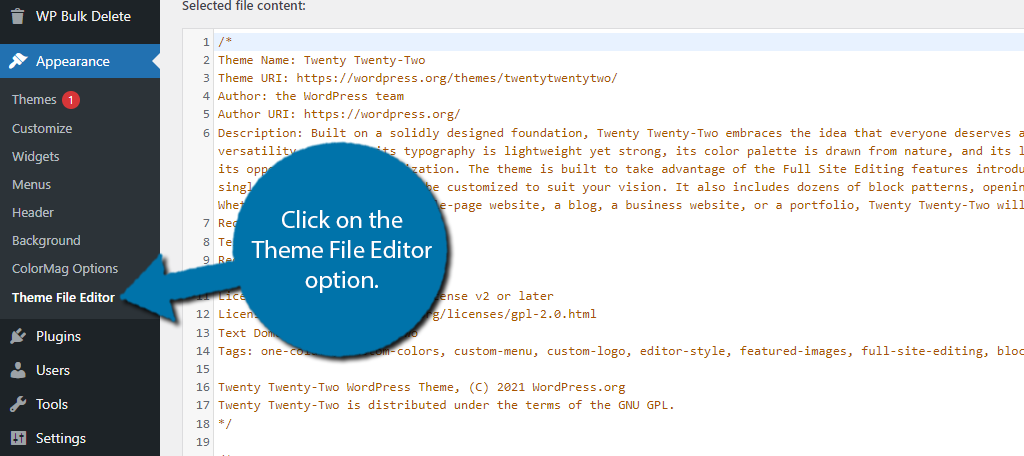
Go to the Appearance section in the WordPress admin panel and click on the Theme File Editor option located at the bottom.
On the top-right of the screen, you can use the drop-down box on the right to select the theme you are currently using.
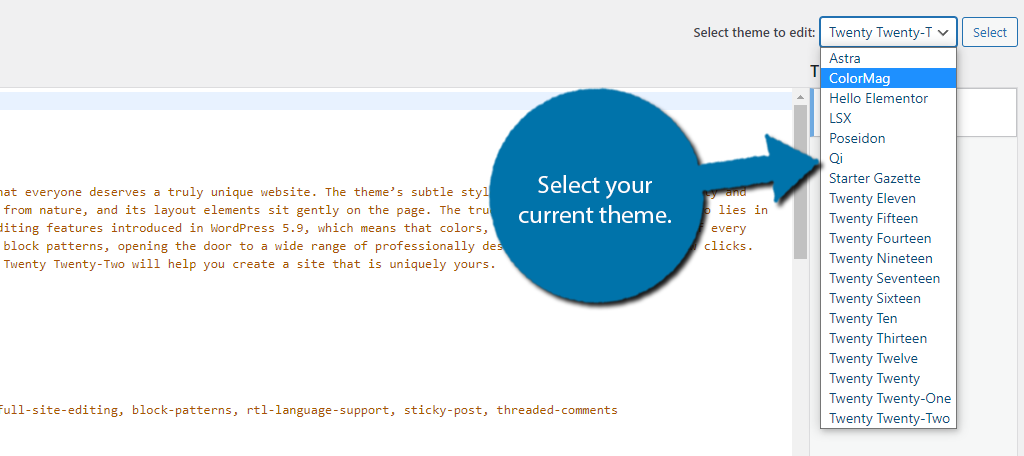
Click on the “Select” button next to the drop-down box to pull up the theme’s files.
Note: This method will not work for block themes like Twenty Twenty-Two. These themes use the new Site Editor. To access the files, you would need to do so through the cPanel.
Step 2: Locate the Footer File
Okay, so now you need to locate your theme’s footer file. The good news is that this should be easy to locate as it is often called “Theme Folder”
On the right, you’ll see a list of files under Theme Files. Locate the file labeled, Theme Footer.
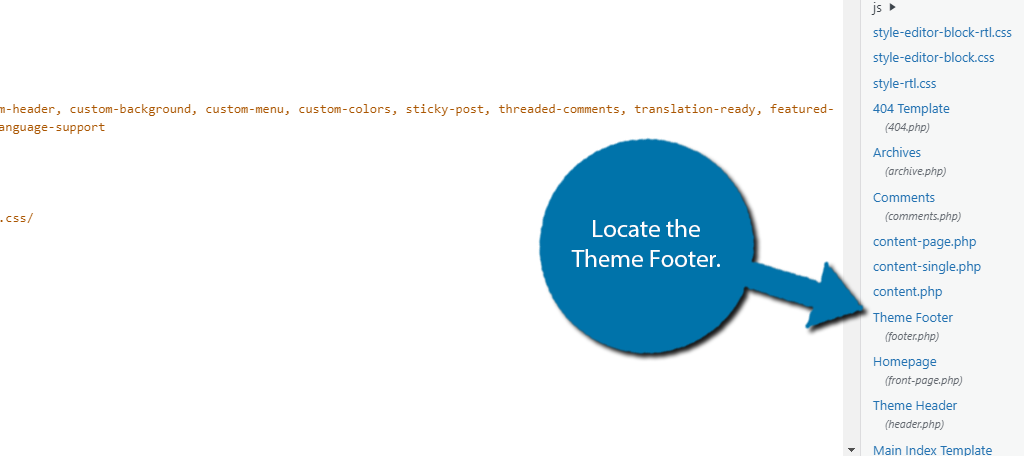
Click this file to open it in the editor window.
Step 3: Remove the Powered By Code
Now it’s time for the fun stuff. For full clarity, I selected the Twenty Twenty-One them. Each theme’s footer will look different. In the case of this theme, you need to locate the “Powered-By” div class and delete it.
Note: To be safe, you should create a backup of your site or, at the very least, the footer.php file. This can be as simple as just copying everything in the file into a blank notepad file. That way you can restore it if a mistake was made.
So, carefully search through the file to locate this code and delete it.
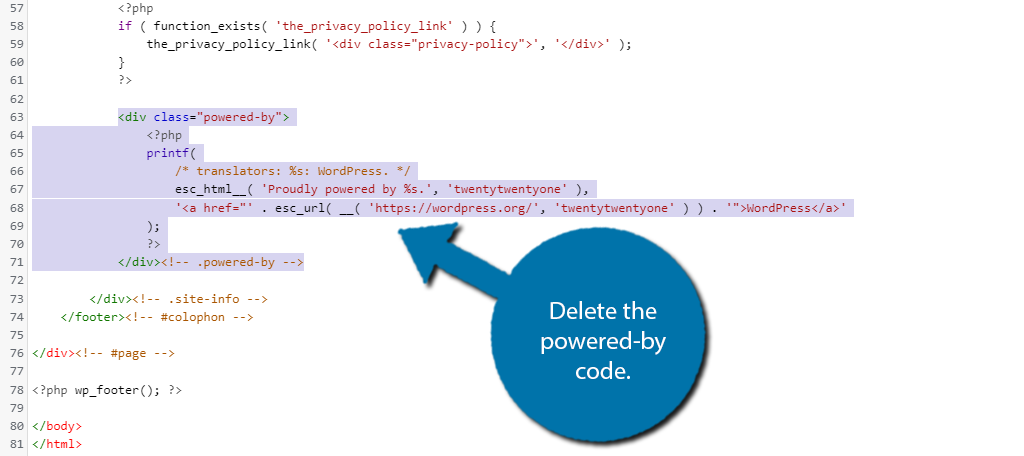
Save the changes and the message will be removed from the footer area.
Now, unfortunately, not every theme is clear like this. It can take some real detective work to identify what code adds to the footer, but the much faster way is to consult the support channels that the theme offers.
If you can send the team an email to ask the question, do so. They often respond in a day or two and will be able to direct you to the exact line. However, not all themes are so forthcoming.
In those cases, forums are your best friend. Themes often have thousands of users, so, resources exist online for most of them by other users.
Does Removing the Credit Void the License?
One of the beautiful things about WordPress is the GPL license. Essentially, it allows anyone to make changes to virtually any aspect of WordPress without worrying about legal repercussions.
As it is an open-source platform, you can edit the core as much as you want.
This protection also stretches across themes and plugins you install directly from the WordPress directory. Thus, you have complete control over every aspect of your WordPress install and can modify it in any way.
You may also be wondering if the same applies to your WordPress theme, after all, many themes try to include the theme name in this powered-by section, and the answer is the same.
You are free to modify your theme in any way you see fit.
Note: Although very rare, some themes lock the ability to remove the powered-by theme behind a paywall. Thus, you may need to actually buy the pro version to do so.
How to Add Social Media Icons to the Footer
One of the most common additions to any footer area is the inclusion of social media icons. And there are several ways to add them, but again, it depends on the theme.
For example, the Astra theme has options for just about every social platform and even services (like GrubHub), built in. If your theme supports this, you won’t need a plugin.
However, since not every theme includes this, I will demonstrate how to do it with the Simple Social Icons plugin.
This plugin makes it easy to add social media icons in WordPress. It adds a custom widget into WordPress that you can place in any widget area, and in our case, we will do it in the footer. However, the plugin works just as well for the sidebar.
Note: You must already have an account on that platform made as it requires you to link to the account. For instance, you must have a Twitter account if you want to show a Twitter icon.
Step 1: Install Simple Social Icons
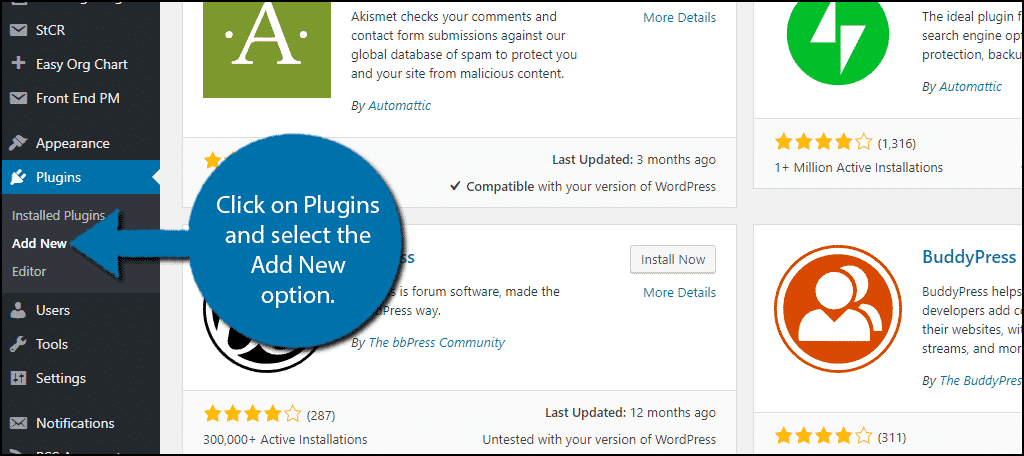
Begin by going to the plugin area of WordPress. To do so, click on Plugins and select the Add New option.
Search for Simple Social Icons in the available search box. This will pull up additional plugins that you may find helpful.
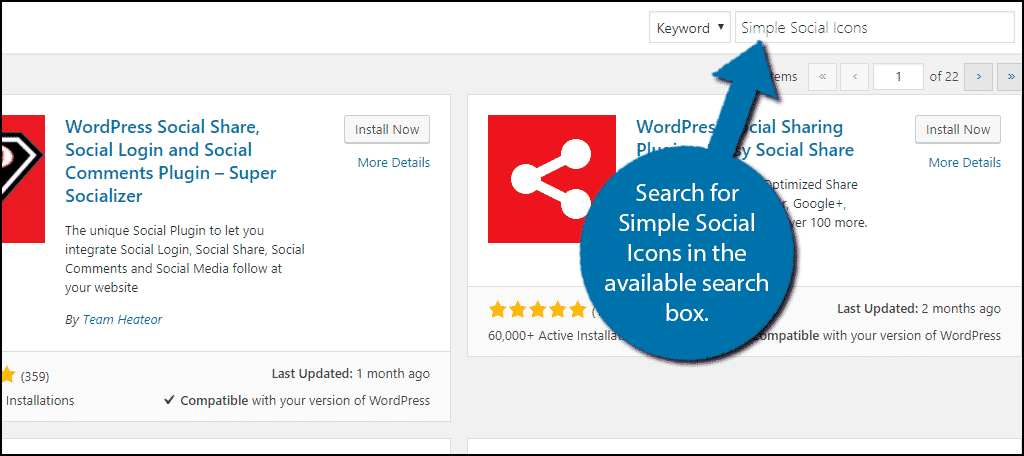
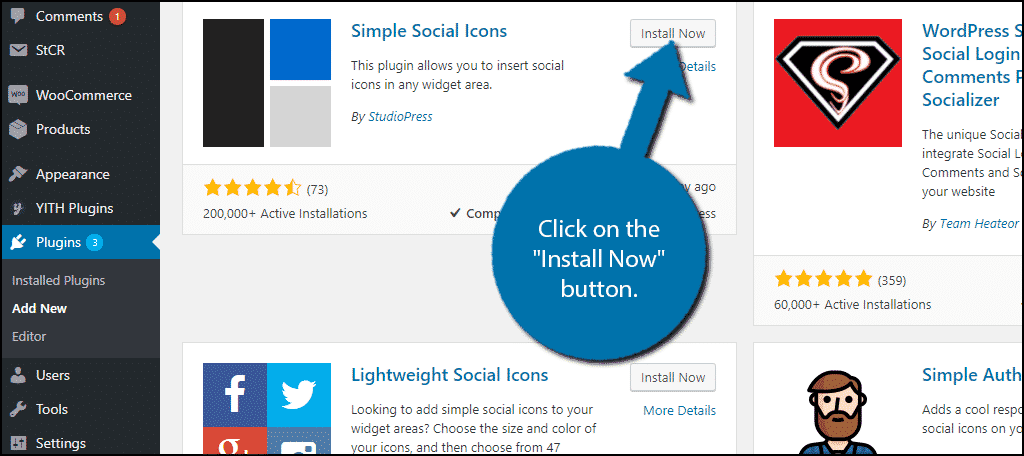
Scroll down until you find the Simple Social Icons plugin and click on the “Install Now” button and activate the plugin for use.
Step 2: Add the Simple Social Icons Widget to the Footer
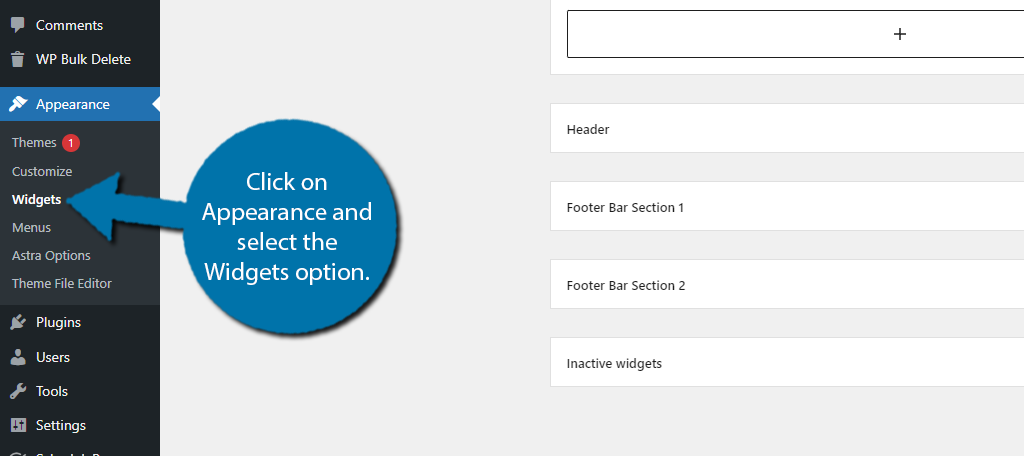
First, you need to go to the widget area of WordPress. To do so, click on Appearance and select the Widgets option.
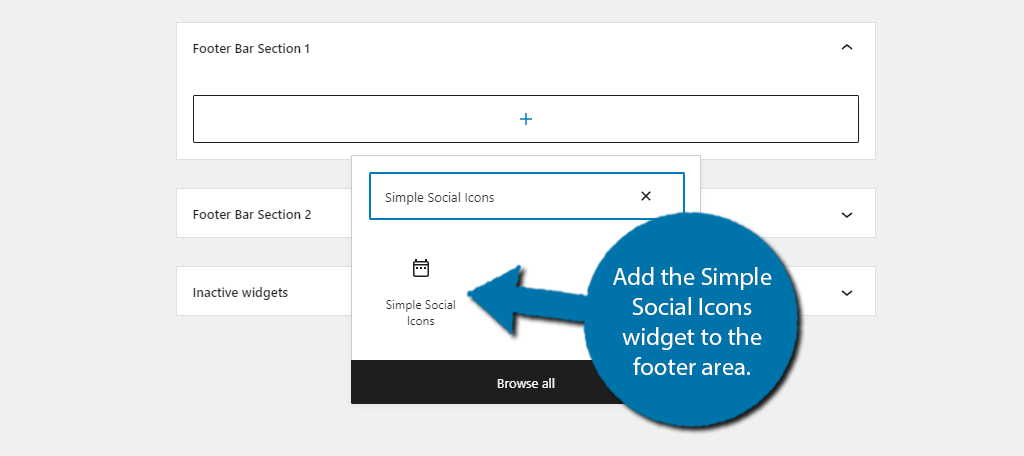
First, locate where your footer widget area is, or if you even have one. Once you locate it, click on it to expand it. Then click on the “+” button to open up the block/widget library.
Search for the Simple Social Icons widget.
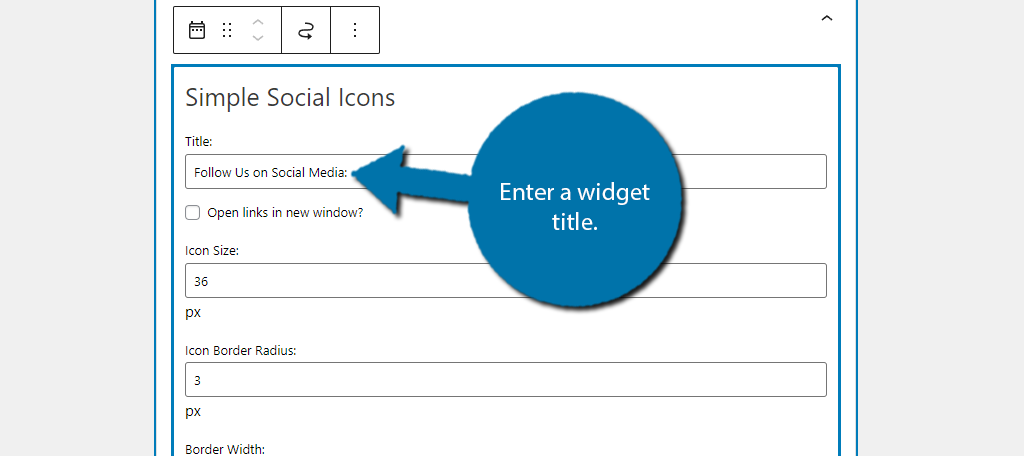
While the widget options might seem long, they are really just a long list of social media platforms that the plugin supports, so, don’t worry. It’s really easy to set up.
The first thing you should do is enter a title for the widget. A standard message like “Follow Us on Social Media:” is more than sufficient, but feel free to use whatever you want.
Next, you can customize the appearance of the widget. You can choose how thick the borders are, the alignment, and what colors they should use.
As always, I recommend using colors that are similar to the color scheme of your website.
Underneath these options, you will find spots to place URL links to social media accounts. When a URL is placed in a box, the plugin will automatically display that social media icon.
They are listed in alphabetical order, and the icons will appear in that order as well. Insert the URLs into the appropriate areas.
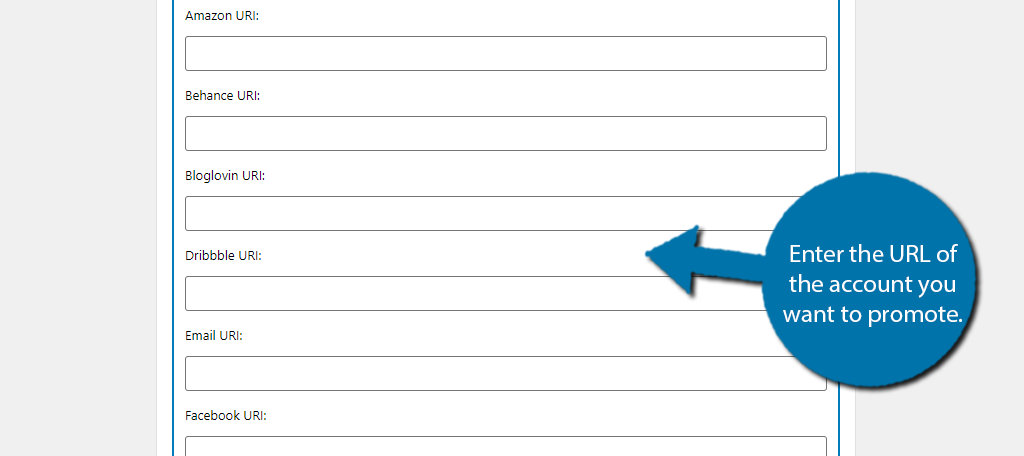
If you are interested in reordering the icons, well, it’s a bit complicated. You will need to visit this GitHub page and add the code to your website. I won’t cover this because it goes outside the scope of this tutorial, but the option exists.
After you have added all of the social media icons you like and customized the design of the widget, click on the “Save” button.
Step 3: View the Social Icons On Your Site
It’s always important to verify that a plugin looks good on your site after configuring it. Take a moment and make sure the social icons are appearing in the footer area of WordPress.
Don’t forget to check it on a mobile device as well!
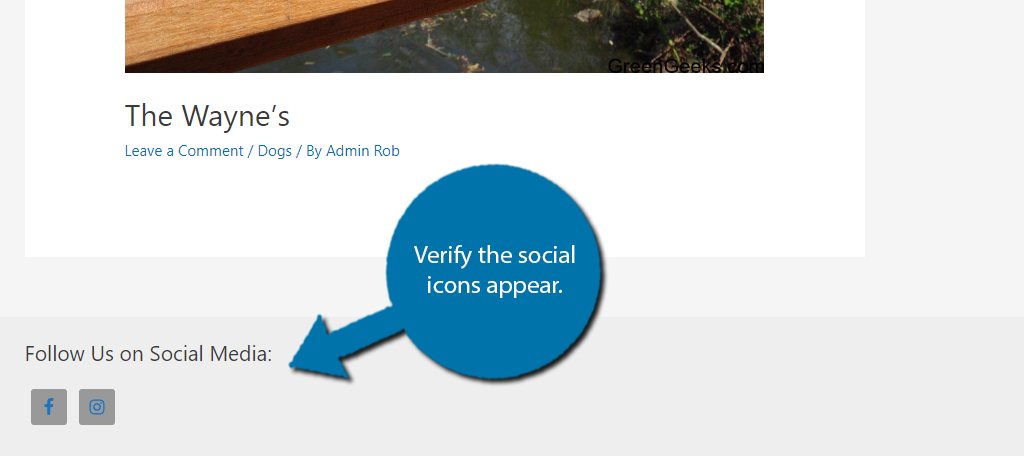
You can go back and configure how the plugin appears if you want to customize the appearance further. If you are happy, then great job.
How to Add A Custom Background to the WordPress Footer Area
You may have noticed that some websites make their footer area stand out from the rest of the site. Whether this is a good thing or not is up to you to decide. But if you are a fan and wondering how to do it, this guide can help.
Now, you may be sick of hearing this, but the theme you install might have the ability to customize the footer background built-in. Thus, you should check the theme documentation to see if your theme supports it.
If not, the easiest way to do it is with a bit of custom CSS.
This might sound hard, but it is honestly pretty easy. For example, let’s say you want to display an image as the background. Well, you just need to copy and paste this line of code into your theme’s additional CSS section:
footer { background: url(InsertImageURLHere) repeat; }
Then, just replace the “InsertImageURLHere” with the actual URL image, and presto, your footer area has a custom background. Even if you are looking to use a solid color, you can just make an image of a solid color and upload it with this trick.
Of course, this is just the easiest way. If you are a more advanced user, you can thoroughly customize the footer area with custom CSS, or even change the footer.php file to achieve a similar result.
Where to Find the Additional CSS Area
If you are having trouble locating the Additional CSS area in WordPress, it is located in the Theme Customizer area of WordPress. It will appear regardless of what theme you are using with only block themes being the exception.
You can find it here:
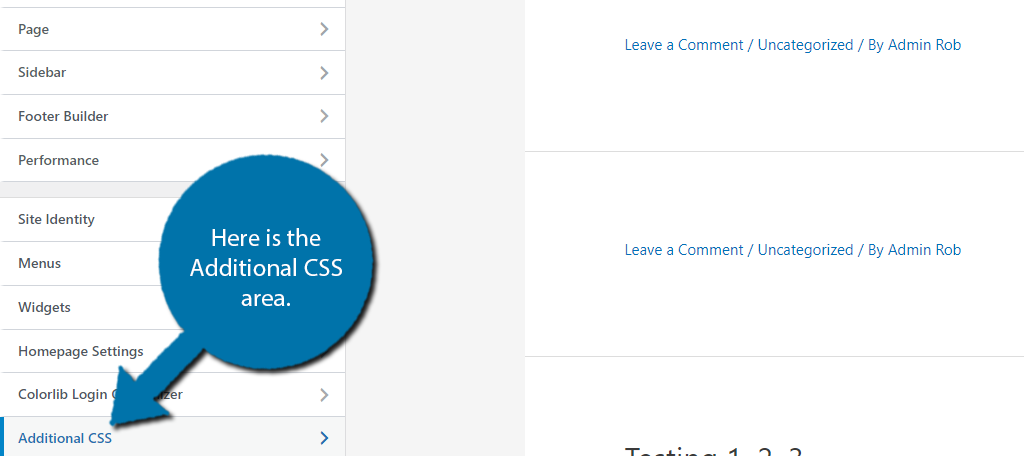
In it, you will just find a text box where you can enter any CSS for your theme. Of course, this section is not just for the footer area. You can use it to add custom CSS to any part of your theme.
Test Your Footer Area in WordPress
Regardless of what you add to the Footer area in WordPress, it is incredibly important to test the features.
For example, if you are adding links to a Terms & Services page to the footer area, make sure they lead to the right page. Many footer areas contain dozens of page links, so, it’s easy to get those wires crossed.
It’s also incredibly important to test the footer area on a mobile device. The small screen size can make things like links, social icons, and just about anything else you add to the footer area difficult to tap on.
And if you have images present, like post thumbnails, make sure they are not blurry or cropped weird. It looks low value and can make visitors think your website is not up to snuff.
Don’t just form the opinion yourself, ask friends and family to test it out and get their thoughts.
Customize Your WordPress Footer Area Today
As you can see, you have a lot of options when it comes to customizing the WordPress footer area. A well-built footer section contains valuable information for your visitors in a location that is available on any page.
Without a doubt, the most important aspect of the footer area is choosing a theme with robust customization options available. That said, with some plugins, you can bypass limitations and design your own footer area, like with using Elementor.
Of course, this is also achievable with the PHP coding language, but it might be too advanced for beginners.
Overall, with plugins, widgets, theme customizer, and coding to choose from, you should be able to find a method to edit the footer area in WordPress without much trouble. It’s all just personal preference.
What did you add to your footer area in WordPress? Do you have a menu in your footer area?

