If there’s one thing that will scare any WordPress developer, it’s when your website experiences a critical error. This error provides no helpful information to troubleshoot the problem, which only makes the situation more stressful.
The good news is that since WordPress is by far the largest CMS in the industry, there is a lot of information available on how to troubleshoot a critical error. And you are gonna need it because time is of the essence.
A website that is experiencing this error cannot receive traffic. That means you can’t make any money and search engines can’t crawl your content. If left unchecked, your rankings will plummet.
Today, I will demonstrate what steps you should take to try and resolve a critical error in WordPress.
What Causes A Critical Error On A WordPress Website?
If you are a veteran WordPress user, then you may recognize the “WordPress has encountered a critical error” as the older white screen of death error. Essentially, WordPress was changed to display the new message, but they are actually the same error.
As to what the actual cause of the error is, well, it could honestly be anything.
I know that’s as about as helpful as the error message itself, but it’s the truth. With that said, potentially the most common cause is that your website has exceeded the memory limit.
The second most common cause is plugin usage. It’s more common than it should be, but if a plugin happens to have an update, it could potentially brick your website. Or, you may have just installed a plugin that is not compatible with another.
A lot can go wrong with plugins, so it’s really a case-by-case basis, but honestly, this is just scratching the surface.
How to Fix A Critical Error On Your WordPress Website
Creating a guide for a problem that could be just about anything is challenging. Thus, I have assembled a list of strategies you can use to fix a critical error that occurs on a WordPress website.
Overall, none of the methods here are difficult to carry out and if all goes well, you’ll have your website back up and running in no time.
Method 1: Increase The PHP Memory Limit
The first thing you should try is to increase the maximum PHP memory limit. This value is set by your web hosting company by default, but you can change it with a few simple lines of code.
Now, you may still be wondering what exactly the memory limit is. To put it simply, every website is stored on a web server, and that web server has a set amount of RAM that it uses to make sure that the website runs correctly.
If your website exceeds that RAM value, well, it won’t work because you have exceeded what the hardware is capable of delivering. For this reason, you need to manually set a limit to ensure that your website doesn’t exceed the web server.
The memory limit is exactly that. Now, the good news is that your website won’t need a ton of memory, but sometimes it can be set too low for certain plugins to function.
Luckily, you can adjust this in a matter of minutes.
Step 1: Locate the wp-config.php File
You can use an FTP client like FileZilla to access your website’s backend or you can use your web hosting account. For simplicity, I will demonstrate this, and all future methods using a web hosting account’s cPanel.
Log into your web hosting account and access the cPanel. Locate the Files section and select the File Manager option.
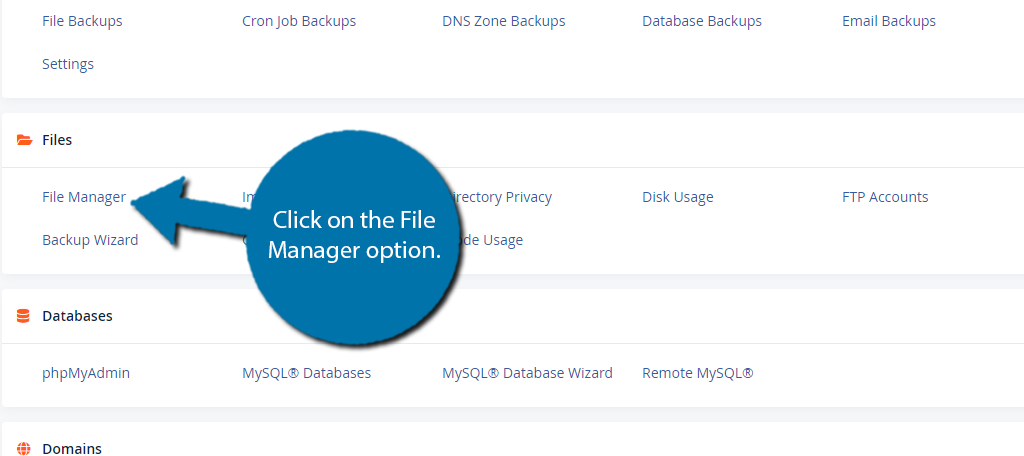
Locate your WordPress directory. It is normally named public_html, but the names may vary from host to host. Once inside, locate the wp-config.php file.
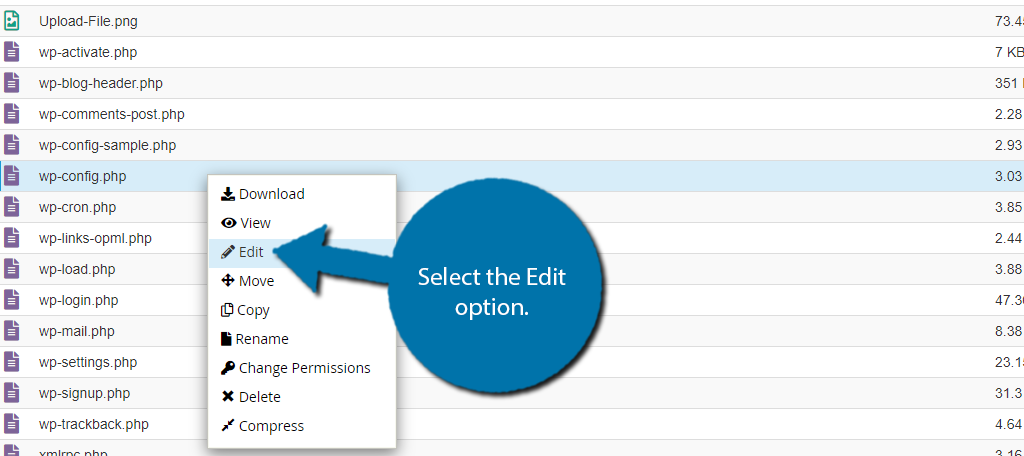
Right-click it and select the Edit option. For MAC users, use CMD+Click to open the drop-down list.
Step 2: Increase the Memory Limit
Increasing the memory limit is incredibly simple and only requires you to copy and paste the following line into the wp-config.php file:
define( 'WP_MEMORY_LIMIT', '128M' );
You can actually adjust the ‘128M’ value to fit your needs. The value assigned by default is dependent on your website host. In most cases, the default limit will be 32M or 64M. You can also try a larger value like 256M.
However, realistically, 128M should be large enough for any website.
Note: Depending on what kind of web hosting plan you purchased, you may not be able to adjust the memory limit. In those cases, you would need to contact your web host and change plans to do so.
Step 3: Save the Changes
Once you have the code in place with the desired memory limit, just save the changes to the file. After that, reload your website to see if the critical error on your website has gone away.
If so, then congrats, if not, don’t get discouraged, there are a lot of potential causes.
Note: It is actually a security vulnerability to leave a very high memory limit in place. You see, this opens the door for hacks to install a back door on your website. Therefore, it is recommended to only set it to what you absolutely need.
Method 2: Disable All Plugins
Plugins are the most likely cause of your website’s critical error. And to confirm that, all you need to do is disable all of the plugins. If the error goes away, you know it is a plugin. Then you need to determine which plugin it is by reactivating them one at a time.
This might sound like a lot, but it’s actually incredibly easy and only takes a few minutes.
Since there is a chance you may not be able to access your WordPress dashboard, I will demonstrate this by interacting with the plugin files that can be accessed in the cPanel.
Step 1: Locate the wp-content Folder
The first thing you need to do is locate where your plugin files are. You will find them in the wp-content Folder in their own sub-folder called plugins. To locate this:
- Log into your web hosting account
- Access the cPanel
- Select the File Manager option
- Enter the public_html directory
Once inside, locate the wp-content folder.
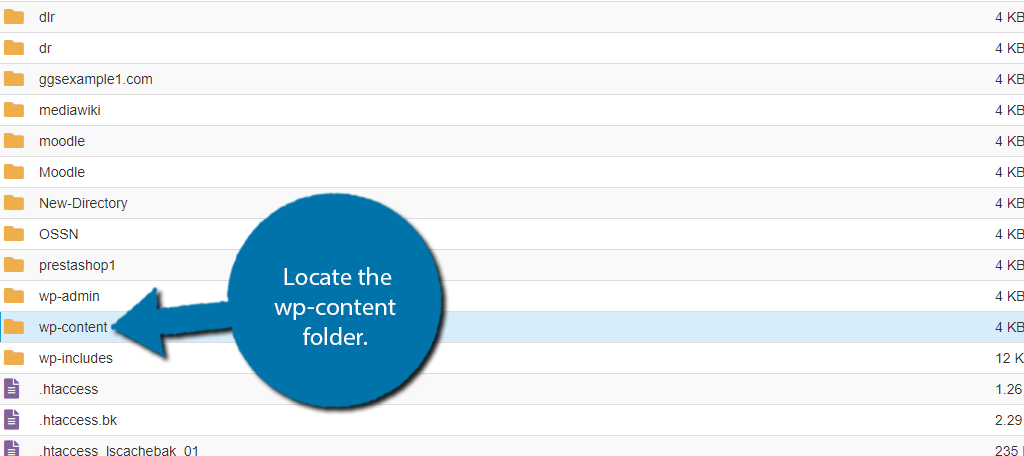
Step 2: Rename the Plugins File
Once inside the wp-content folder, you will see all of the content stored on your website. For this method, you would normally need to delete the plugins folder and see if it fixes the issue.
Instead, you can just rename the folder to something else. By doing this, WordPress will not recognize any of the plugin files within, which essentially deletes them from your website.
To do this, right-click on the plugins folder (or CMD+Click) and click on the Rename option.
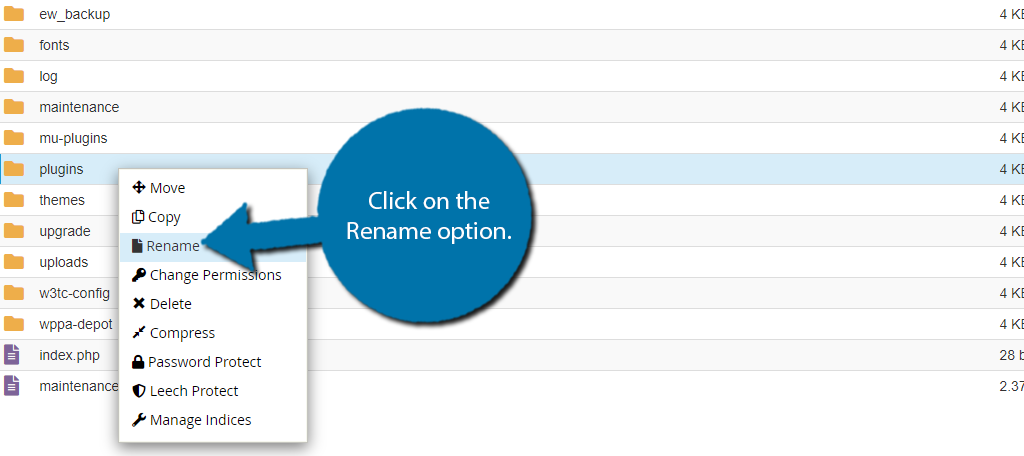
You don’t have to get creative here, so just add a 1 to the name to rename it “plugins1” and click on the “Rename File” button.
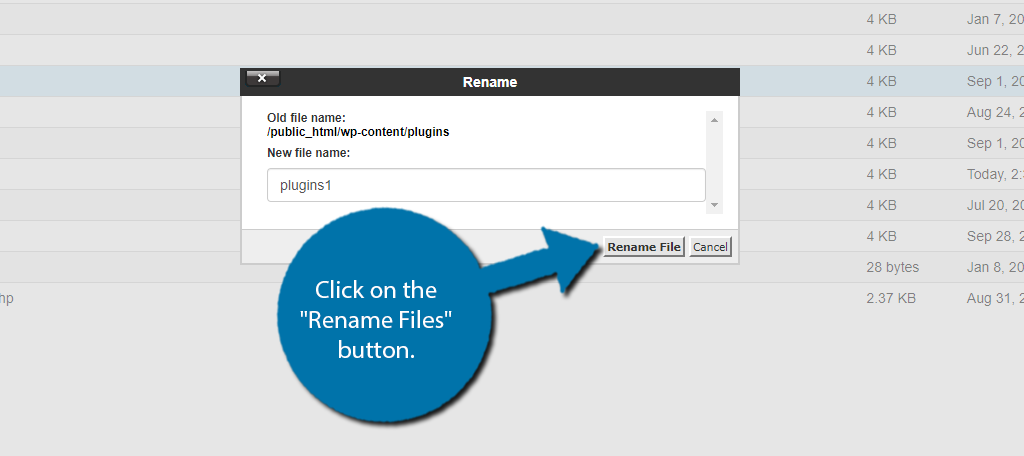
Once you make this change, reload your website to see if the critical error is still present. If it is not, the plugins were to blame, but this doesn’t actually tell you which one caused the issue. For that, check out the next step.
If the error is still present, then a plugin was not the cause. Try the next method to troubleshoot the problem.
Step 3: Determine What Plugin Is Causing the Error
Alright, now that we know the plugins are the issue, we need to restore the plugin folder to its original name. You will do this the same way that you did to change it. The folder must now be named, “plugins.”
Once that is fixed, enter the plugins folder. You’ll see a list of every plugin installed on your website (active or not). Each plugin has its own folder that contains its files.
Now, it’s very important to make a copy of the file before deleting it. This way you can quickly restore it if you find out that the plugin wasn’t the culprit. There are two ways to do this:
The first way is to individually copy each plugin folder like so:
- Right-click on the plugin folder
- Select the Copy option
- Enter a location to store the file
Alternatively, you can make a copy of the plugins folder and name it “plugins1” like before. That way, you have a copy of the folder and can just change its name again to restore it as the main folder.
In any event, once you have a copy in place, start deleting your plugins one at a time. After deleting each plugin, check to see if the critical error is gone. Once it goes away, you’ll know exactly what plugin was causing the error.
For now, the best course is to delete that plugin until you can figure out why it is causing the problem in the first place.
Method 3: Restore Your Website Using A Backup
If the previous two methods did not work, that means something more serious has happened or a file was recently changed. Think for a moment and see if you can recall if there was an update to the WordPress core files, theme, or plugins that occurred before the error.
If so, then you probably just want to revert those changes. Of course, it’s entirely possible that a file became corrupt.
The easiest way to do this is to restore your website before the critical error occurred by using a backup.
Now, if you don’t have a backup, this method isn’t for you. And once you fix this error, you should create a backup to ensure this is an option in the future.
There is a good chance that your web hosting company automatically backs up your website. You should double-check to see if they do this. If so, contact them to see if they can help you restore your website.
If you use other means to create a backup, like a backup plugin, then follow the steps from that plugin or service to restore your website before the error occurred.
This should get your website up and running again, but be careful not to update anything as that was likely the cause.
You may need to create a testing environment to determine exactly what is causing the critical error.
Method 4: Swap to a Default Theme
While plugins are the most likely cause, it is also possible for the problem to stem from your theme. Just like plugins, themes get updates on a regular basis and those updates can sometimes cause massive problems.
Especially if you have modified your theme significantly.
One way to quickly identify if the problem is your theme or not is to switch from the layout you are using to the default WordPress theme. Of course, if you are already using one, well it’s very unlikely that it is the WordPress theme causing the issue.
But you can still try swapping it if you think it is a possibility.
Step 1: Locate the Themes Folder
Your WordPress themes are stored in the Themes folder. I know, it’s very obvious. First, you need to locate this folder, which is in the same location as the Plugins folder from method 2. To do so:
- Log into your web hosting account and access the cPanel
- Select the File Manager option
- Enter the public_html directory
- Enter the wp-content folder
Once inside, locate the enter the Themes folder.
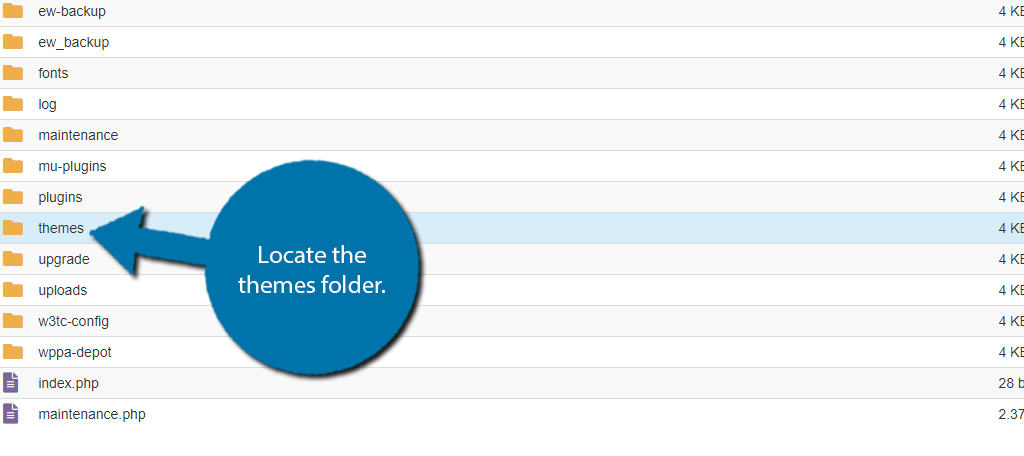
Step 2: Rename the Theme You Are Using
Similarly to plugins, you will see a full list of every theme you have installed. A normal website will probably have one or two installed (usually the one they use and the default theme).
Simply put, you are going to rename the theme you are currently using and instead use the default theme. Now, if you do not have a default theme, you need to add the files to this folder.
You can find the necessary files by downloading them from the WordPress.org repository. In this case, I recommend Twenty Twenty-Two.
Right-click on the theme you are using and select the Rename option. Again, just add a “1” to the name for simplicity.
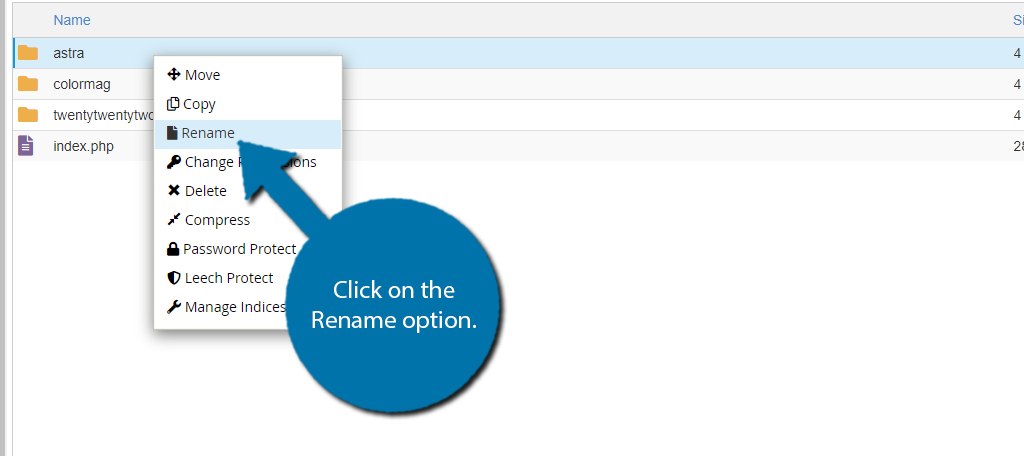
What this does is make WordPress revert to the default theme present in the Themes folder. In this case, it should be the Twenty Twenty-Two theme.
Step 3: Verify
At this point, you should reload your website to see if the critical error is still present. If it is, then your theme was not to blame. You can quickly rename the theme you were using to its original and then you can set it as the theme again.
If the error did get fixed, this means something within your theme is to blame. You will then need to begin troubleshooting your theme. If it is a premium theme, this is a great opportunity to take advantage of any support options it offers.
A theme support team will help you quickly identify the problem. If not, you will have to manually search through its files.
Of course, you could just delete the theme and switch to a new one. Odds are a theme that causes a critical error is very outdated. If this is the case, sticking with it will just lead to more errors down the road.
Method 5: Clear Your Website’s Cache
Websites should utilize caching to get the best performance possible. However, caching is not a flawless system. In reality, it’s possible that your cache is corrupt, which can lead to this error.
All you would need to do to fix this is clear your cache.
Most web hosts offer caching as part of the plan, which websites should take advantage of. The steps I will demonstrate can be different depending on your hosting environment.
Step 1: Find Your Caching Tool In cPanel
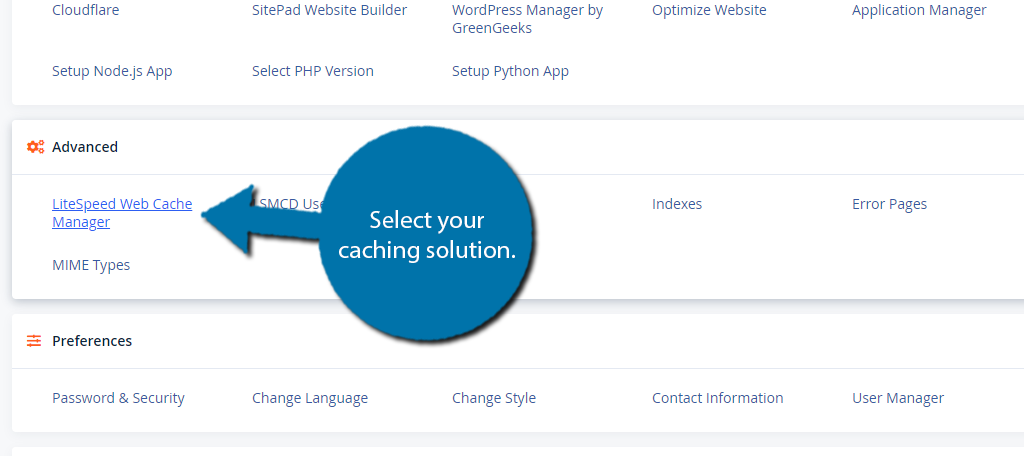
First, log into your web hosting account and access the cPanel. The location may vary, but in most cases, you will find your caching solution under the Advanced section.
In my case, the option is called LiteSpeed Web Cache Manager.
Step 2: Clear Your Cache
There’s really not much to it, your caching solution should have an option to clear or flush your cache on this screen.
In this case, I just need to click on the “Flush All” button.
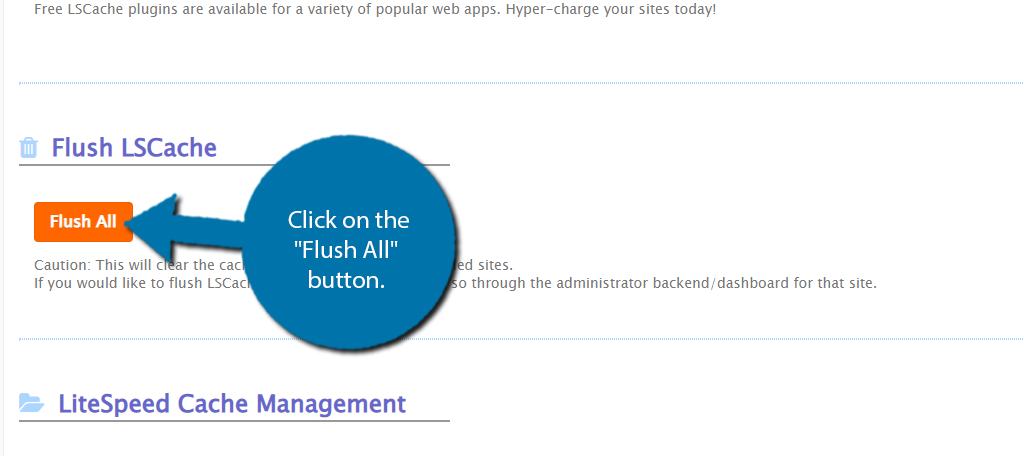
You’ll likely have a small confirmation pop-up. Just click yes, and your website’s cache will be cleared.
Step 3: Verify
Now, it’s time to check if your website is working correctly. If the critical error plaguing your website is gone, congrats. If not, you’ll need to try something else.
And don’t worry, your website’s cache will fix itself shortly after being cleared. This will ensure your content is delivered as fast as possible. Well, at least when your website starts working again.
Method 6: Upgrade Your PHP Version
WordPress is written in the PHP language. As such, you need to make sure your website is using the latest or at least a more recent version. At the time of writing this, it is acceptable to use PHP 7.3 and beyond.
However, if you are still clinging on to an older version, well, that could definitely be causing the error.
Thus, it’s time to check and upgrade your website’s PHP version.
Note: The only reason to use a much older version of PHP is if you are using a much older version of WordPress or some plugin that you don’t want to give up. Neither is recommended because they make your website vulnerable to hackers.
Step 1: Find the PHP Version Option in cPanel
You can easily change what version of PHP you are using. In fact, you can select any version to use, which can often cause more problems, but having the option is nice.
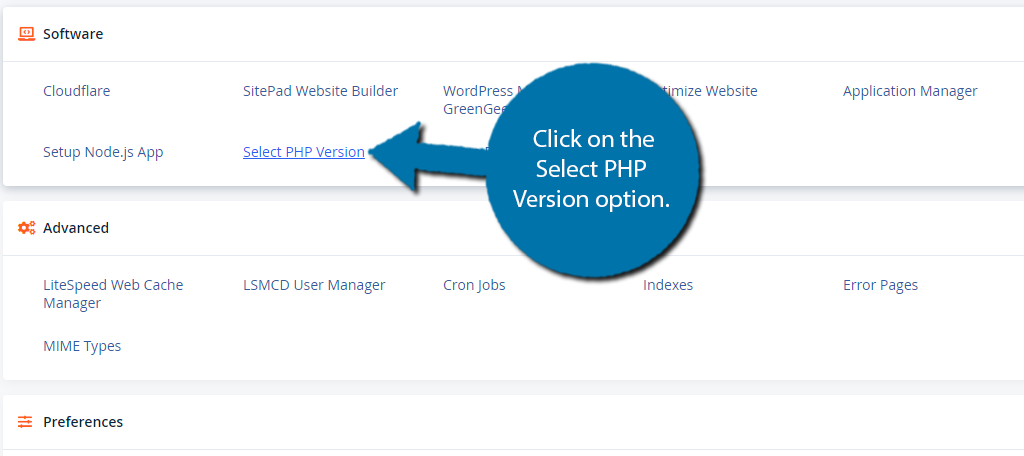
In this case, you should look in the Software section and select the Select PHP Version option.
Step 2: Choose A PHP Version
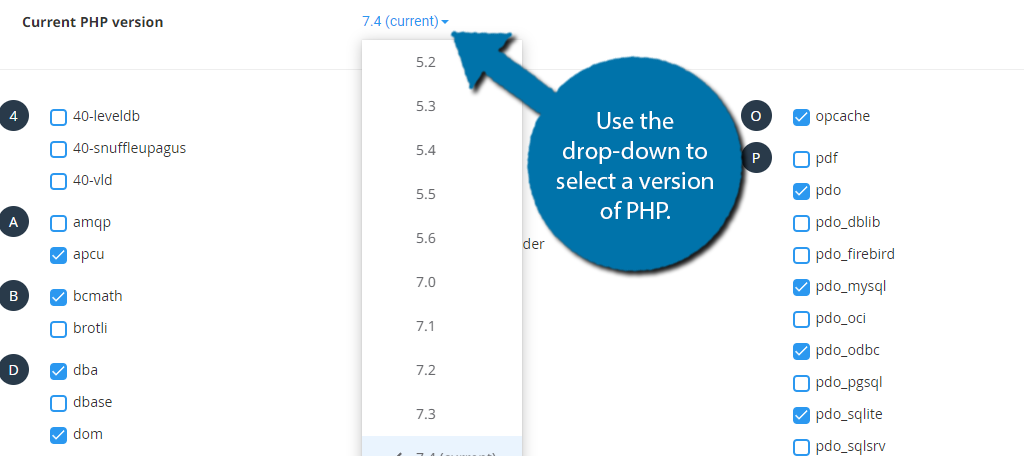
You will see your current PHP version at the top of the page. As long as it is above 7.3, you should be fine. If it is not, click on the current PHP option and use the drop-down list to select a newer version.
After you select the PHP version, you must click on the Set As Current option next to it.
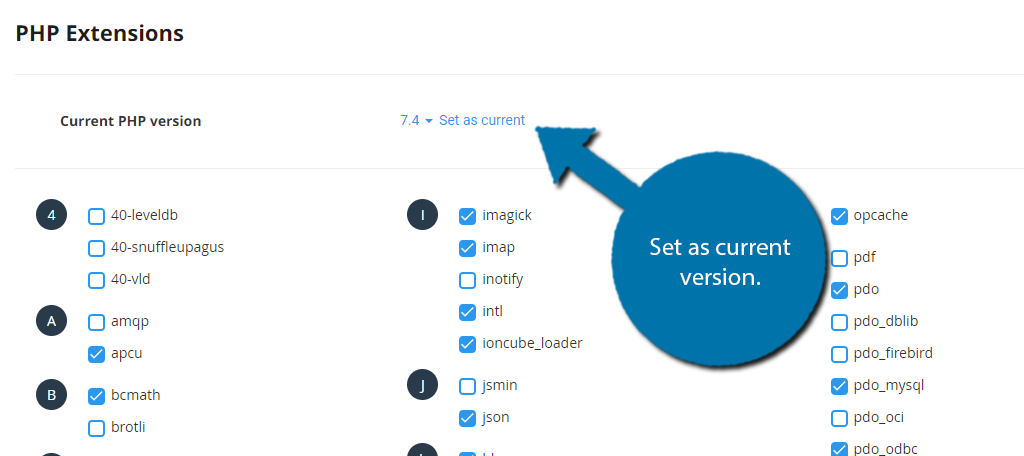
And that’s it, your PHP version has been updated.
Step 3: Verify
All that’s left to do is once again check to see if the critical error is still present on your website. If it is gone, your version of PHP was to blame, which is why you should not use an older version.
Even if the error was not fixed, it is highly recommended to use a newer version of PHP. However, you are free to change it to whatever you desire at this point, but be aware of the risks.
Method 7: Use Debug Mode to Find the Error
If you’ve reached this point, things are not looking great. Essentially, we’ve hit the point where the cause could be something uncommon and that makes it difficult to troubleshoot the problem with the information available.
To fix that, we are going to obtain more information by activating debug mode in WordPress.
This is a feature that will find errors on your website and point you in the right direction. You may even be wondering why I didn’t make this Method 1. Well, that information isn’t very useful if you don’t know what to look for.
And unfortunately, you do need to know how to read the debug mode to get the most out of it.
Now, debug mode is not on by default. You actually have to go into the wp-config.php file and add code to enable it. don’t get scared, it’s just copying and pasting a few lines.
Step 1: Enable Debug Mode
To enable debug mode, you will need to access the wp-config.php file. Once there, it’s a matter of copying and pasting some code.
To locate the wp-config.php file:
- Log into your web hosting account
- Click on the File Manager option
- Enter the public_html directory
Once inside, locate the wp-config.php file, right-click on it and select the Edit option.
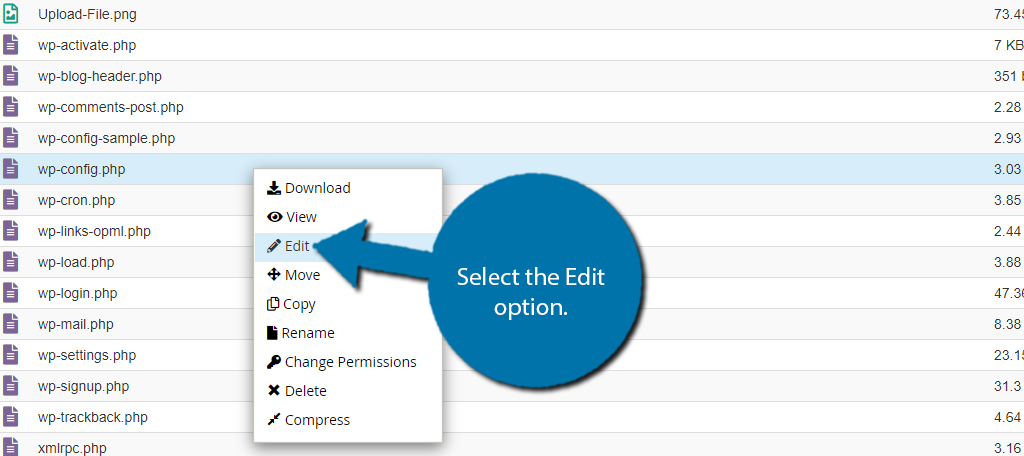
Once you access the file, simply copy and paste the following lines of code:
define( 'WP_DEBUG', true );
define( 'WP_DEBUG_DISPLAY', false );
define( 'WP_DEBUG_LOG', true );
With the code in place, click on the “Save Changes” button. This will enable debug mode and your website will generate a debug.log file, which is the debug report for your website.
Step 2: Locate And Read the Debug Report
Now we need to find that file. It is located within the wp-content folder.
To locate the debug.log file:
- Log into your web hosting account
- Click on the File Manager option
- Enter the public_html directory
- Enter the wp-content folder
- Inside it, you should spot a debug.log file
Note: WordPress creates this file automatically if it detects an issue. If nothing was detected, the file may not generate. If your website is experiencing a critical error, the log should always spawn.
Once, you find the file, open it to review the log. Now, every log will be completely unique because it is filled with the errors your website is experiencing. What you need to look at is what type of error it says, and what directory it is occurring in.
For instance, you might see an error coming from a plugin folder. Well, even if you are not sure what the error message is, you do know it is that specific plugin.
If the error was caused by a specific line of code added somewhere on your website, the debug file will tell you exactly which file it is and which line of code is causing the error.
Simply put, the debug mode will show you all of the problems on your WordPress site and help you apply fixes to them.
Step 3: Fix the Error With Your Web Hosting Company
Now, it’s a matter of tracking down that error and fixing it. Unfortunately, without the actual error, I can’t create a guide to help you.
However, you should already have a solution available to you: your web hosting company.
Since you have the debug.log file, you are in a position to receive troubleshooting help from your web host. Their support team should be able to help you identify and fix the problem to get your website back online.
Any web host worth its salt will have a live chat available 24/7. If you are having trouble contacting your web host when you are in need of support, it may be time to switch web hosts.
Fix the Critical Error On Your Website Quickly
One method I did not include was perhaps the simplest, which is to wait.
In many cases, a critical error can fix itself. However, having your website down until it does is not a good choice. For eCommerce sites that have a lot of activity, it could cost you thousands of dollars to have it down for multiple hours.
even blogs will suffer greatly from not being able to have visitors read the latest content.
Waiting is not a good option. Failing to fix the error quickly will have a serious impact on your website. And there is a chance that waiting won’t actually fix anything. Thus, it ends up being a waste of time.
If you take too long to fix it, your website’s ranking could suffer. After all, Google, or any search engine, does not want to recommend a website that visitors cannot access.
The bottom line is that you need to fix a critical error on your website ASAP!
Fix Your Critical Error Today
This guide demonstrates seven ways you can fix a critical error on your WordPress website. However, the truth is that we just covered the easiest and most utilized methods. It is possible something small and hard to find can be the issue.
This is why if all else fails, don’t hesitate to contact your web hosting company. They are ready to help and have multiple troubleshooting steps of their own. The worst thing you can do is nothing.
Always keep a backup of your website to restore it in the event of an error like this. It is by far the most useful tool a web developer can use, and they are easy to make.
So don’t wait another moment, fix critical errors the moment they pop up.
What was causing a critical error on your website? How difficult did you find it to track down the source of the error?

