Blogger is a good system for beginners. It’s free and comes with a few tools to help you get started. However, there is a reason why WordPress controls nearly 60% of the market share when it comes to content management systems: versatility.
This is one of the biggest reasons why so many migrate from Blogger to WordPress.
Today, I’m going to show you how to transfer from Blogger to WordPress without losing search engine rankings. It’s an easy process that will open a variety of doors to making it big on the Internet.
Keep in mind I am talking about WordPress from a self-hosted standpoint. Don’t confuse this with the free platform at WordPress.com, which has many of the same limitations as Blogger.
Why Convert Blogger to WordPress?
Don’t get me wrong, Blogger is a nice and stable system for creating websites. However, it’s extremely limited in terms of what you can do with the pages.
Blogger simply lacks the extensive customization you get with WordPress.
Some of the more prominent features of using this popular CMS include:
- Full control over the platform. Which means you can make coding changes, add tools and fully customize the experience according to your needs and wants.
- Monetizing the website. Blogger has quite a few restrictions in place that prevent making money. When you control your own WordPress website, you’re only limited by the imagination.
- Easier to market. When you sign up for a new account on Blogger, you’re using a subdomain on Google’s platform. So, a domain like “HealthyFoods” would appear as “HealthyFoods.blogspot.com” as the entire address. With your own website, it would simply be “HealthyFoods.com.” Which is easier to share and type for users.
- More than 55,000 plugins and tools. WordPress has a growing list of functional plugins, widgets and themes to design almost anything your heart desires.
Whether you want a simple blog or an extravagant eCommerce system, WordPress can do it all.
1. Setting Up Your Website
Before you can begin migrating, you need to set up a website. This involves finding a web host provider that is optimized for WordPress and has a strong system in place to accommodate your needs.
Get a Web Host
Hosting WordPress gives you access to everything without restrictions. Access to root directories, setting up multiple emails, unlimited disk space and much more are available with GreenGeeks web hosting.
We’ll even toss in a free domain name, which saves you a bit of money when starting up.
And since our platforms are backed by a 30-day money back guarantee, you don’t lose anything by giving the hosting a try.
The bottom line is hosting WordPress yourself gives you full and total control. If you want a special plugin to help you write content, you have the ability to install it.
Installing WordPress
After getting your hosting account set up, you need to install WordPress. You have two ways to do this: a) automatically with Softaculous, or b) a manual installation.
Either of these methods isn’t all that difficult. However, the manual installation is a bit more time-consuming in the long run.
If you’re new to self-hosting your website, I’d suggest using the automatic install. There is less of a chance something will go wrong and cuts a lot of time out of the process.
2. Export from Blogger
Exporting from Blogger is not all that difficult. It just takes a couple of steps and you’ll be ready to move the content.
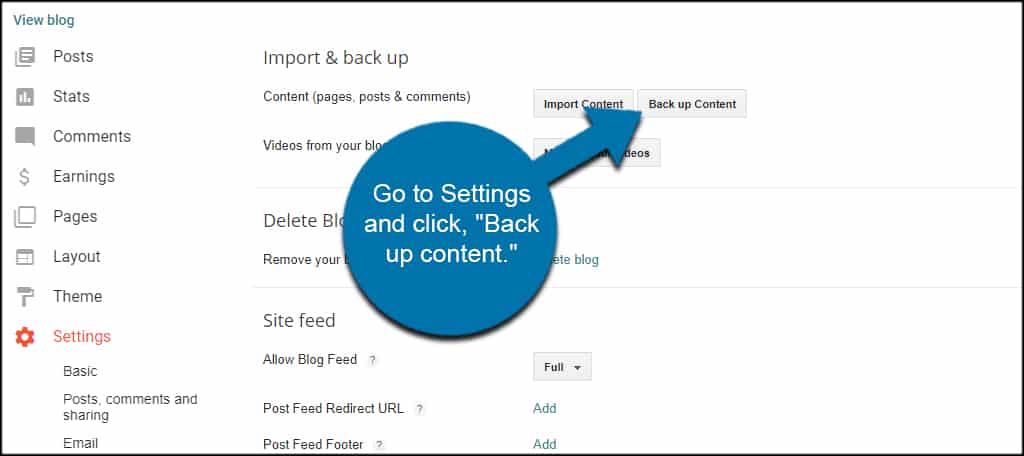
From your Blogger dashboard, go to Settings and click, “Back up content.”
This will open a new window for backing up the content from your Blogger site. Click, “Save to your computer.”
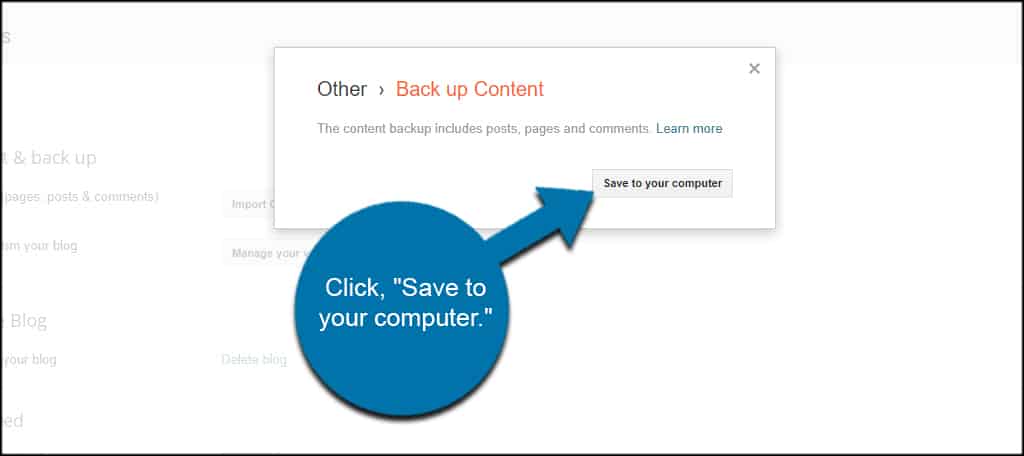
The file you’re saving is in XML format. You can find it in your downloads folder unless you have the option to change.
Personally, I find saving things like this to the desktop makes the process easier and faster. That way, I know exactly where the file is when uploading. But this is at your own discretion.
3. Import from Blogger to WordPress
Now that you have a hosting platform and WordPress installed, it’s time to move your content from Blogger to WordPress.
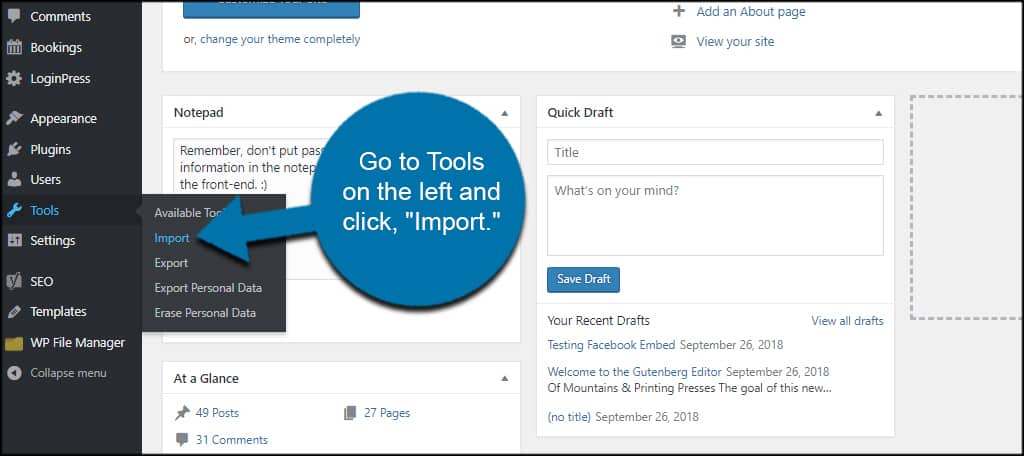
From your WordPress dashboard, go to Tools on the left and click, “Import.”
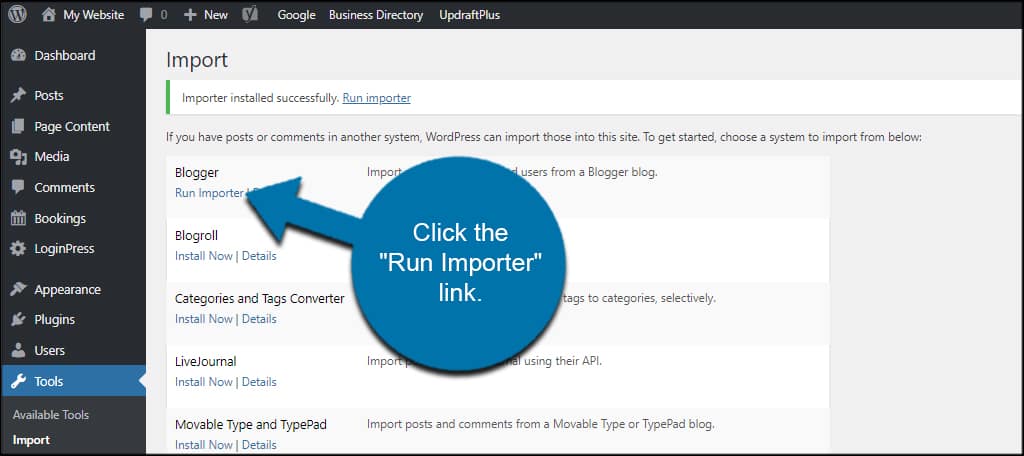
At the top of the list, you’ll see the option for Blogger. Click the “Install Now” link to add the importer for WordPress.
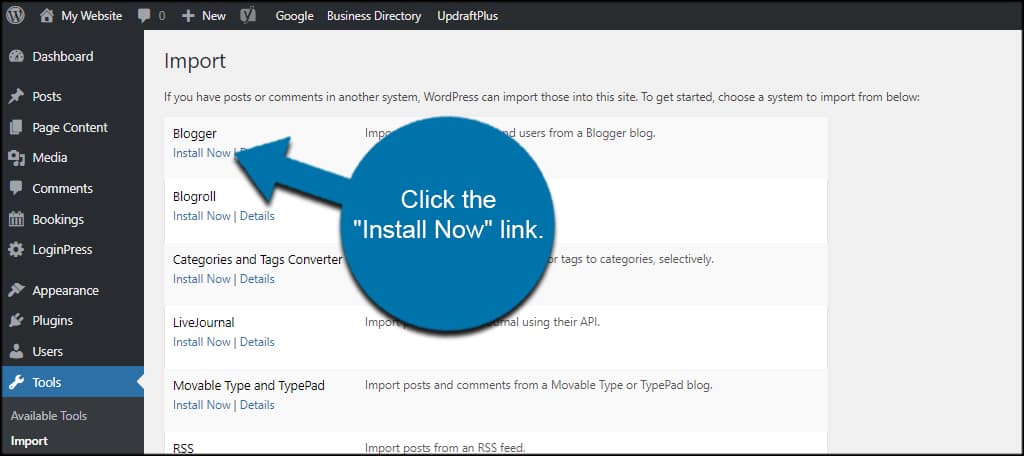
This will only take a second or two.
Once the installation is successful, click the “Run Importer” link.
Choose the Blogger file you exported earlier and click, “Update file and import.”
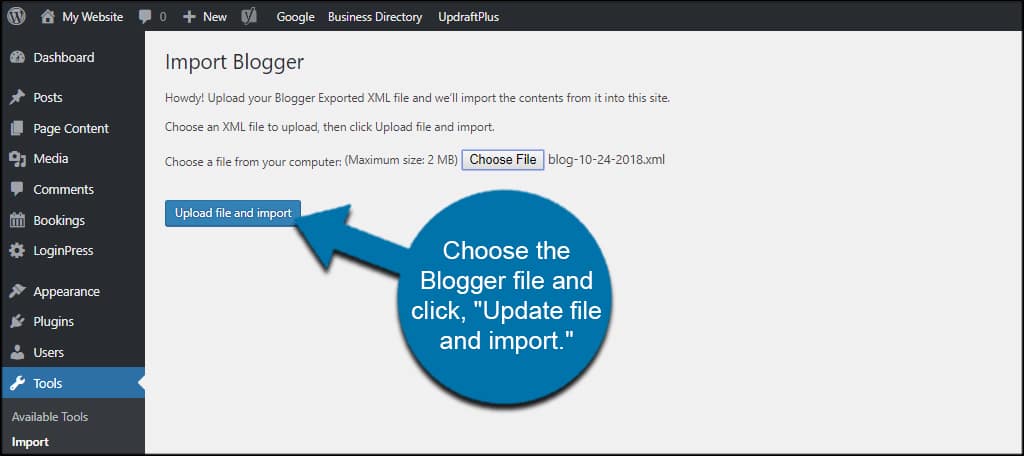
The system will then ask about assigning authors to the content. This will be up to you on how you want the content to show on the website.
Once you click “Submit,” the system will add content from Blogger to WordPress. Depending on how many posts you have, this may take a minute or two.
3. Adjust WordPress Permalinks
The last thing you will want to do is change the permalink structure for WordPress. This is for two reasons:
- It makes content more user and SEO friendly.
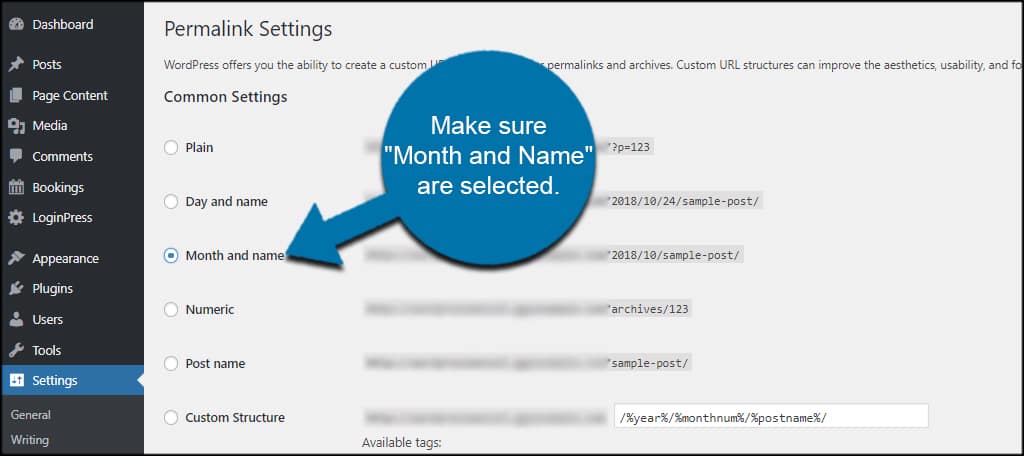
- Matches Blogger’s layout so you don’t lose traffic to the website.
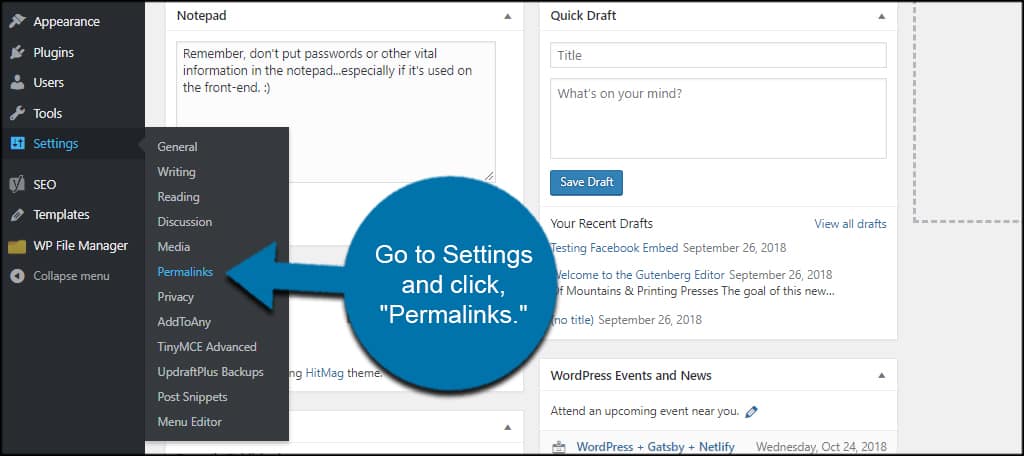
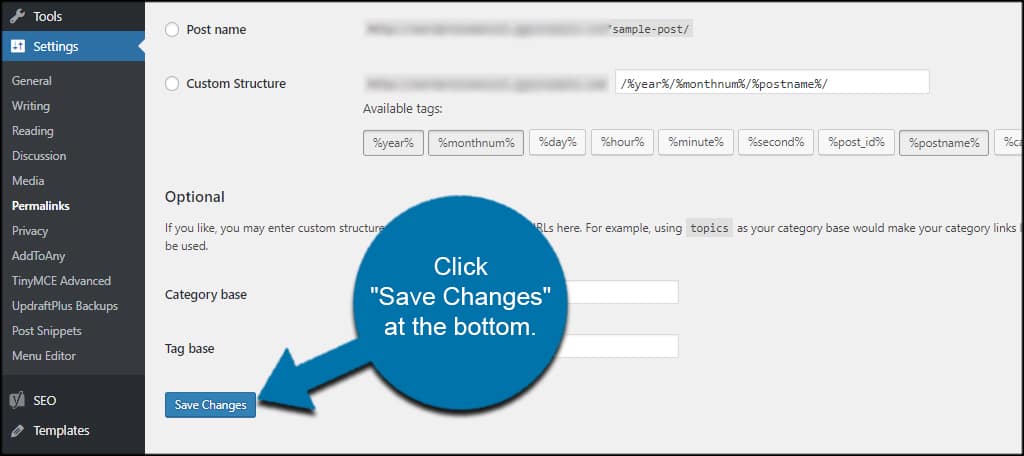
In WordPress, go to Settings and click, “Permalinks.”
Make sure “Month and Name” are selected.
Click “Save Changes” at the bottom of the screen.
Now, your site is up and ready for new features and content.
4. Change Custom Domain DNS Settings (optional)
If you have a custom domain name for your old Blogger account, you’ll need to change the DNS to reflect the new web host. Otherwise, website traffic will not find your content related to that domain name.
Think of it like moving to a new house. You need to submit a change of address form so you can get your mail or packages.
The steps for changing the DNS are different for each registrar on the Internet. The main point is to make sure you’re aiming the nameserver at your new web host.
After logging into you domain’s registrar, you’ll need to access the settings for DNS. It shouldn’t be all that difficult to find, really.
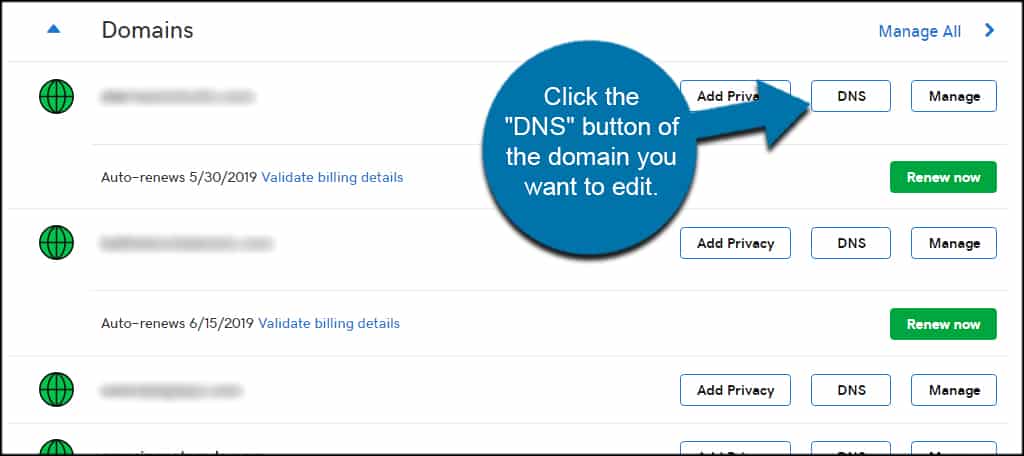
If your registrar has an obvious option for it, click the “DNS” button of the domain you want to edit.
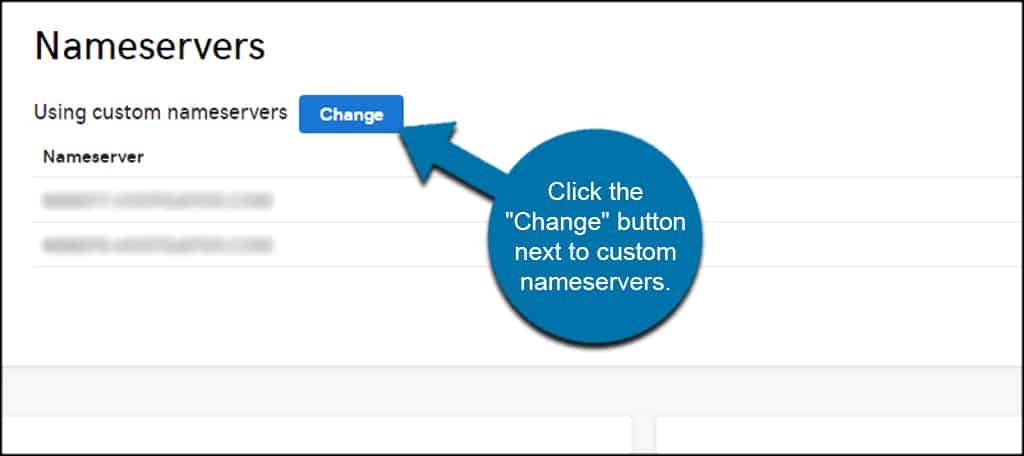
Click the “Change” button next to custom nameservers.
Make sure the type is set to custom and input your new nameservers. These are provided by your new web hosting company.
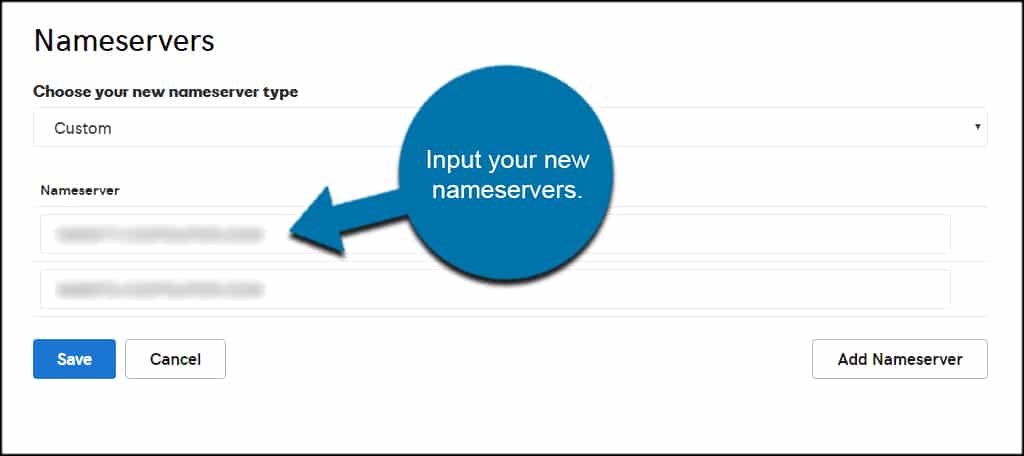
Click the save button at the bottom.
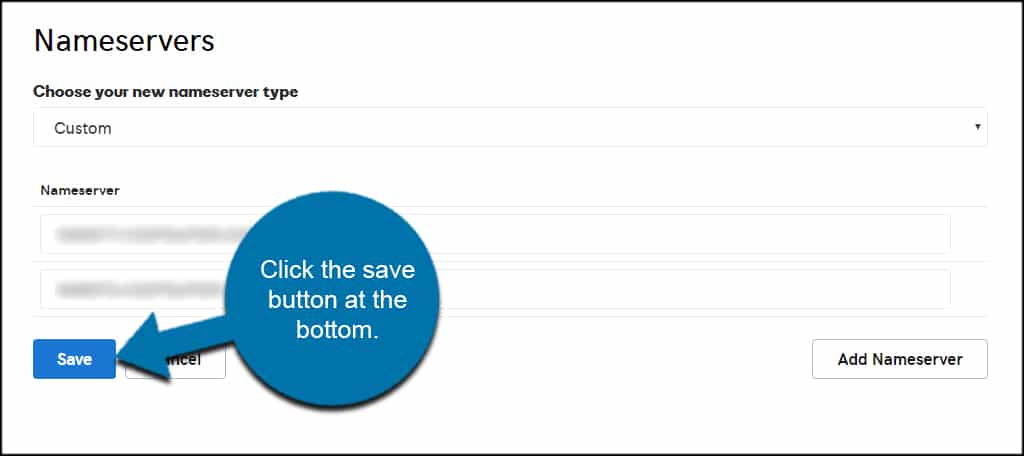
Depending on the registrar, it could take up to 24 hours before website traffic is routed to the new web host. But speaking from experience, I’ve never seen this process take longer than 10 minutes.
In some cases, traffic was sent to the new host in a matter of minutes.
5. Change Your RSS Feed (optional)
The last thing I would recommend doing in your Blogger account is to redirect your blogger feed.
You want to set it up so that it redirects to your new WordPress powered RSS feed. You can do that by visiting Settings > Other within your Blogger account.
Under the Site Feed section, put your new feed URL in the box marked, “Post Feed Redirect URL”.
You may also want to explore how to maximize your RSS feed in WordPress to get more from sharing. There’s a lot you can do there, and it may boost website traffic.
Welcome to a Whole New World
Moving from Blogger to WordPress opens the doors to a whole new level of possibilities. From amazing plugins and tools to elegant themes and layouts, even the most novice of users can create something simply spectacular.
Get more out of your content and explore some of the things WordPress can do to accentuate the website.

In case someone is looking for an automated tool to switch a website from Blogger to WordPress, I can suggest using cms2cms. It transfers the content in a fast and safe manner and keeps all the SEO preserved.
That’s actually a nice system. However, it seems a bit pricey for what I’d use it for. Thanks for the suggestion, though.
WordPress is hands down the best long-term solution for any serious blogger who wants to grow their site or build am online business.