When it comes to creating a unique look for your WordPress website, few tools have the functionality of SiteOrigin’s Page Builder. This plugin gives you control over the layout and capabilities of your posts and pages and is compatible with most of the themes available. In this tutorial, you’ll learn how to modify your posts and pages to create that perfect look for your site with SiteOrigin’s Page Builder.
Installing the Plugin

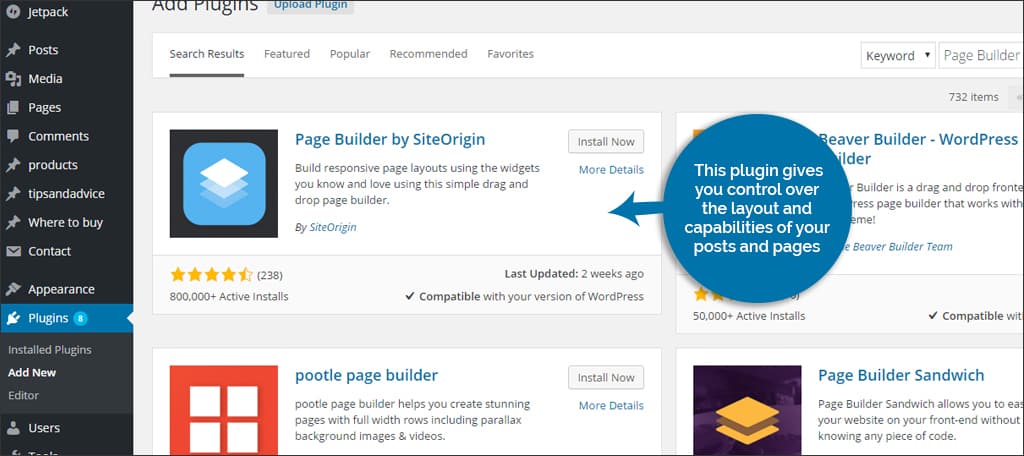
The first step is to install and activate the Page Builder plugin. This is quite simple to do and can be done by:
- Going into your “Plugins” section in the WordPress dashboard.
- Clicking the “Add New” button from the plugin screen.
- Searching for “Page Builder” in the search bar on the right.
- Clicking the “Install Now” button next to Page Builder by SiteOrigin.
- Clicking on the activation link once the plugin is installed.
What Does This Do?

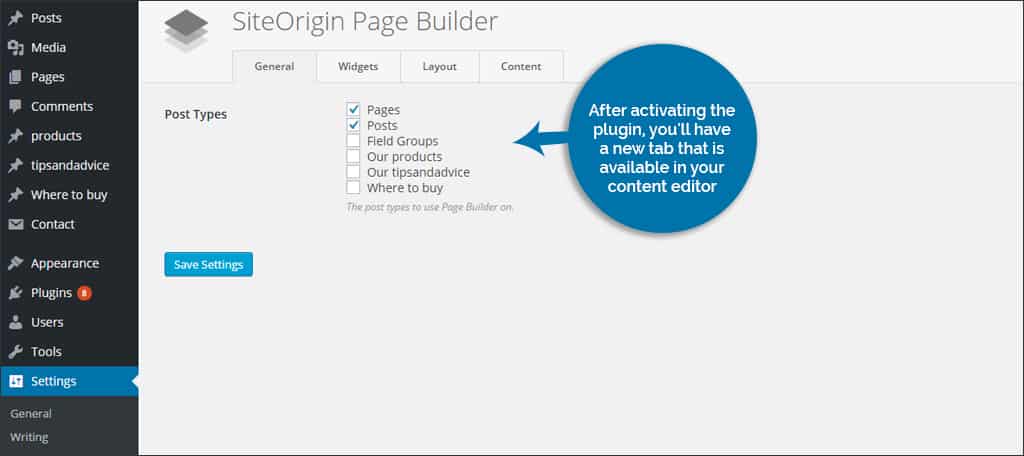
After activating the plugin, you’ll have a new tab that is available in your content editor. This is displayed for both pages and posts. You’ll also have a new function under your “Settings” section for Page Builder itself.
Page Builder Settings
In the “Settings” of WordPress, click on “Page Builder.” You will then see the screen for the new plugin. These are simple settings that will help you fine tune the site:
General Tab:
In this tab, you can control which parts of your site include the Page Builder editor. Any installed and supported content management plugin will be visible from here after the pages and posts.
Widgets Tab:
In this tab, you can control how widgets are displayed in the content you develop with Page Builder. You can even change the header size of the widget’s name to fit your design ideas.
Layout Tab:
Here, you can control the width, margins and responsive capabilities of the materials designed with this plugin. Many developers simply use the default settings, but this is completely up to you.
Content Tab:
This allows you to control whether pre-existing content is ported into the design tab of your editor. This can be incredibly useful when modifying posts and pages that already have content.
Tools of the Page Builder Editor
Until you’re comfortable with the capabilities of Page Builder, it may be best to start with a new post or page that you can delete afterwards. This will reduce the risks of deleting content you’ve already created.
Accessing the Page Builder

In your post or page content editor, there will be a new tab labeled: Page Builder. This will be next to “Visual” and “Text” views above where you write content. When you click this tab, you’ll see a variety of buttons such as “widget,” “row” and “prebuilt layout.”
Widget
When you click to add a widget, you’ll see every usable component you have installed. This will include everything from content to the widgets that are included in the Jetpack plugin. You may need to refer to a separate WordPress site builder tutorial for those plugins and additions that are available.
Row
This command allows you to insert a row as well as the number of columns you want to place. This can be ideal when you want to show a series of things such as other pages or posts in a grid layout.
Prebuilt Layout
Page Builder comes with a variety of prebuilt design layouts to choose from. These could be helpful when designing a home page or giving your posts an added flare.
Porting Your Content
Adding content is done through using the “Post Content” widget available from Page Builder itself. This widget will display the content from the post or page you’re currently working on. If you have different rows or columns installed, you can drag-and-drop the content anywhere you want.
Adding Widgets
Select the row or column you want to insert a widget. Click the “Add Widget” button and find the one you want to use. Once you click on that particular widget, it will be added to the post or page.
Changing Attributes
Many widgets and controls within Page Builder give you control over the attributes of the component. For example, you could add background colors, images, borders, add custom CSS or even alter the padding between widgets. This is especially useful if you want to take the customization of prebuilt layouts even further or just to control your own design.
NOTE:
It’s important to note that deleting content or widgets in Page Builder will not delete them from your actual page or post. If you decide to delete what you’ve created, you’ll have to remove it in either the “Text” or “Visual” editor.
SiteOrigin’s Page Builder offers a robust method to create everything from the home page to adding style to your pages and posts. Since this plugin is free to use, you have nothing to lose but time exploring what it can do for your site. Take control of your web pages, and offer a unique experience through Page Builder.
What kind of platform do you use to build your pages? Do you settle for default themes, or do you enhance the experience with plugins?

I finally understand how to start using Page Builder. No other tutorial that I found gave me this basic information. I can’t thank you enough!
Your welcome Bonnie 🙂
Hi Josh,
First of all great tutorial!
I have a doubt, can I create a single layout and then apply it to ALL of my website articles? I have more than 2000 articles so making one by one it’s impossible.
Look forward to hear from you,
Mónica
I am confused! I just want to add a content/text block beneath the header image & I don’t see an option to do this. I’m using the Lawyer Zone theme & it comes with the SiteOrigin page builder plug-in, but I’m finding it rather difficult to use when I assumed it’d be intuitive. Any help would be greatly appreciated!