When it comes to analytical tools, there is nothing better than Google Analytics. And it has a lot more to it than just tracking traffic. Google Analytics also has event-tracking capabilities that you can use on your WordPress site.
This feature allows you to track various stats related to an event, such as the number of users who click on or scroll past it. Understanding user behavior can help you build a better campaign using images, links, and more.
The same logic can be applied to showing ads on your site. Finding the best location to place an ad banner is almost identical to finding the best location to advertise an upcoming event. As such, understanding user behavior is vital for success.
Today, I will demonstrate how you can use Google Analytics event tracking in WordPress with Goal Tracker.
Why Is Event Tracking Important?
Understanding how users interact with elements on your site is incredibly important.
This insight gives you the information you need to build pages that can effectively target your audience. This means finding the best location for an event announcement to be placed and understanding how you can attract a user’s attention to it.
If this sounds familiar it is because it is identical to how any site approaches ad placement.
You want your ads in a prominent location that users will see and are likely to click on, which can help you earn more money from them. This is also true for any online stores showing off a product or service they want to sell.
It’s even true for getting users to sign up for an email newsletter. Google Analytics can help give you a deeper insight into user behavior and boost engagement on your site. That said, having other tools that offer A/B testing and site heatmaps are also great choices.
How to Track Events with Goal Tracker
Goal Tracker is a no-code plugin that helps you track activity within your WordPress site. The main features allow you to track URL links, email links, clicks, and much more. Tracking these, and other events helps you make the best choices when designing pages.
Step 1: Install Goal Tracker
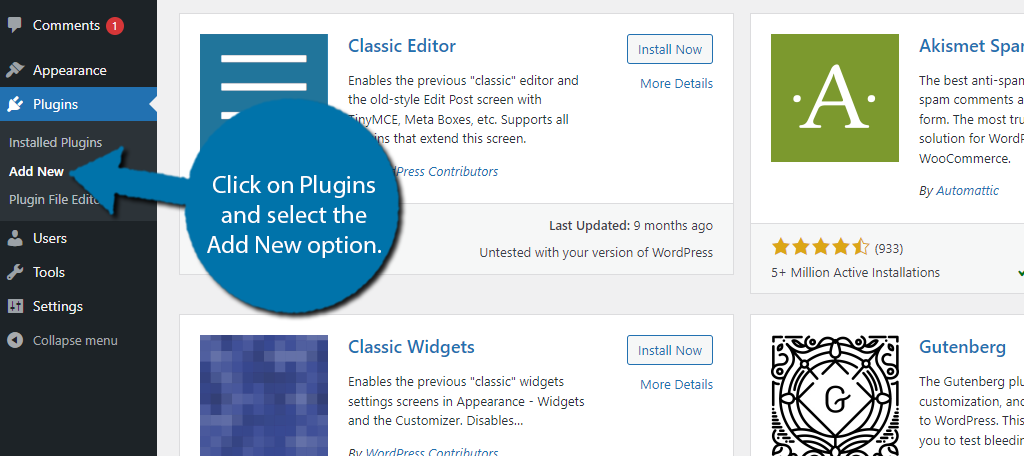
Let’s start by clicking on Plugins and selecting the Add New option on the left-hand admin panel.
Search for Goal Tracker in the available search box. This will pull up additional plugins that you may find helpful.
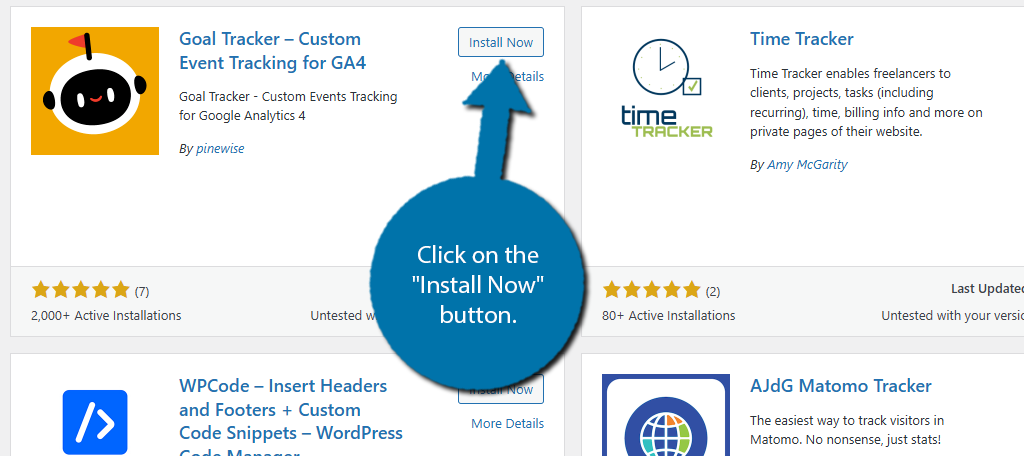
Scroll down until you find the Goal Tracker plugin and click on the “Install Now” button and activate the plugin for use.
Upon activation, you will be asked if you want to opt in for email notifications related to updates for this plugin. Feel free to skip or accept as it has no impact on using the plugin.
Step 2: Connect With Google Analytics
This tutorial already assumes you have a Google Analytics account. The first step to using this plugin is to connect your Google Analytics account with Goal Tracker. Luckily, this is pretty simple to do.
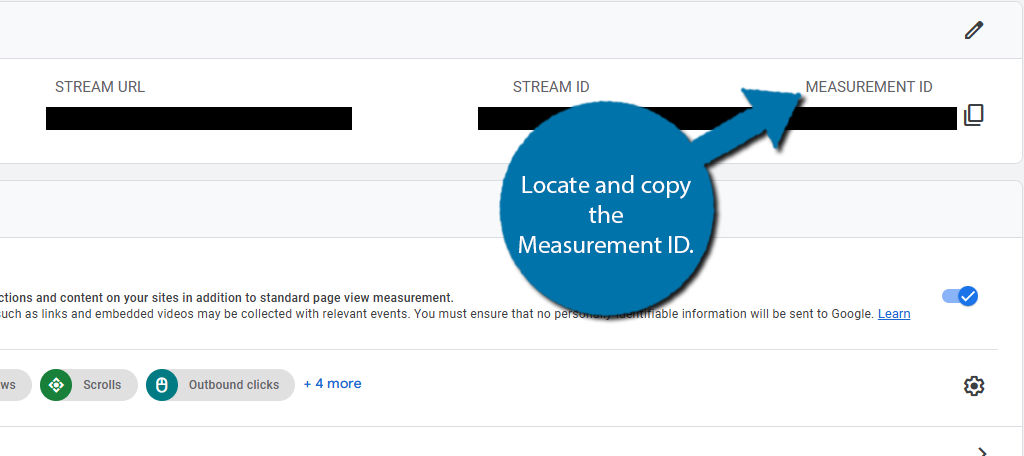
All you will need to do is sign into Google Analytics and locate your measurement ID. As long as you have set up an account for your site, you should see it upon logging into Google Analytics.
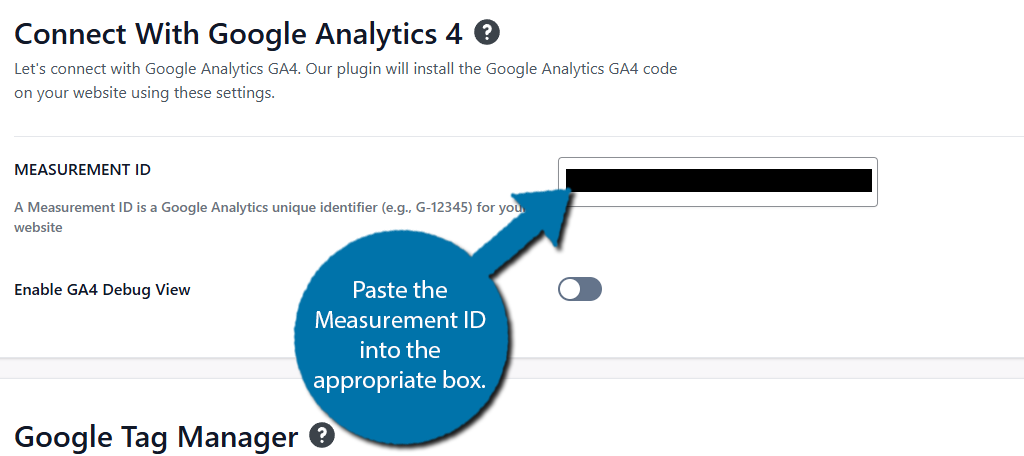
Once you have copied the measurement ID, go back to WordPress and click on Goal Tracker. Select the Goal Tracker option.
Scroll down to find the Connect With Google Analytics 4 section. Paste the Measurement ID into the appropriate box.
With this done, all you need to do is scroll down to the bottom and click on the “Save” button to save the changes you have made.
Step 3: Enable Link Event Tracking
Now that your plugin is connected with Google Analytics, you need to set up what events it will track. This tutorial will focus on the free version of the plugin, but be aware that there are many additional features locked behind the Pro version.
Return to the Goal Tracker settings where you entered the Measurement ID. If you scroll down, you will see the Custom Events Tracking section. Here is where you can enable the event-tracking capabilities of the plugin.
Simply use the switch to enable these features.
There is also an option that tells the plugin to not track admin users. This helps you ensure you are only viewing data from real users to help get the best results. The rest of the options are for Pro users.
Scroll down and click on the “Save” button to save the changes you have made.
Step 4: Setting Up Event Tracking
Next, let’s set up other types of Event tracking. To set this up, click on the Goal Tracker option. The default screen is for Click Tracking, but you can choose other options, which we will explore.
Simply put, Click Tracking is exactly as it sounds. When a user clicks somewhere on your site, you can track that. There are two different ways to add event tracking in this plugin. The first is to create a custom event and the second is to use a recommended event.
Recommended events are the most common types of events that most sites want to track. Like when a user clicks on the Cart button. Custom events are exactly what they sound like, you select the criteria for the event to be tracked.
Let’s focus on adding our own event. To begin, click on the “Add Event” button.
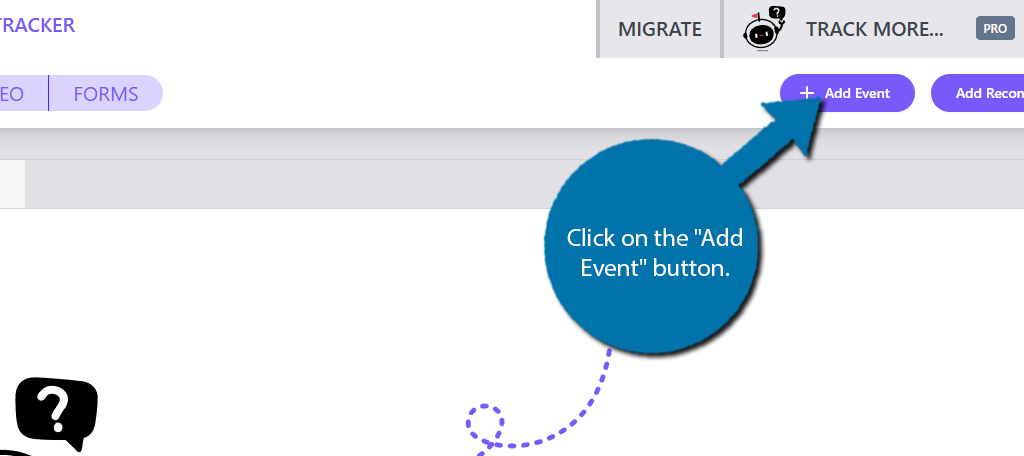
This will open up a small window. First, enter the name of the event you are creating. Something simple like click tracking will suffice. Next, enter the Class or ID selector. This allows you to track the specific element when clicked by a user.
Finally, you can enter a key and value option. This allows you to name what you are tracking. For example, if someone is clicking the “Buy Now” button on a $100 product, you could choose to add the price as the value.
There’s no right or wrong way to go about it, so the best advice I can give you is to play around with it and focus on the naming convention later on. Be sure to save the changes.
You can repeat this as many times as necessary.
The rest of the tracking options work identically to this in terms of setup, but they cover different events. So let’s cover what they track.
Visibility tracking will track user behavior when a specific element comes into the display range. For example, you could track what a user does when a newsletter sign-up form comes into view.
WooCommerce tracking is a Pro-only feature, but as you may guess, it tracks everything related to WooCommerce. This includes product tracking, cart tracking, checkout tracking, and more.
There are also Pro-tracking options for video content. That way you can easily track how users behave with your video content, but if you are already using YouTube, you’ll have access to these analytics.
Finally, there is Pro tracking for forms created with Contact Form 7. You can track how users interact with the forms, submissions, and everything else you can imagine.
And that covers everything that the plugin offers.
How Can I Use Event Tracking Analytics?
Obtaining the analytical data is really only half of the work. Once you get the data, you need to be able to understand what it means and come up with a strategy that allows you to implement what you have learned from it.
For example, let’s say you set up visibility tracking for a newsletter signup form. This allows you to see how users engage with your site when the form comes into view. You’ll need to decipher why the users behave the way they do.
For example, let’s say you notice someone starts filling it out, then stops, scrolls down, and decides to not finish it. What does this mean? Well, there’s not one answer. One explanation was the user started and then saw how long it is to fill in and gave up.
Another was that they saw a piece of information they did not wish to provide and stopped.
What can you do with this information?
Well, you can try shortening the form to make it quicker to sign up. Or, if you notice a lot of users stopping after being asked for a specific piece of information, you may want to stop asking them for that info or make it optional.
This is just one scenario. You’ll need to research what you are tracking and put yourself in the shoes of users.
Start Event Tracking with Google Analytics Today
As you can see, there are a ton of different ways to perform event tracking with Google Analytics. Doing so can give you a better insight into why users behave the way they do and how you can improve your site based on user data.
That said, it is not always easy to understand why users behave the way they do. As such, make sure you collect a lot of data before you make any significant changes. Sometimes users just get distracted or have to abruptly stop.
As such, the larger the sample size you have, the better off your analysis will be.
What kind of events do you track on your website? How do you read into user behavior?
Can you please post an updated tutorial for analytics 4?
We sure can. I’ll add that to our list of future articles. Thank you for the suggestion. 🙂