Is your email constantly bombarded by spam messages? If you are like me, the answer to that question is a resounding yes. Luckily, there are ways to reduce the amount of spam you receive, and one of the easiest ways is to set up an email filter in cPanel.
This feature gives you the ability to specify certain phrases and scan emails if they contain them. For example, let’s say you entered the term “Buy Now” as the filter term. This would mean any email that contains these words would be filtered as spam.
This can be far more effective than just marking an email as spam because the sender can just use a different email account to send it, but with a filter, it will be blocked as long as it includes the filter term.
Today, I will demonstrate how you can enable email filtering on the cPanel.
What Can Email Filtering Do?
While I mentioned that you can use it to filter out terms to mark as spam, that’s really just one use for it.
Another possibility is to redirect emails to another address. For example, let’s say you put a product or service you offer as the filter term. You could redirect or forward those emails to a specialist so they can get the best result.
This is something a lot of businesses do. Think about it for a second, how many businesses have a single support email that is meant to encompass an entire site? Most do because it is easier for users to find a single email address.
However, it’s a nightmare for anyone who needs to shift through those emails as the range of questions can vary wildly. An email filter can help make going through those emails far more manageable.
Email Filtering Can Sometimes Backfire
At the start, I gave a simple example of using “Buy Now” as the filter term, but what happens if your website actually has a “Buy Now” button and you receive an email to inform you that it isn’t working?
Well, the filter would send it to spam, trash, or whatever you told it to. Thus, you never see that critical information.
As such, you really need to use a lot of care to select terms that won’t come from legitimate messages you want to see. As such, a great tactic that can help you escape this pitfall is to make a dedicated folder to send emails to for specific terms.
Thus, instead of sending everything to the spam folder or trash bin, it will be in its own folder that you can review to ensure that the filter is working properly. It is best to avoid using common terms that could cause problems.
Enabling Email Account Filtering
This feature is for email accounts you have created for your domain. You can enable and configure Email Filtering in the cPanel from your web hosting account.
The process is very simple, but understanding all of the possibilities can take some time.
Step 1: Access Email Filters
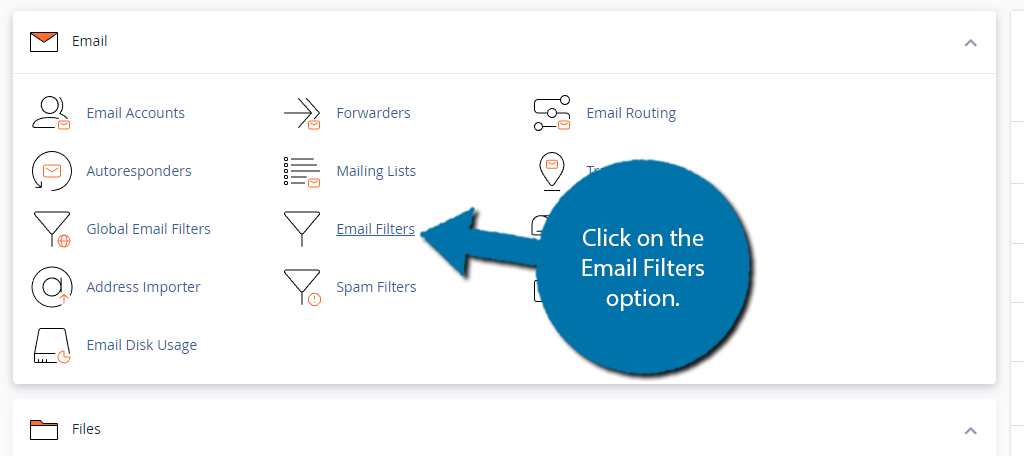
The first thing you need to do is locate the Email Filters area in the cPanel. Start by logging into your web hosting account and accessing the cPanel. Once inside, at the very top, you should see the Email section.
Here, you can find all of the options related to cPanel emails. Click on the Email Filters option.

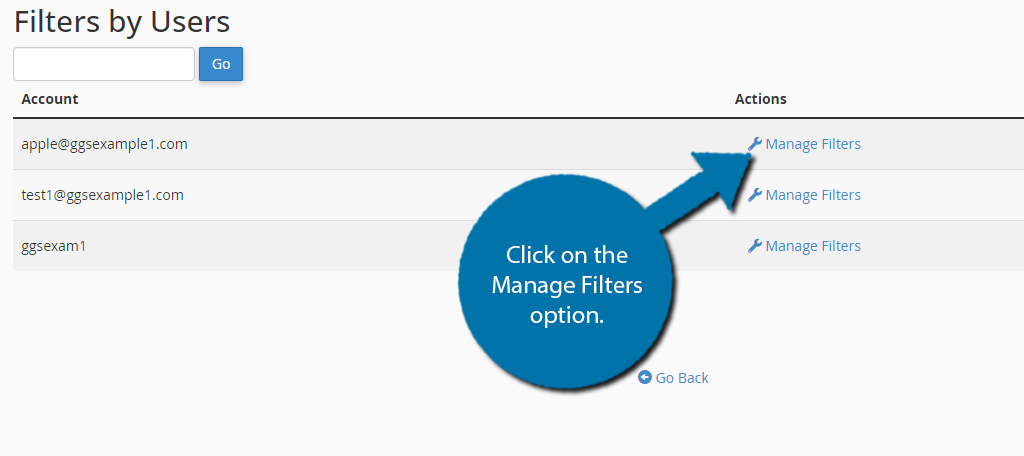
Once inside, you will find a list of the current email accounts you have created. Locate the email account that you want to add the filter to and click on the Manage Filters option next to it.
If you are having trouble finding the email address, you can use the search function to search for specific accounts.

Step 2: Create A New Filter
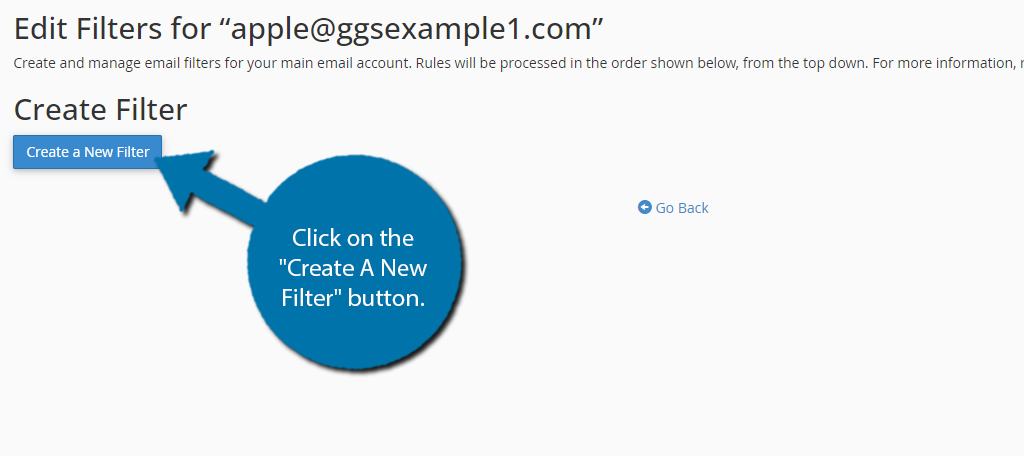
This Email Filter area should be blank, as you have not created any filters yet. Click on the “Create A New Filter” button.

In this next screen, you will set the attributes of this new particular filter. You’ll need to edit:
- Filter Name
This needs to be a unique name for the filter. For example, you can create a filter named “Bad Language” and filter out profanity. - Rules
The rules of the filter include elements such as from, to, body, and other email components. So, if you wanted to filter out bad words, you would set it to “Body” and “Contains” and then place the word to scan for. - Actions
This is the action the filtering system takes if the rules are broken. For this example, I am setting it to “Discard Message.” However, there are other options available depending on your objective for the filter such as redirecting to a different email account.
Once you have your filter ready, click on the “Create” button.

NOTE: If you want to add more rules to the filter, you can add or remove them with the “+” and “-” buttons on the right. In this example, I could enter an entire list of profanity for the email account and delete the message if any of the words are present.
Step 3: Understanding Rules & Actions
As you can see, it is rather simple to create a filter. But you may have noticed that you have a lot of options at your disposal when exploring the drop-down menus. So, let’s take a moment to cover what is available.
The cPanel has all of this information with additional examples available on their site. It is a great reference and what we used to create the following lists.
Rules
Let’s start with the Rules. There are two drop-down menus that you can use. The first is what part of the email the filter should scan.
These options include:
- From: The email sender’s address.
- Subject: The email’s subject line.
- To: The email address to which the was sent to.
- Any Recipient: Any recipient of the email.
- Reply: The email address at which the sender receives replies.
- Body: The email’s content.
- Any Header: Any part of the email’s header.
- Has Not Been Previously Delivered: Examines emails that have not been delivered to the recipient.
- Is an Error Message: Examines emails sent from an auto-response system.
- List ID: A unique identifier for a mailing list.
- Spam Status: Whether Apache SpamAssassin™ marked the message as spam. The Spam Status line begins with Yes or No.
- Spam Bar: The content of the Spam Bar header that Apache SpamAssassin generated for this message. The more plus signs (+) that Apache SpamAssassin assigns to a message, the greater the likelihood that the system marks the message as spam.
- Spam Score: The total number of plus signs (+) in the Spam Bar value, expressed as an integer.
The second drop-down menu allows you to select the Operators. These allow you to set the actual criteria the rule must follow when scanning the email. Most are self-explanatory, but let’s cover them here.
- equals: The message exactly matches a defined string.
- matches regex: The message matches a regular expression that you define.
- contains: The message is a string that you define.
- does not contain: The message does not contain the defined string.
- begins with: The message begins with the defined string.
- ends with: The message ends with the defined string.
- does not begin: The message does not begin with the defined string.
- does not end with: The message does not end with the defined string.
- does not match: The message does not exactly match the defined string.
So, as a simple example, if you entered “Buy Now” as the term filter and selected “Body” and “equals” as the rule, the Email Filter would scan the body portion of the email for “Buy Now.” If it finds an exact match, that email will be filtered by the action you select.
Naturally, you can select as many rules as you want. The more complicated the rule, the more likely you are to avoid blocking real emails.
Actions
Now that we understand this let’s take a look at the actions you can select.
- Discard Message: The system discards the incoming message with no failure notice.
- Redirect to email: The system forwards the message to another email address that you specify.
- Fail with message: The system discards the message and automatically send a failure notice to the sender.
- Stop Processing Rules: The system stops performing further actions or applying any remaining filters on this message.
- Deliver to folder: The system delivers the message to a specified folder.
- Pipe to a program: The system sends the incoming message to a specified program.
You may only select a single action for each email filter you create in the cPanel. Until you are comfortable and fully understand how these rules and actions behave, I recommend avoiding the Discard Message action.
This will avoid a situation where emails are being deleted due to a mistake in the filter. I would strongly recommend sending the emails to a folder so you can review if it is working as intended, then switch to the Discard Message action if it is.
Get Control Over Your Email by Adding A cPanel Filter
As you can see, the Email Filter section of the cPanel gives you complete control over what emails you receive. This can help you sort emails by department or improve spam detection. It just depends on how creative you are with the rules.
With this said, I need to mention that it is very possible to create a filter that does not work as intended. As such, take caution when creating the filters to avoid deleting emails that are important.
I hope you found this tutorial helpful in learning how to set up an email filter in the cPanel.
What kind of email filter did you create in the cPanel? Have the filters helped reduce spam?


Hi there,
I’d like to know if there is a solution for filtering out a long list of words. For example, I have one email that gets spammed relentlessly. There are about 150 keywords +/- that are common spam words I’d like to filter out. There must be a way to enter a batch of words without having to do it word-by-word. FYI, I already have my general spam settings quite high (I think I have it set to delete messages with a spam score of 4 or greater).
This will depend on the email provider you use. You will want to set your Spam settings according to how they tell you.