Today, I’m going to talk about how to set up Google Tag Manager and where to find your Google Tag Manager ID. If you use a lot of tracking tools on your website, a tag manager is an essential time-saver.
But before we get into the specifics of the Google Tag Manager ID, let’s back up and talk about tags.
What Is a Tag?
A “Tag” is another name for website tracking tool code. You’re probably using at least one tracking tool on your website. For instance, Google Analytics is a tracking tool. Facebook has a tracking tool called “Facebook Pixel.” Website user analytic—or “heatmap”—programs like CrazyEgg are tracking tools.
In most cases, to use tracking tools, you have to insert a bit of code into your pages. People who work in marketing often call those bits of code “tags.” So when we talk about tags, that’s what we’re talking about. Bits of code (or tiny image files called “pixels”) that track some kind of website activity.
These elements track page loads, clicks, form submissions, and just about anything else a visitor can do on your site. When a visitor lands on your website, your tracking codes, or tags, are loaded, and the visitor’s actions are tracked.
Adding a single tag to your site is easy, and it only has to be done once. But if you want to use multiple tracking tools, you’ll have to add more code to your site. And later on down the line, you may have to modify or remove existing tags.
To maintain everything correctly, you’ll benefit from using some sort of tag management system.
What Is Tag Management?
A tag manager centralizes your tags in one place. No need to go into your site and figure out where certain tags are used. They’re all in the tag manager. Make your update there, and the new or modified tags appear right where they need to be on your site.
How does it do that? First, you enter the tags from your website into the tag manager in a “container.” The tag manager then creates the code or tag for the container, and you add that to your site.
Then, you can remove all of the other tags from your website, leaving just the tag manager container tag. The tag manager code pulls all of your tags from the tag manager and inserts them into your site.
What Is a Container Tag?
Tag Manager uses “containers,” so you can set up different groups of tags. That’s helpful if you manage multiple sites, or want to use different tags on different parts of a single site. Each container has a unique ID, and the code for the container is the container “tag.”
The important thing to remember is when we talk about “tags,” we’re talking about a few lines of Javascript code.
How to Set Up a Google Tag Manager Account
If you don’t have a Tag Manager account yet, you can set one up in a couple of minutes.
Log in to your Google account (Gmail, Analytics, or any other Google account) and go to the Tag Manager page.
Click the “Start for free” button.
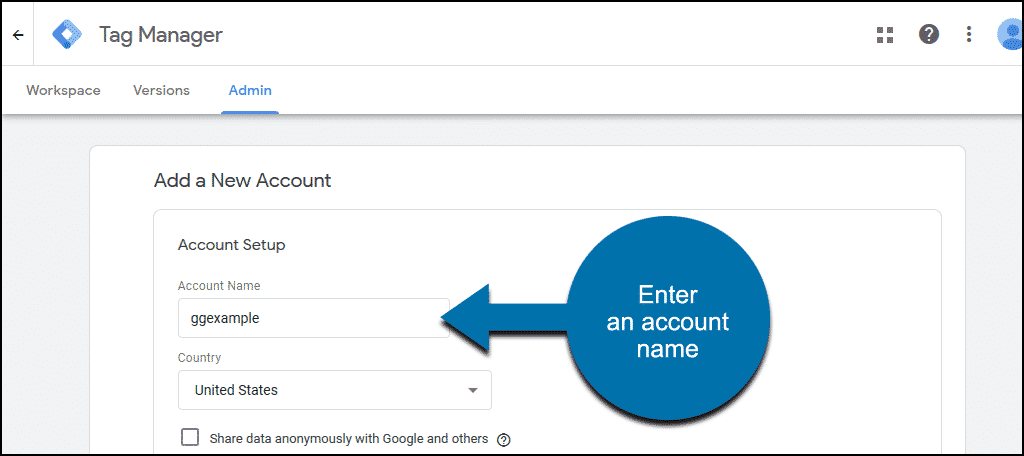
Enter an account name. That can be anything—for example, the name of your site.
Next, you’ll create your first tag container.
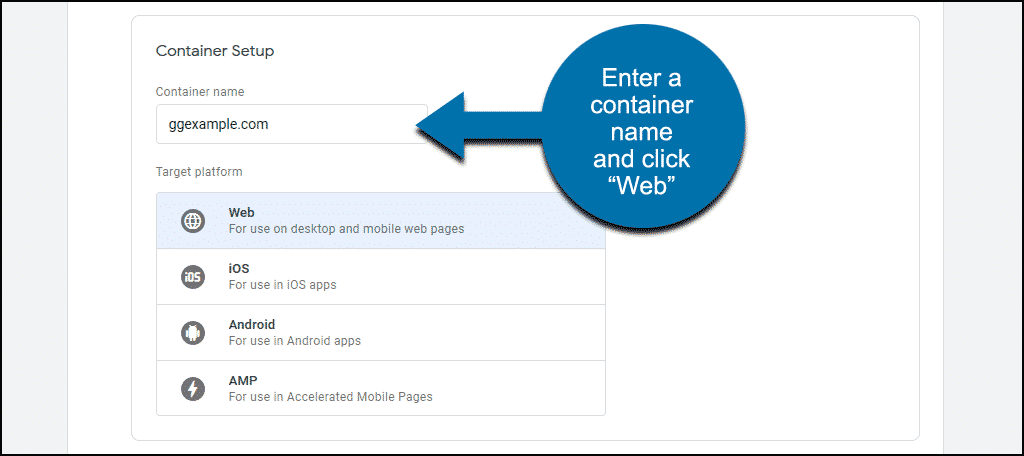
Give the container a name in the “Container name” field, and click the “Web” section.
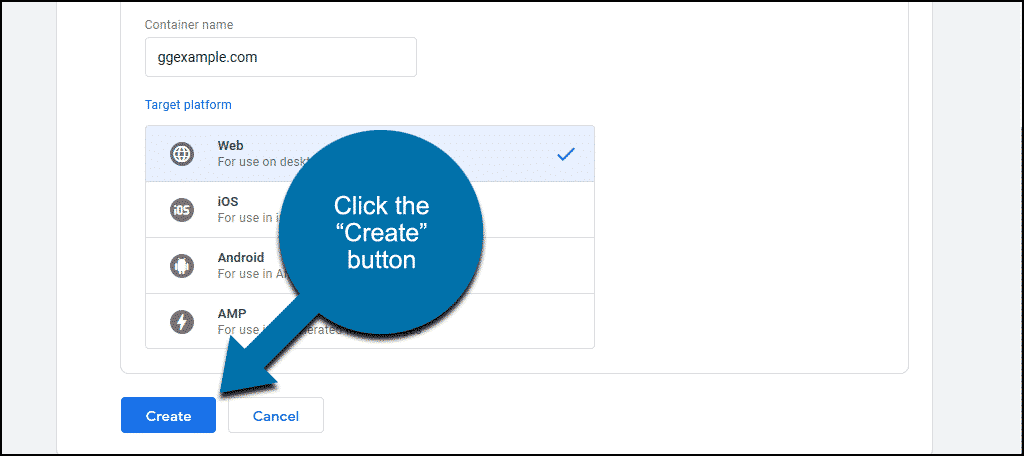
Click the “Create” button.
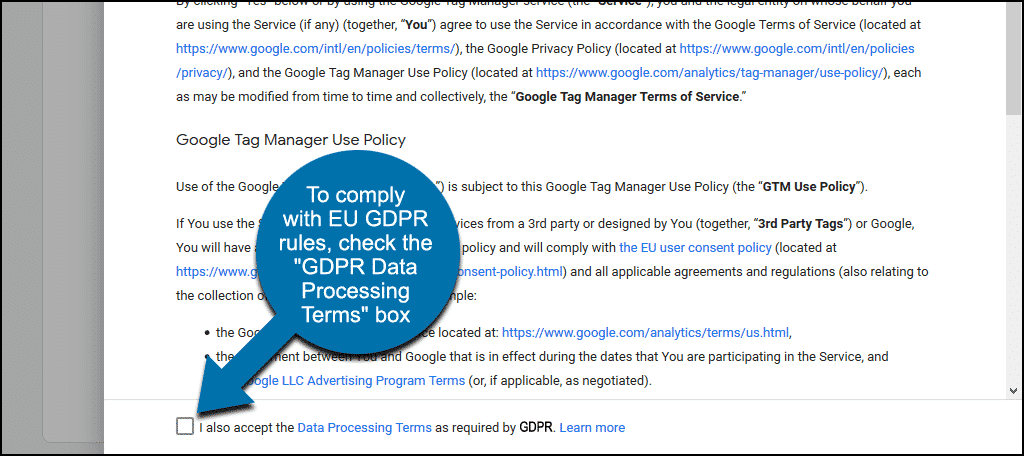
If your website complies with EU GDPR rules, check the “GDPR Data Processing Terms” box at the bottom of the page.
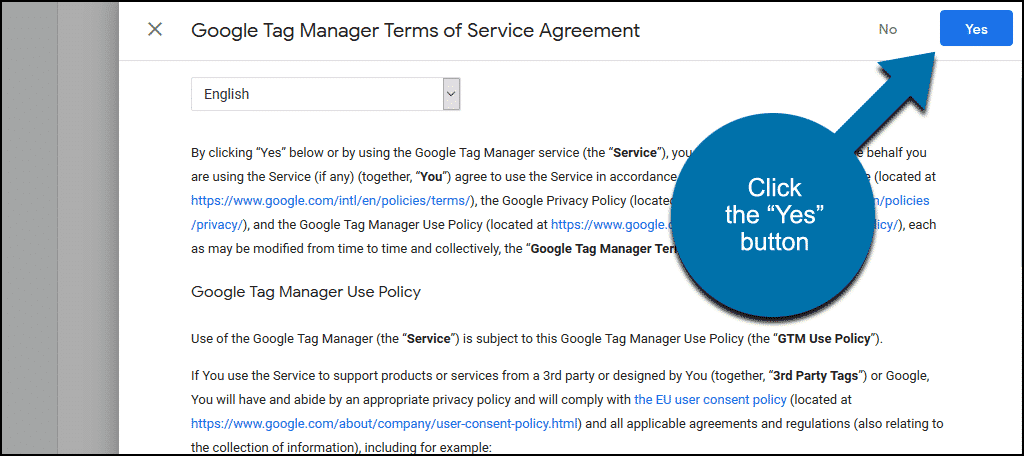
Click the “Yes” button to agree to the terms of service.
Implementing the Tag Manager Code on Your Site
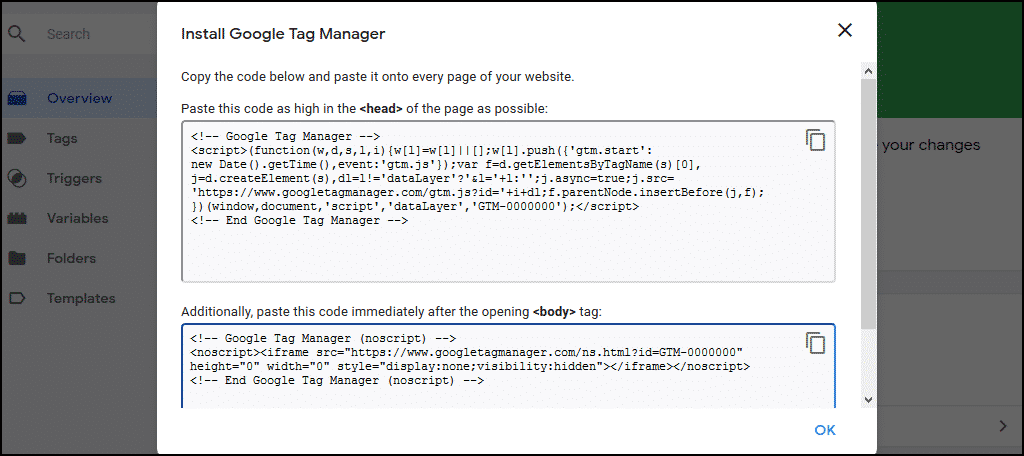
When your Tag Manager account setup is complete, a popup will be displayed. It contains the code needed to use Tag Manager on your site.
There are two code blocks. The first one is pasted into the <head> tag of your site, the second directly after the <body> tag.
How you insert the code depends on how your site is built. The code has to appear on every page, so it works best with a website using a universal header file. Most modern sites are made that way, using a single header file that is inserted into every page automatically.
If your site uses WordPress, you can insert both pieces of code once, and they’ll appear on every page. I’ll show you an easy way to add Tag Manager to a WordPress site later.
But the Tag Manager can be used on smaller sites made up of pages where each <head> section is different. In fact, those kinds of sites are where Tag Manager really shines.
Yes, it’s tedious to add the code to every page. But once you’ve done it, you can manage tags on all of the pages using Tag Manager. If you’ve ever avoided using tracking tools on a site without a common header, Tag Manager opens that door.
Publishing (Activating) Your Tag Manager Container
Your newly created container is empty, and it’s not yet activated. Let’s add a Google Analytics tag and publish our container so you can see how it works.
Click the “Tags” tab in the left column of the Tag Manager navigation.
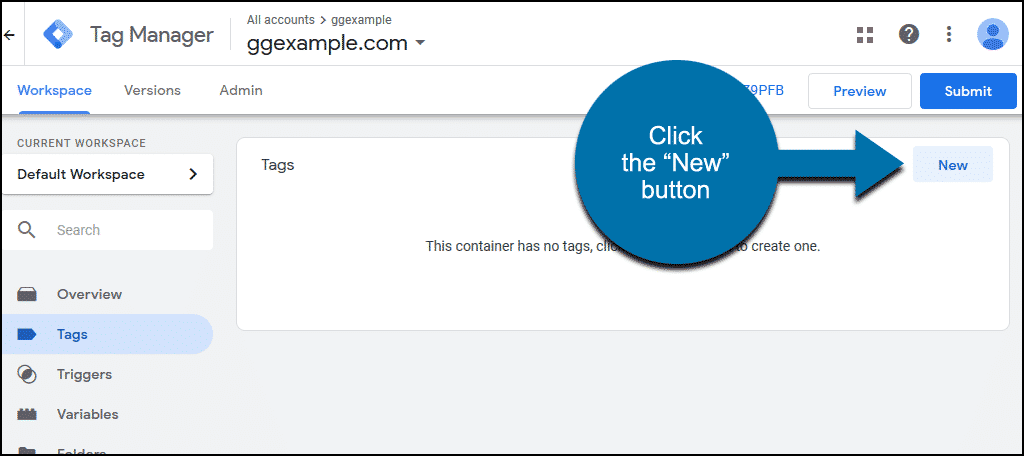
When the “Tags” area opens, click the “New” button.
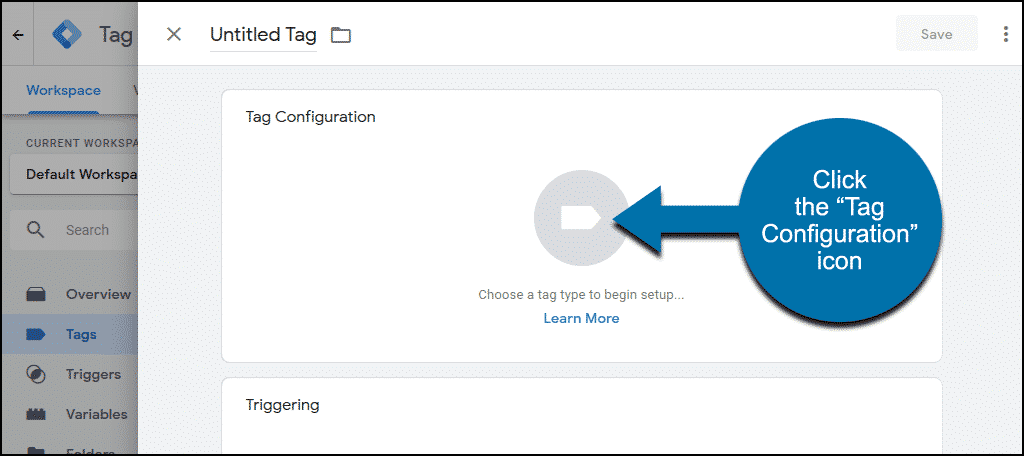
Click the “Tag Configuration” icon.
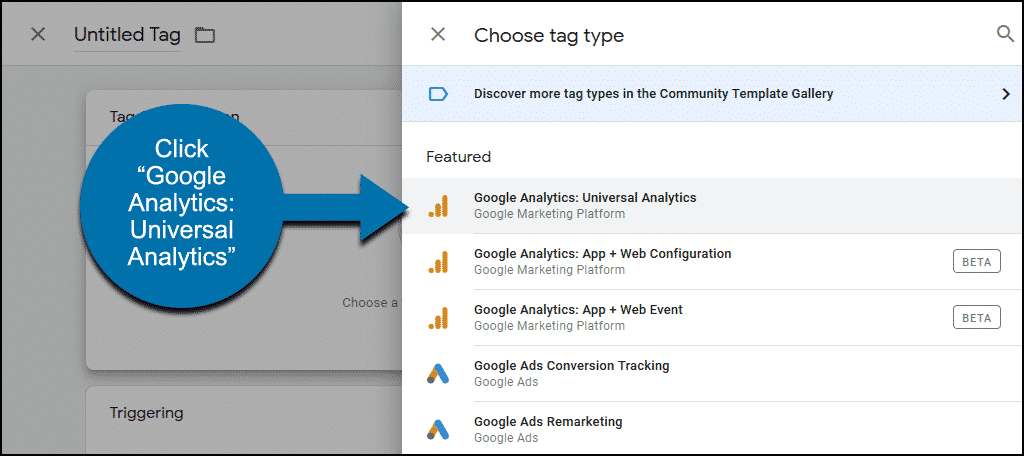
Click “Google Analytics: Universal Analytics.”
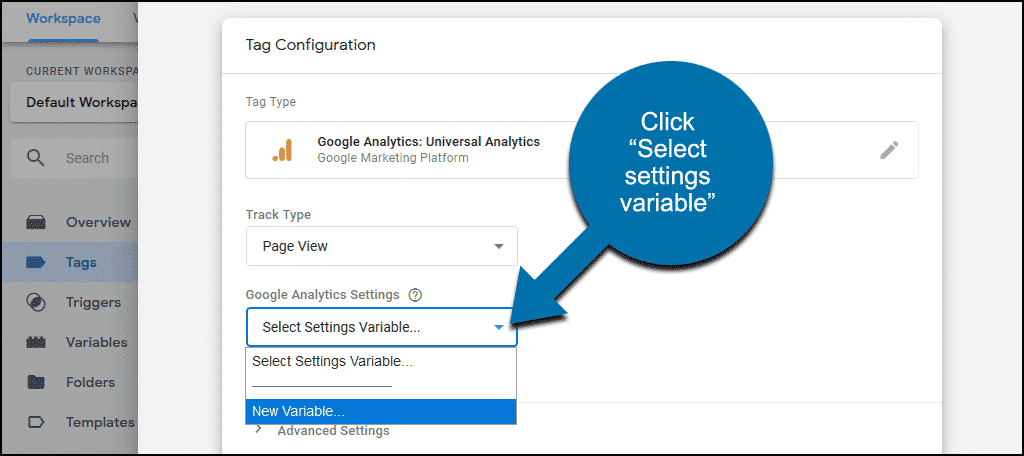
In the “Google Analytics Settings” section, click “Select settings variable…”
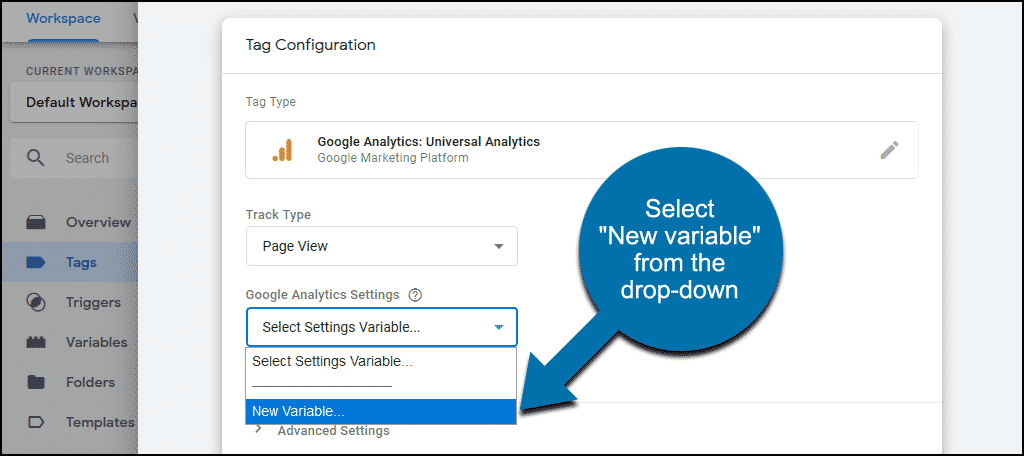
Select “New variable…” from the drop-down.
Enter your Google Analytics tracking ID and click the “Save” button.
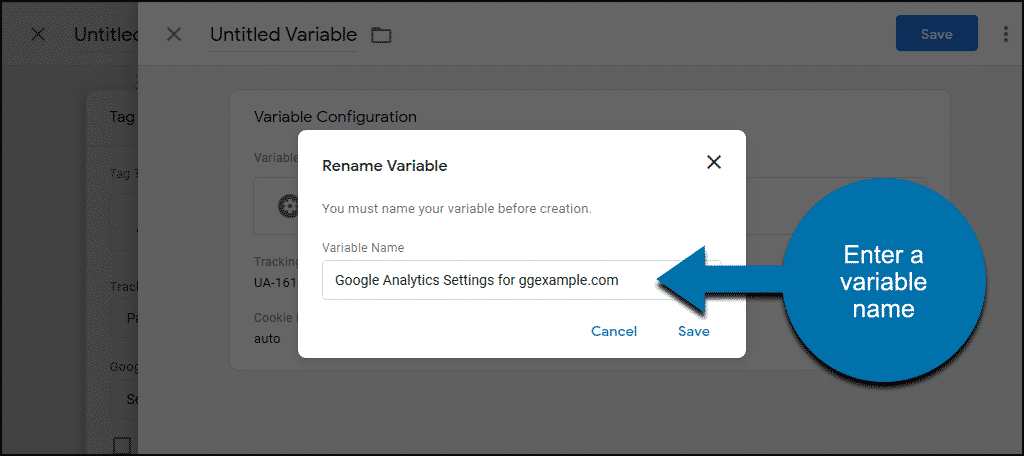
A window will pop up, prompting you for a variable name. Enter whatever you’d like and click “Save.”
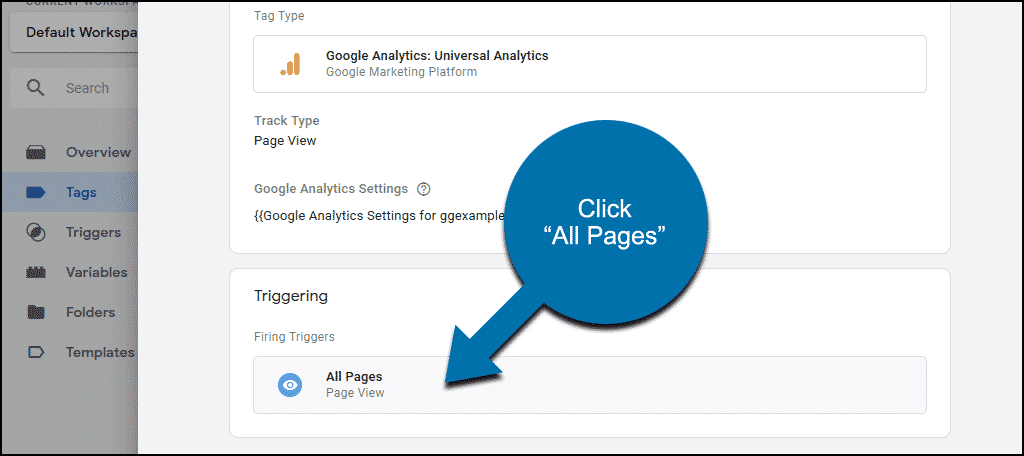
Now scroll down and click the “Triggering” icon.
Click “All pages.”
Now give the tag a name and click the “Save” button.
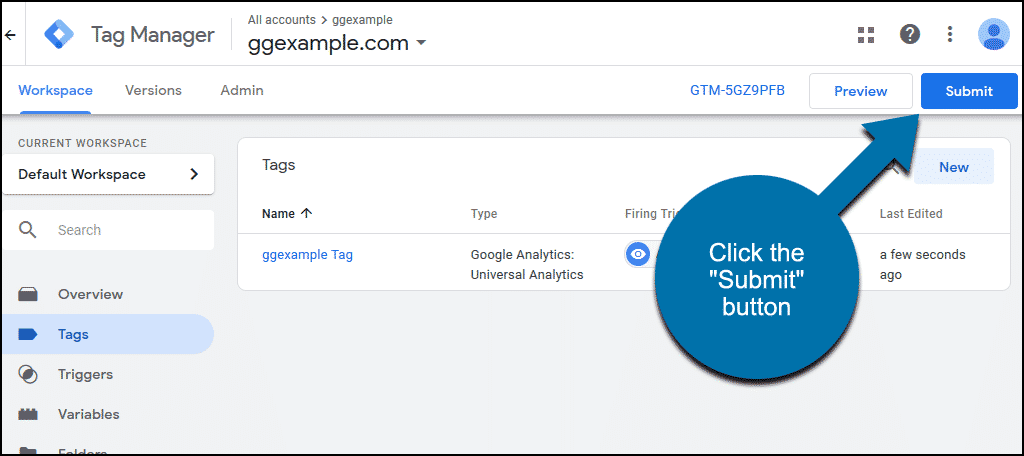
Click the “Submit” button.
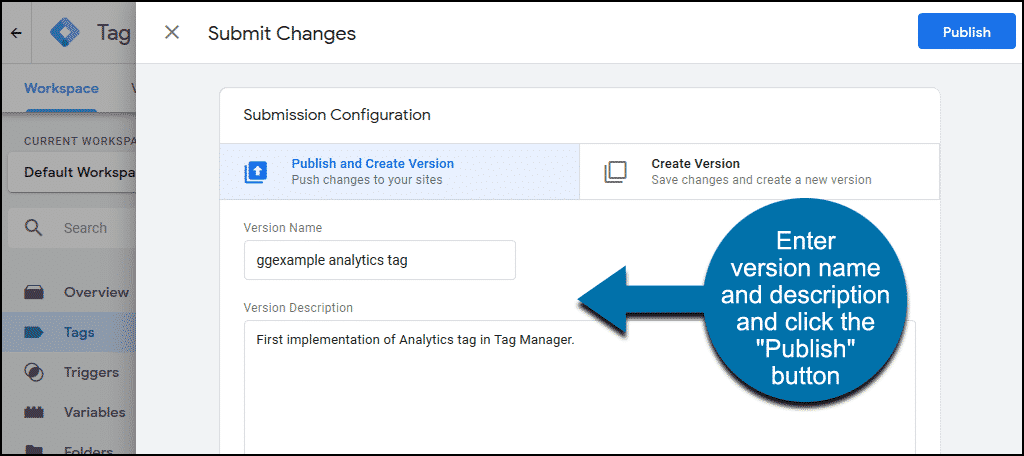
Enter a “Version Name” and “Version Description” and click the “Publish” button.
Now your tag container is live on your site.
The Google Analytics code will be automatically added to every page of the site. Additional tags are added in the same way we just created the Analytics tag.
What Is My Google Tag Manager ID and Where Can I Find It?
Speaking of WordPress, a lot of website builders use plugins. And sometimes, when you install a plugin, it will ask for your Tag Manager ID. There are a couple of ways to find the tag ID.
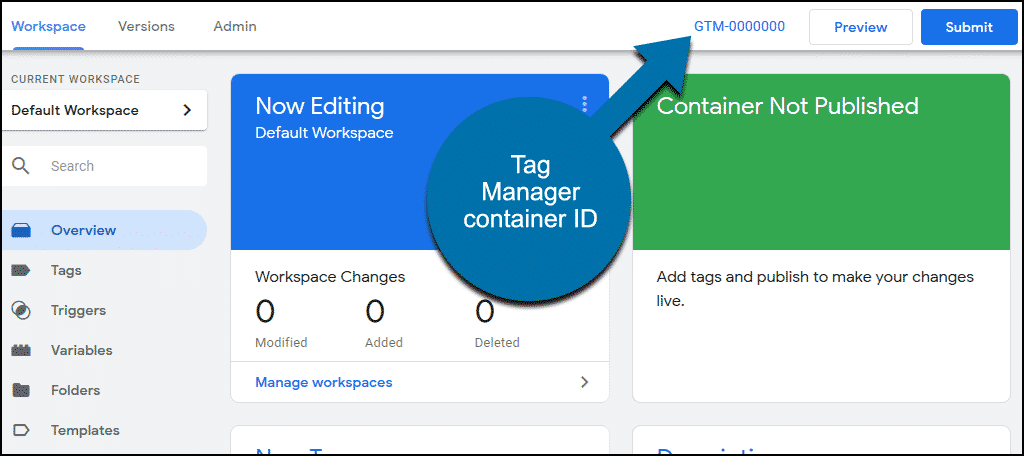
First, it’s displayed at the top of the page in Tag Manager.
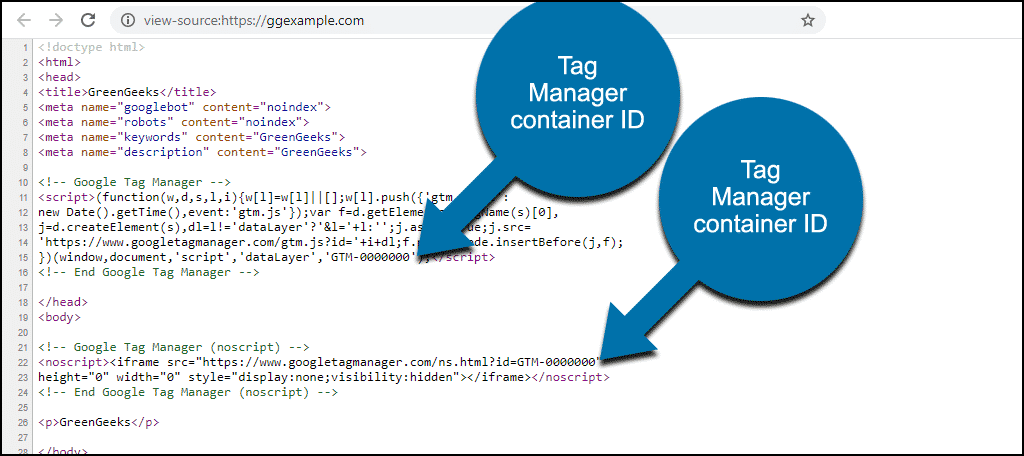
If you don’t want to log in to Tag Manager to find it, it’s displayed on your website.
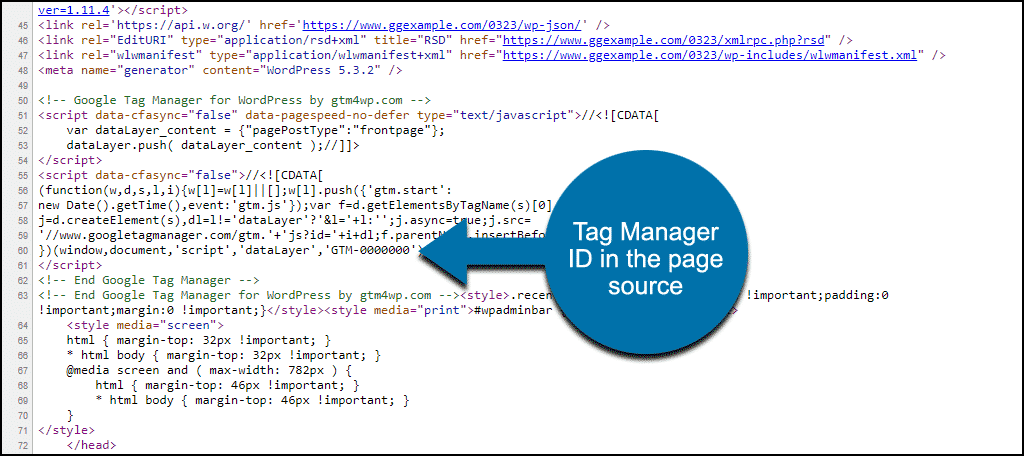
Right-click on a page and view source. The ID can be found in the Tag Manager tags. Look for:
<!– Google Tag Manager –>
or:
<!– Google Tag Manager (noscript) –>
In those code blocks, the Tag ID will be “GTM-” followed by seven random numbers and uppercase letters.
How to Add Your Google Tag Manager ID to a WordPress Site
You can add a Tag Manager ID to a WordPress site by editing the theme header and page template(s). Bear in mind, of course, that you should always use a child theme when you edit WordPress theme files.
But editing WordPress theme files is no fun, and when you edit, there’s always the risk of accidentally breaking something. The beauty and strength of WordPress are the available plugins that do the dirty work for you.
There’s a Google plugin that can add your Tag Manager ID (and a lot of other things) to your site. It’s called Site Kit. I’m not going to use it here because it integrates with your Google account, so there are a lot of set up steps. But, it’s worth checking out when you have some time to play with it.
Instead, we’re going to install the Google Tag Manager for WordPress plugin. It does what we want it to do, and it’s a quick install and configuration.
Well, it mostly does what we want it to. There is a caveat.
As you know, there are two parts to the Tag Manager ID. One part goes into the <head>, the other after the <body> tag. The plugin can insert code into the head of your theme, but not the body.
But the second part of the Tag Manager ID, the part inside the body tag, is a fallback. It is only used if the visitor’s browser has Javascript disabled. A human visitor would rarely be using such a setup.
So if you want to install the Tag Manager ID strictly to Google’s instructions, you can use this plugin, but you’ll still have to add code to your page template(s).
If you use the plugin without editing any theme files, it will be sufficient for normal use.
Installing the Google Tag Manager for WordPress Plugin
Log in to your WordPress admin panel.
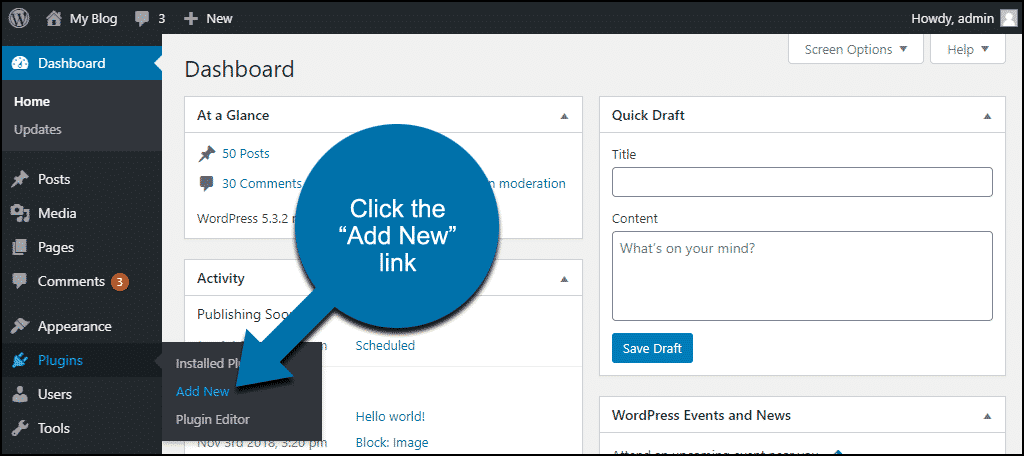
In the left column navigation, mouse over the “Plugins” link and click the “Add New” link.
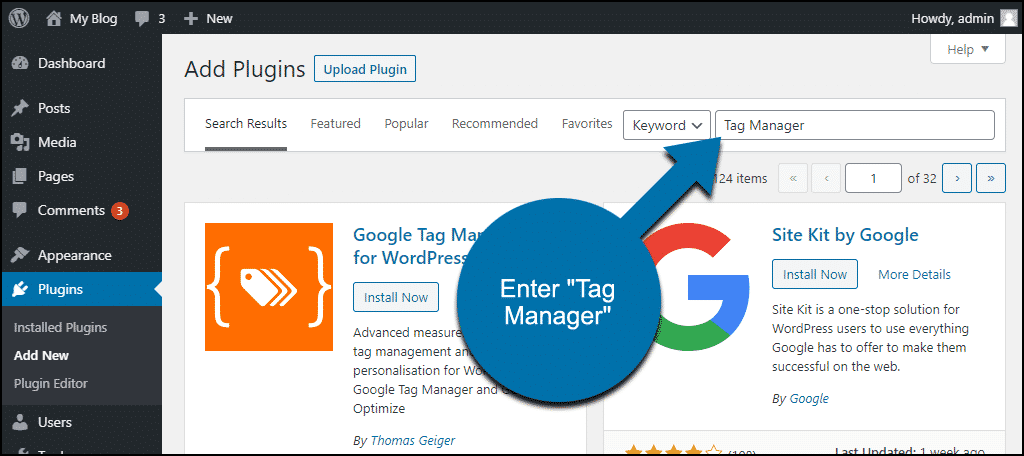
In the “Search plugins…” box, enter, “Tag Manager.”
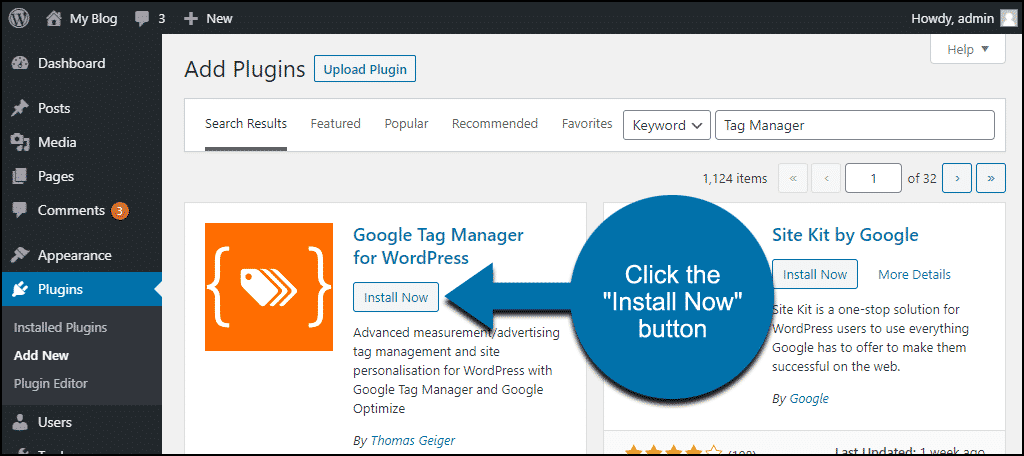
Once you have located the plugin, click the “Install Now” button.
Finally, click the “Activate” button.
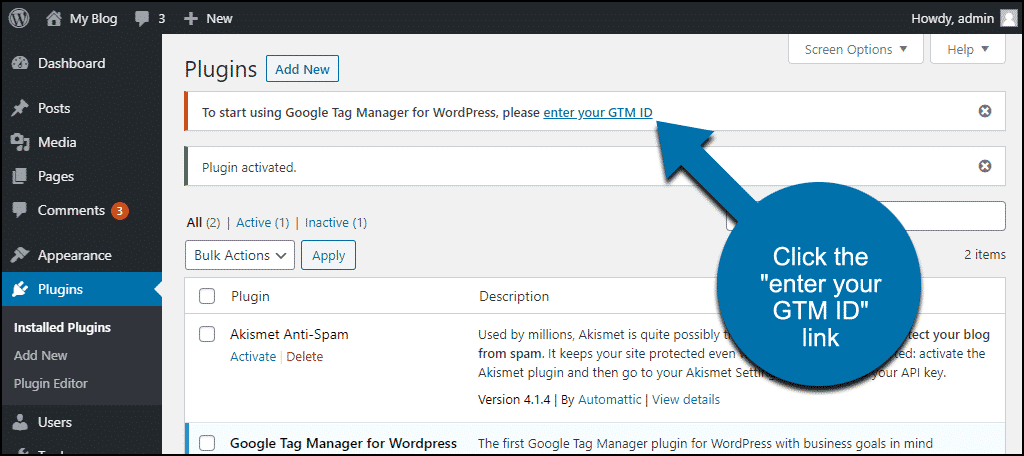
You’ll be taken to your dashboard, and there will be a notice at the top of the page.
Click the “enter your GTM ID” link in the notice.
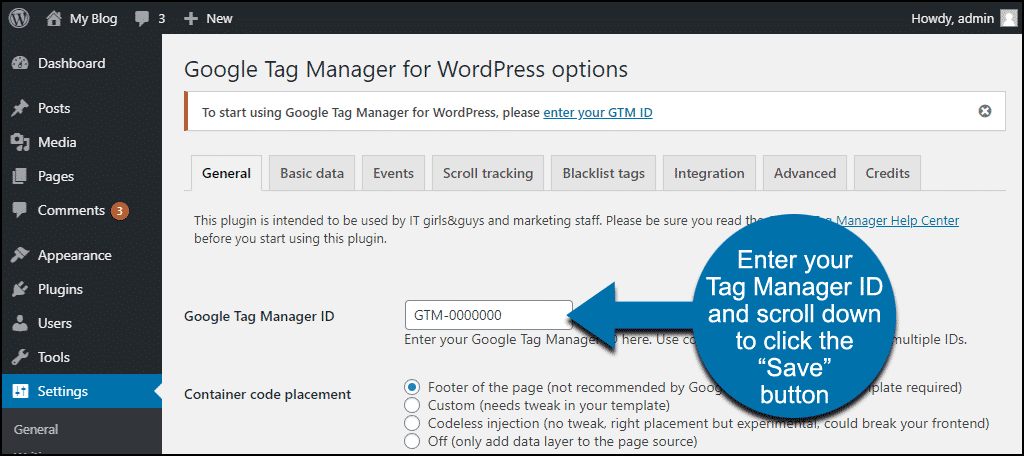
Enter your Tag Manager ID in the “Google Tag Manager ID” field.
Scroll down and click the “Save” button.
Now, if you view source on a page of your site, you’ll see the Tag Manager ID.
If you want to do the page template modifications we talked about, details are in the “Container code placement” selection.
What Happens if You Uninstall the Google Tag Manager for WordPress Plugin
If you uninstall the plugin, your Tag Manager ID will have to be added to your theme files manually.
“For Every Minute Spent in Organizing, an Hour Is Earned”
Benjamin Franklin said that, and he was a pretty smart guy. He didn’t have to manage website tracking tool tags, but he did invent the lightning rod and bifocals.
And he was right about organization saving time. The tools that are available to us now to observe and quantify website visitor behavior are remarkable.
If you could go back in time 25 years and tell webmasters (remember them?) that one day they would be able to see where visitors clicked on a page and how far they scrolled, they would have laughed.
But here we are. Of course, that technical progress has introduced complexity. It always does. So any time a tool like Tag Manager is created to help reduce complexity, we should take advantage of it.
The Google Tag Manager isn’t a simple tool that you can master in five minutes. But few truly useful tools are. The time you spend learning how to use it is a wise investment.


