A site-specific WordPress plugin is used to add customization code to a site that is not theme dependent. That means no matter which theme you use, or if you switch between themes, your plugin’s custom code will always run (as long as the plugin is activated).
If you’ve ever dedicated any time to customize a WordPress installation, you’ve no doubt come across tutorials telling you to add code to the functions.php file. The problem with that approach is your customizations disappear when you update the WordPress theme. You can use a child theme to prevent overwriting the functions.php file, but if you decide to switch to a new theme, once again, your customizations are lost.
If you create a site-specific plugin, your WordPress customizations are no longer dependent on a particular theme, and you are free to update or switch themes at any time.
Creating your own WordPress plugin may sound like a daunting task, but if you follow these steps, you can have a site-specific plugin up and running in minutes. All you need is your favorite text editor, an FTP program, and a WordPress installation.
Creating a Site-specific WordPress Plugin
Please create a new folder on your desktop and name it website-plugin. We’ll use “ggexample” as our website name in this tutorial, so our new folder will be named ggexample-plugin.
If you’re following along, use your website or domain name wherever we use “ggexample.”
1. Create Your Plugin’s File
Open your text editor (if you don’t normally use a text editor, look for Notepad on a Windows computer, or TextEdit on a Mac). Create a new file and add the following code:[ht_message mstyle=”info” title=”” show_icon=”” id=”” class=”” style=”” ]
/* Plugin Name: Site Plugin for ggexample.com
Description: Site-specific code changes for ggexample.com */
/* Add functions below this line */
/* Add functions above this line */
?>
[/ht_message]
Now save the new file as ggexample-plugin.php in the ggexample-plugin folder.
Guess what? You’ve just created a site-specific plugin.
Of course, your plugin doesn’t do anything yet. We’ll take care of that minor detail in a minute. But first, let’s install the plugin on our WordPress site.
There are two ways to install the site-specific plugin, either via FTP or using the WordPress admin panel (with a .zip file).
2. How To Upload Your Site-specific WordPress Plugin Via FTP
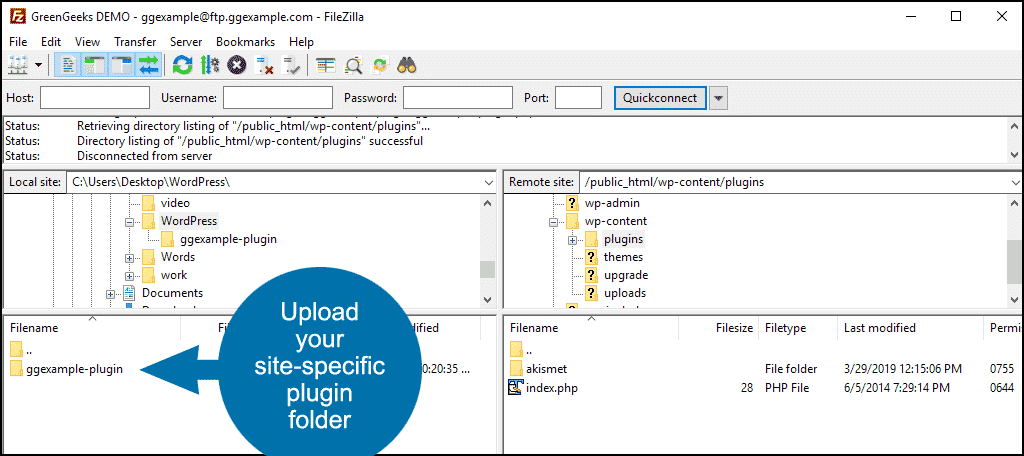
Open your FTP client and connect to your WordPress website. Go to the /wp-content/plugins/ folder in the remote site column. Upload your site-specific plugin folder to the /wp-content/plugins/ folder.
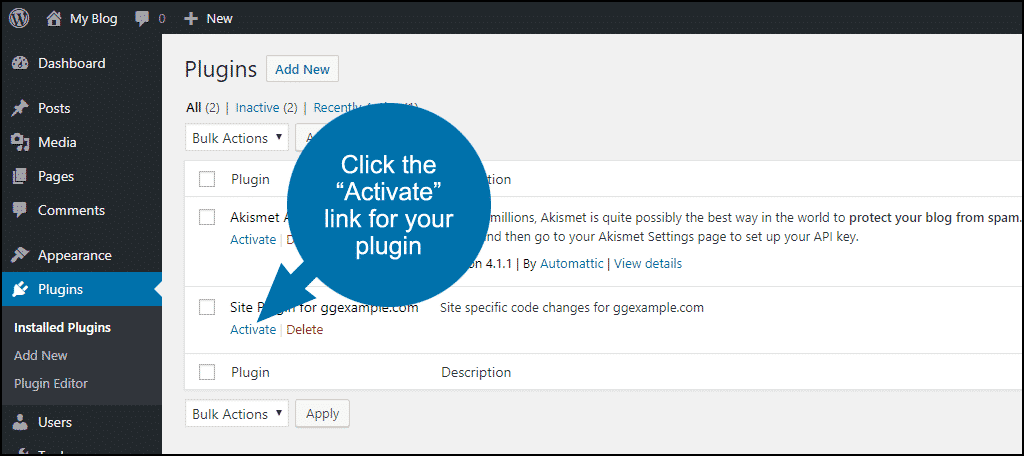
To activate the plugin, go to the WordPress “Plugins” page and click the “Activate” link for your Plugin.
3. How To Upload Your Site-specific WordPress Plugin Using the WordPress Admin Panel
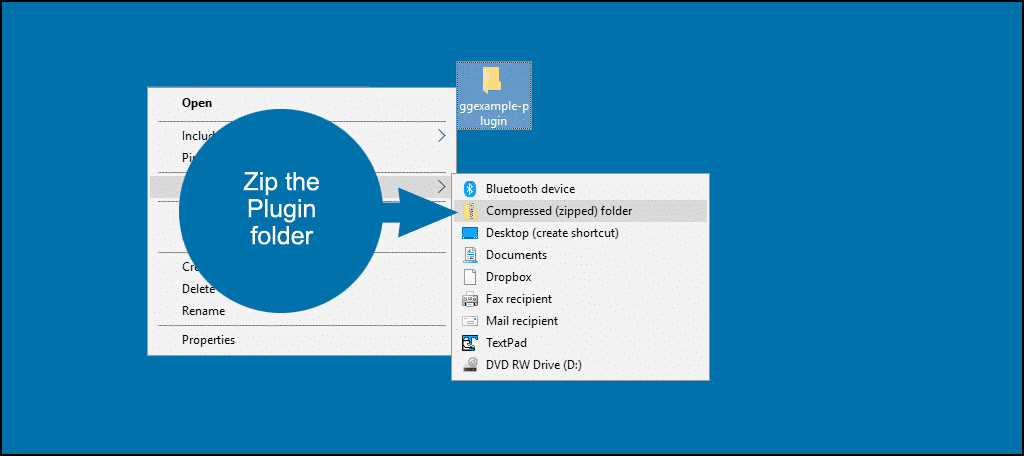
Create a zip file of your site-specific plugin folder. On a Windows computer, right-click the plugin folder and select Send to > Compressed (zipped) folder.
On a Mac computer, right-click the plugin folder and select “Compress ggexample-plugin.”
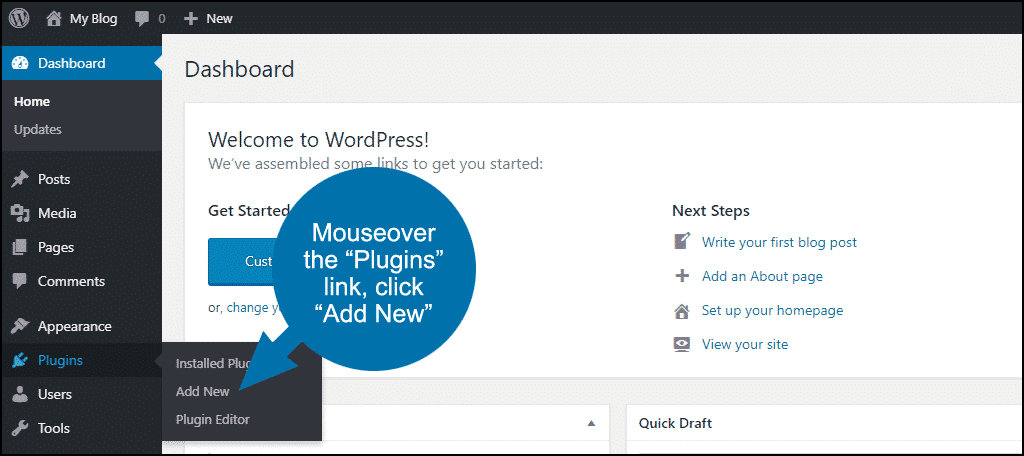
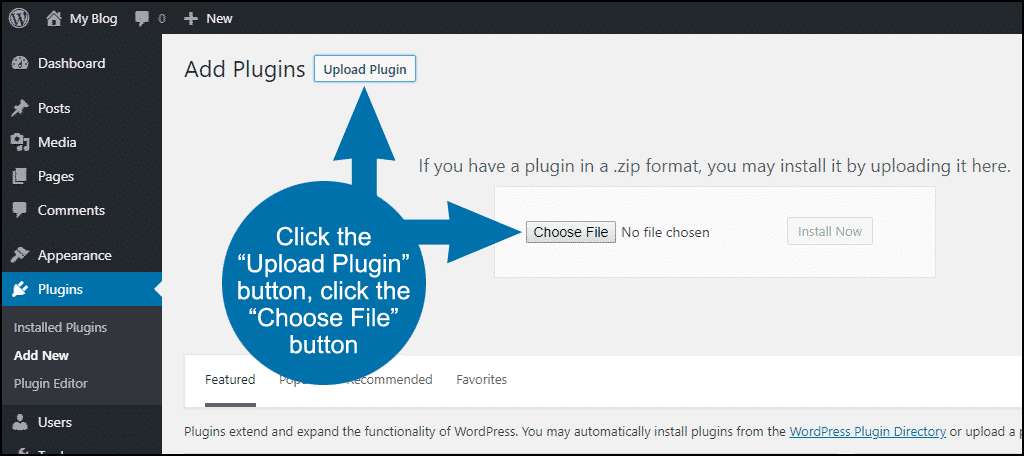
In your WordPress admin panel, mouse over the “Plugins” link in the left navigation and click the “Add new” link.
Click the “Upload Plugin” button, then the “Choose File” button.
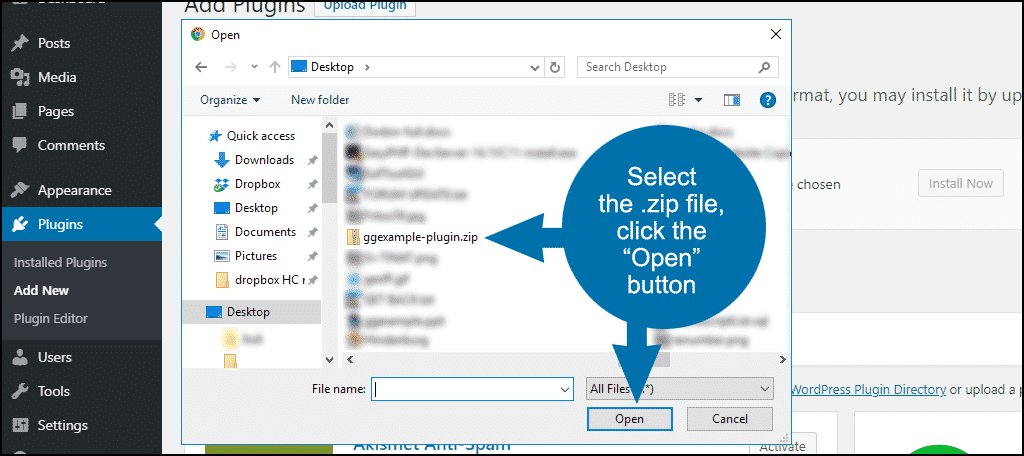
Select the zip file you created and click the “Open” button.
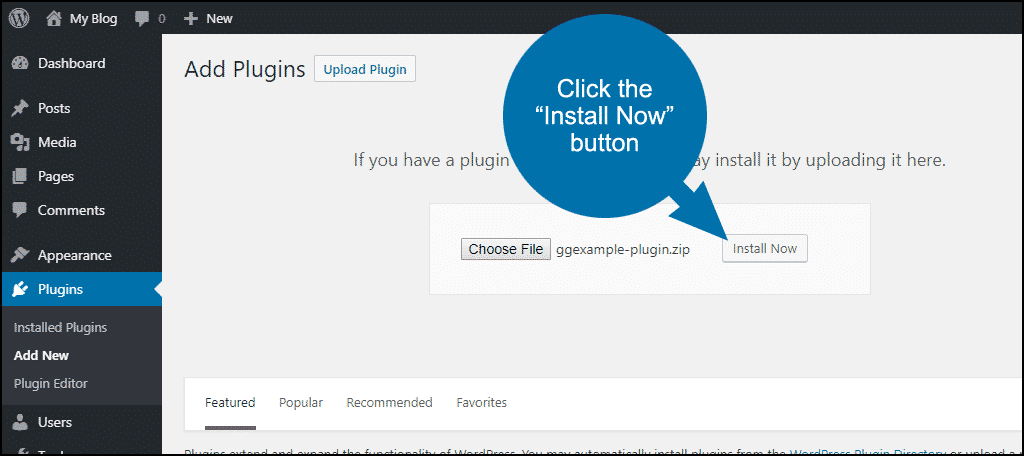
An “Install Now” button will appear next to your .zip file name. Click it.
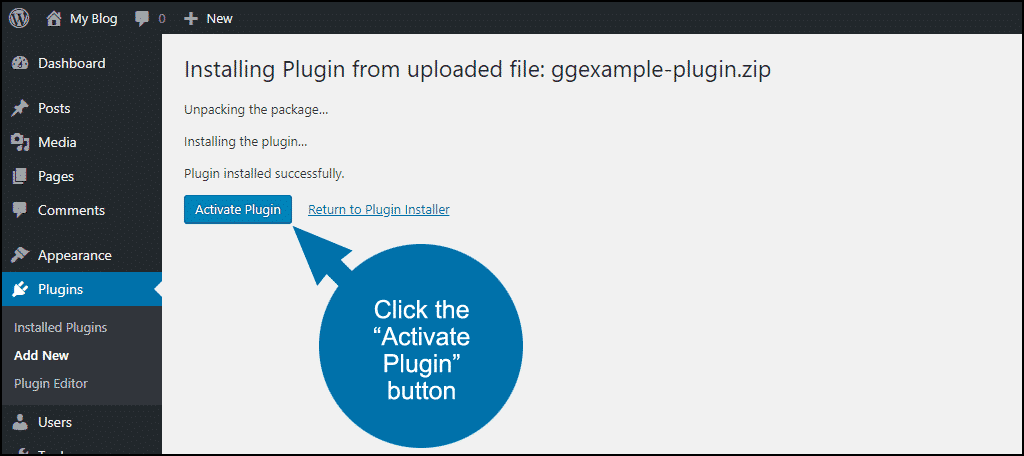
Click the “Activate Plugin” button.
That’s it. Your site-specific WordPress plugin is installed.
Now let’s put it to work for us.
4. Adding Custom Code to a Site-specific Plugin
There are two ways to add custom code to your plugin.
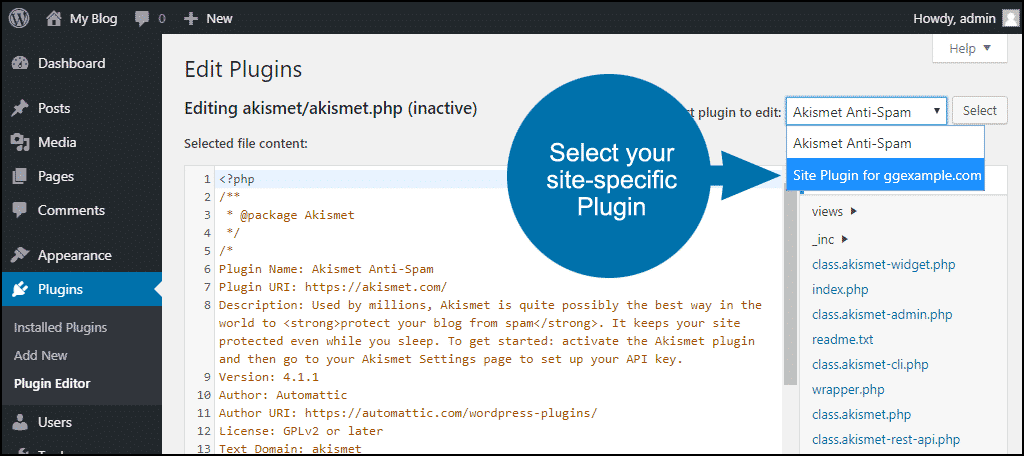
The first method is to edit via the WordPress admin panel. We don’t recommend that method, but if you want to use it, go to “Plugins” > “Editor,” click the “I understand” button on the warning, and select your site-specific plugin from the “Select plugin to edit” drop-down menu.
There you can edit the plugin file and save your changes.
The preferred method is to edit the plugin file using a text editor and upload the changes via FTP.
As you may have guessed, the custom code goes between the “Add functions below this line,” and “Add functions above this line” lines.
So if we were adding, for example, a function that removes the default WordPress RSS links from all pages, it would look like this: [ht_message mstyle=”info” title=”” show_icon=”” id=”” class=”” style=”” ]/* Plugin Name: Site Plugin for ggexample.com
Description: Site-specific code changes for ggexample.com */
/* Add functions below this line */
remove_action ( ‘wp_head’, ‘feed_links’, 2 );
/* Add functions above this line */
?>[/ht_message]Save the changes to ggexample-plugin.php, upload the file to /wp-content/plugins/ggexample-plugin/ and you’re all set.
5. Taking Your Custom Plugin Further
You’ve seen that the basic building blocks used to create a plugin aren’t very complicated. But what a plugin does from there can become very complicated. You’ll have to be familiar with the basic elements of WordPress: PHP, CSS, and HTML, to build a working plugin.
Once you’ve created a plugin, you can use it for yourself, or release it for use by any WordPress site. If you want to make your plugin public, it has to be licensed, to establish the terms of use or modification. The license has to be compatible with the GNU General Public License that WordPress uses.
To be accepted, your plugin has to do something new, do something in a new way, or solve a problem. WordPress will reject plugins that are duplicates of other plugin code. They’ll also reject a plugin that doesn’t do anything (obviously), is illegal, or encourages “bad behavior.” Bad behavior includes things like black hat SEO spam, content spinning, hate-speech, etc.
If you add your plugin to the WordPress repository, you have to be prepared to provide support for it. Users may ask questions or report bugs, and you have to respond to those public messages. Well, technically, you don’t have to respond, but if you don’t, your plugin will suffer poor ratings.
Most plugins are created because someone had a need that the WordPress core files couldn’t meet. You might also see a business opportunity in creating a plugin to perform a function that isn’t otherwise possible. Whatever your motivation, creating a plugin can be a rewarding experience.
Important Details About Creating a WordPress Plugin
When developing a plugin for your personal use, you may think all you have to do is make it work. Once you’ve accomplished that, your job is done, and you can call it a day. But for more details and a ton of helpful, relevant information, check out the official WordPress plugin handbook.
It covers issues like plugin security, something you may not have considered. Similarly, if your plugin uses JavaScript, jQuery, or Ajax, there are some things you need to know. When it comes to extending the capabilities of WordPress, plugins are the tool for the job. But the more you know about creating and working with those tools, the better.
The last thing you want to do is create a plugin that may cause problems for you in the future. Especially a plugin that you’ve come to rely on for your website functionality. Remember, there’s no tech support for your own plugin. You have to be prepared to update and repair it if (when) WordPress changes.
Learn all you can about the ins and outs of plugin building and give it a try.
Are you surprised to learn that it’s that easy to create a custom plugin for your site? Do you have any personal uses for a custom plugin?

