Setting up meta tags in WordPress setup is not difficult. They are also one of the most basic elements of SEO. There are a couple of things you need to ask yourself regarding WordPress meta tags. Are they a factor in Google page rank? What effect does it have on your website’s SEO?
Let’s take a quick look at these questions and then I will show you how to add meta tags to WordPress.
What Are Meta Tags?
Simply put, meta tags are words that are hidden within your website code. User’s browsing your site will not be able to see them, but they are there. They are a legal way of hiding certain words in your webpages that will benefit you within search engines.
In year’s past, they were very heavily valued as a factor in search engine rankings. However, people started abusing them to get on top of the SERPs. Ever since then, Google opted out of allowing certain meta tags to be used in ranking factors. That being said, meta tags are still very useful and can still play a huge role in the SEO structure of your WordPress website.
Three Main Parts of Meta Tags
There are three main parts of meta tags that you can use to build your SEO site structure accordingly.
Title: The title tag is the text that is shown in search engines. While it is not exactly a meta tag, it does function as one and is important. And a good title will affect the site’s click-through rate.
Description: The meta description tag is where you want to put an appropriate summary for your website. This is where you want to describe what you offer and what you do. Remember, most search engines only read up to a certain amount of characters, so make your statement concise and to the point.
Keywords: The meta keywords tag is where you will want to put all the appropriate keywords relevant to your website. This will help bounce you to the top of the SERPs if it is used correctly. Keywords are very important, as your website user should know exactly what your content is about by reading only these phrases.
The main importance and role of meta tags is to help search engines read and compare everything and how it relates to the readable content on your site.
Adding Meta Tags to WordPress
There are basically two ways that you can add WordPress meta tags. Neither are very difficult, but one involves using some code and accessing your site files, and the other one involves using a plugin.
Let’s take a quick look at both styles so you can decide which way you want to add a meta tags WordPress setup.
Add Meta Tags WordPress Setup by Accessing Site Files
To add meta tags in WordPress without a plugin, you need to access your WordPress site files and add appropriate code.
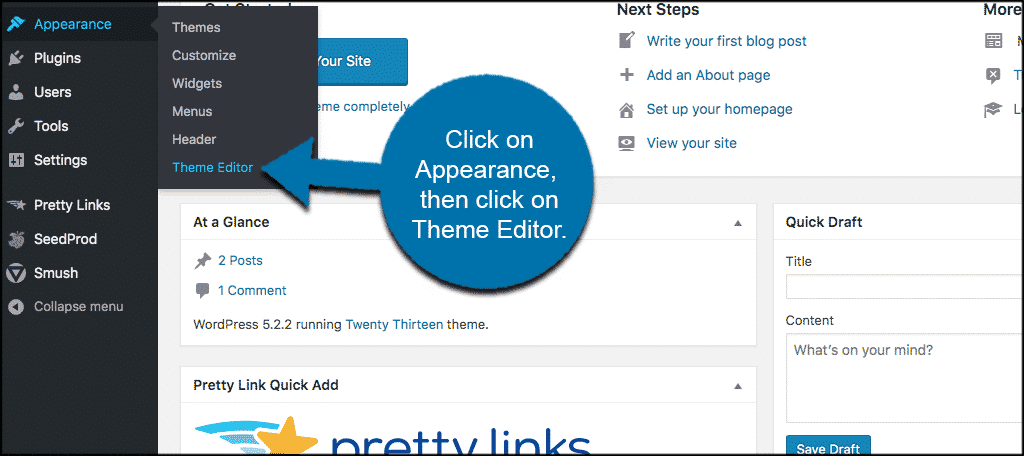
From your WordPress admin dashboard click on Appearance > Theme Editor.
You want to locate the Theme Header file and open that up. Look for header.php and click on it to open the file.
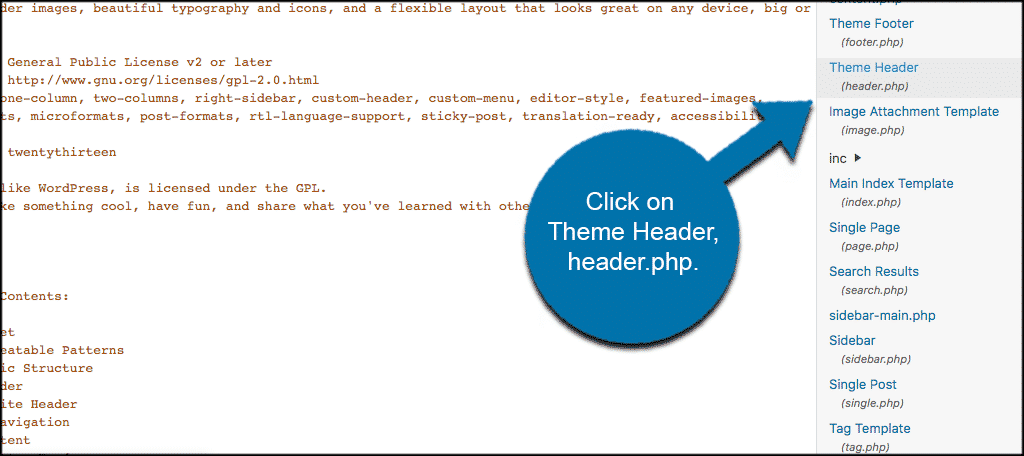
You will enter meta tags in the head tag of the header. Below is an example of a meta tag for a description.
<meta name="description" content="This is the
description sentence or short paragraph about
the article or post." />
Common Meta Tag Examples
Below you will find the most common meta tags WordPress examples. You can use this as somewhat of a guide.
<meta name="resource-type" content="document" />
<meta http-equiv="content-type" content="text/html; charset=US-ASCII" />
<meta http-equiv="content-language" content="en-us" />
<meta name="author" content="John Doe" />
<meta name="contact" content="[email protected]" />
<meta name="copyright" content="Copyright (c)2010-2020
John Doe. All Rights Reserved." />
<meta name="description" content="Tutorial on meta tags." />
<meta name="keywords" content="tutorial, meta tags, wordpress, greengeeks, john doe, adding meta tags, meta, how to, seo, yoast," />
Now, if you want a much easier way to do this, then read on.
Add Meta Tags Using Yoast SEO Plugin
If you prefer to add meta tags in WordPress using a plugin, there are several out there that can help. However, for this tutorial, we are going to use the Yoast SEO plugin.
Yoast SEO is designed to do just about anything and everything imaginable when it comes to SEO on WordPress websites.
Install and activate the Yoast SEO plugin from the admin dashboard of your website.
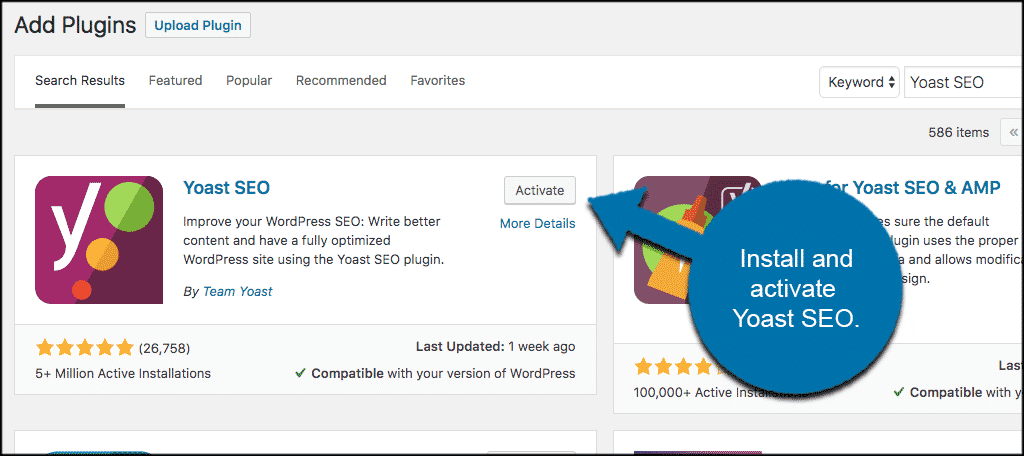
Once the plugin has been installed and activated, you have a few options.
You can go through the process of a detailed installation and setup of Yoast SEO, or you can start adding meta tags immediately to your content.
Click on any existing post or page on your WordPress website. Or, if you prefer, add a new post or page and start there.
When you have selected a post or page, scroll down to the Yoast SEO section. It is available after activating the plugin.
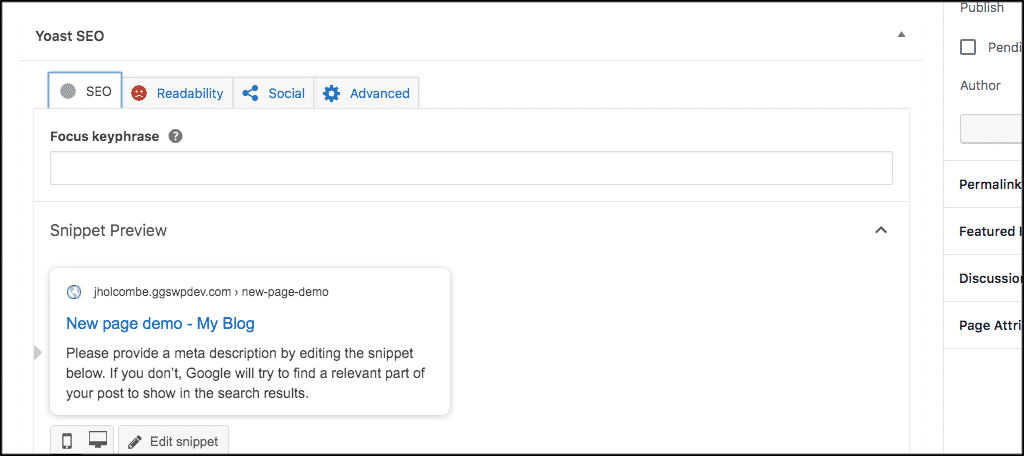
As you can see, you will be presented with a number of SEO and Readability options. Configure all your SEO settings last, so you know what you need to fix and how to fix it.
Yoast gives you detailed instructions on what is wrong and what needs to be fixed. Once you turn both lights green, you are good to publish.
However, for this example let’s stick to adding meta tags.
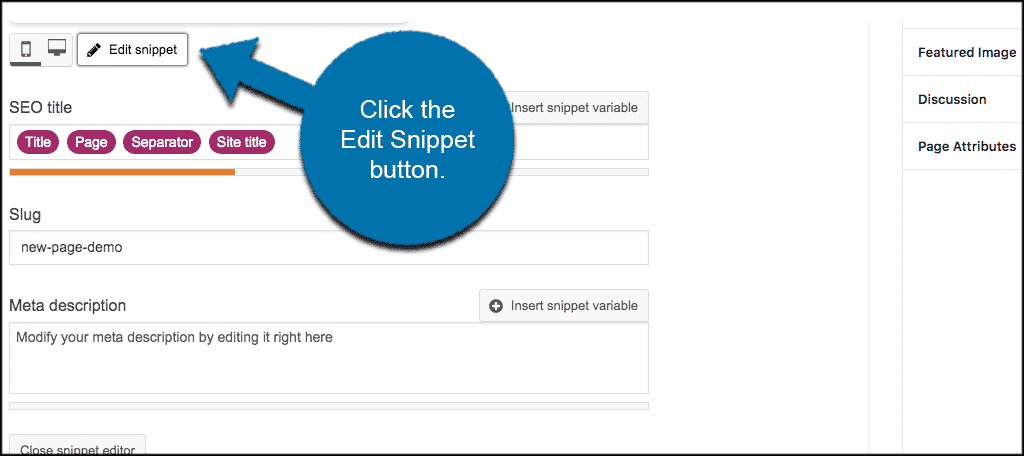
First, let’s edit and fix the meta description and title fields. Click on the “Edit Snippet” button and fix your slug, title and meta description snippet appropriately.
Now go ahead and enter a “Focus keyphrase” for the post or page.
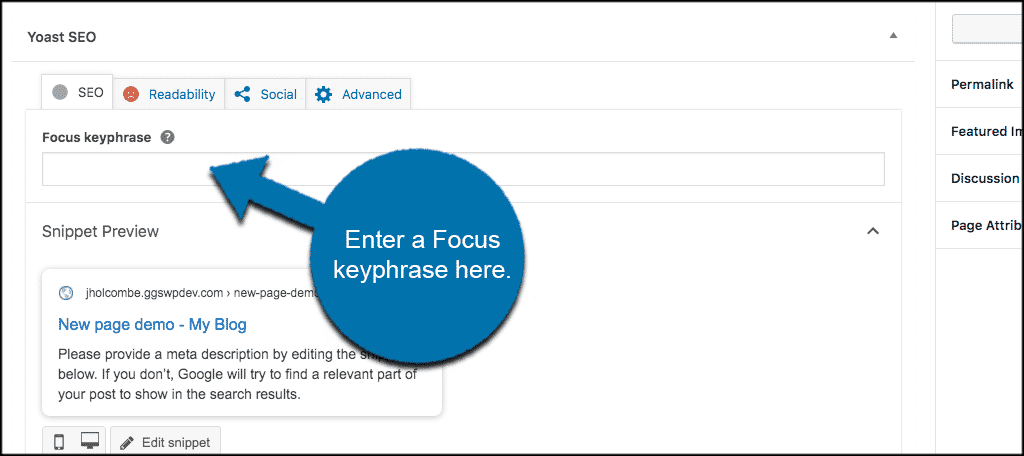
That’s it, you have successfully added meta tags to your post or page in WordPress. You simply repeat the process for all posts and pages.
Note: If you have the pro version of Yoast SEO, you will be able to add related keyphrases, build cornerstone content, and a few other things.
Add Meta Tags in Search Appearance
To add meta tags and a meta description and work on the overall appearance of your website, click on SEO > Search Appearance.
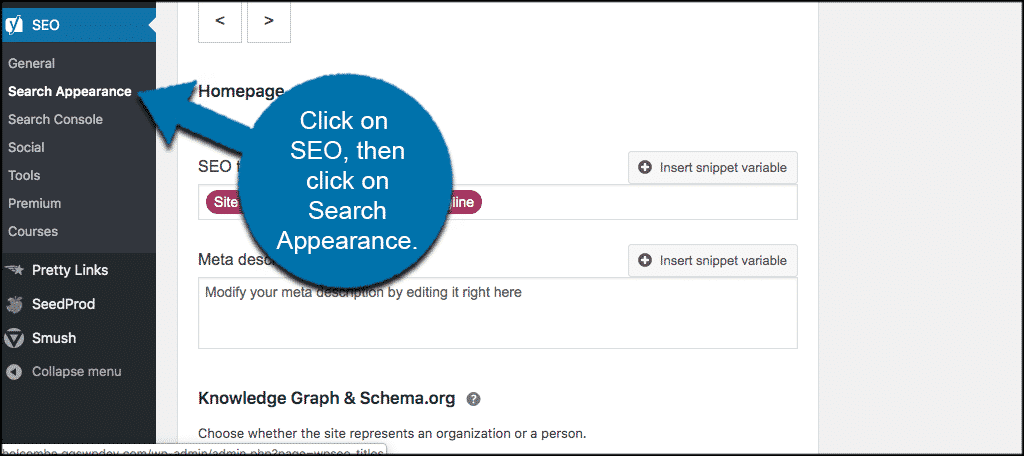
This will take you to one of the setting’s pages for Yoast where you will be able to tinker and add whatever you want.
Final Thoughts
That’s it! You have successfully learned some about meta tags and how to add them to your WordPress website using code or a plugin.
Have you found that adding meta tags and meta descriptions have helped your website traffic and Google page rank? Which method do you prefer to use to add meta tags?
