WordPress is a powerful platform that allows developers to create any type of content. However, to get the most out of it, you do need to understand the basics of content creation. And that all starts with understanding how to add a new post in WordPress.
Now, you may think that is an easy thing to do, and it is. But most beginners ignore or are completely unaware of some of the more important steps in this process. Trust me, most sites put a lot of thought into what posts they make and why.
Today, I am going to cover every detail you need to consider when you create a new post in WordPress.
How to Create A New Post In WordPress
Creating a new post in WordPress is easy, but creating a good post is difficult. There is a lot of research and work that goes into producing high-quality content that ranks well on Google while also capturing the reader’s attention.
Luckily, there are a lot of tips that can help you with the writing process and I have assembled them into this list.
1. Keyword Research
The first thing you need to consider when creating a new post in WordPress is what keywords you want to rank for. Thus, you need to do keyword research before you do anything in WordPress itself.
There are several tools you can use, so if you already have one, feel free to use that.
The Google Keyword Planner is a great choice. It is part of the “Google Ads” platform, but you don’t need to create an advertisement to use it.
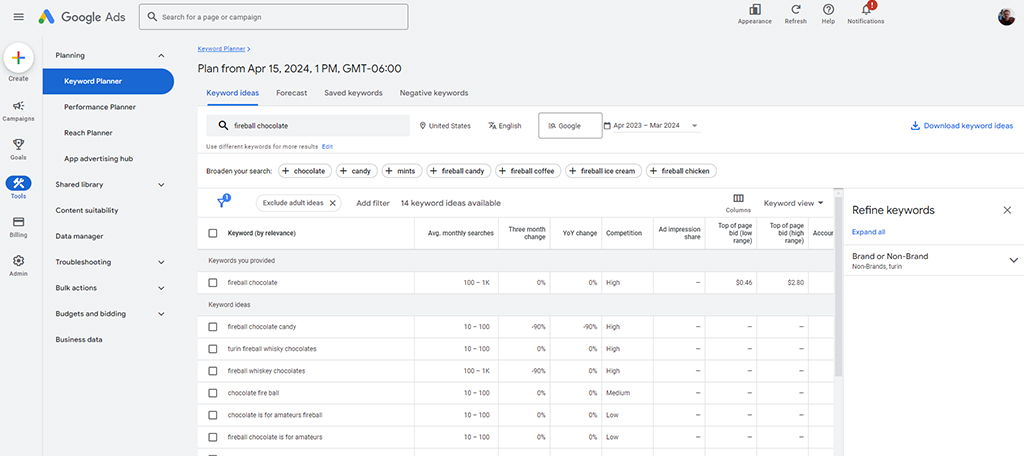
As the name suggests, it is made by Google, which has the most data to back up its listing. You’ll simply type in the keyword you are interested in ranking for and the tool will provide a list of similar phrases and how they all perform in search.
This includes the average monthly searches, how much the search volume has changed over the last three months, the level of competition, and much more. A keyword that does not get a lot of volume is not a great choice.
You want something that gets a lot of searches and does not have a lot of competition. It’s easier said than done, but this is the starting point when creating any new piece of content.
The Internet is full of keyword tools. Find one that works best for your needs and explore what kind of content people are looking for that fits your niche or topic.
2. Understand Search Intent
Now that you have a keyword picked out, take a moment and consider what users searching for it will actually be looking for?
An easy example would be if someone searched for “Apple Pie Recipes” they are going to be looking for recipes and instructions to bake an apple pie. While that is a simple one, others are not so clear.
For example, if someone was searching for a general term like “The Avengers,” that is very difficult to figure out the user’s intent. Are they talking about the movies, comics, animated films, or perhaps the video game?
As you can see that can get very complicated. So how do you figure this out? That’s when you rely more on long-tail keywords.
For instance, let’s take our “The Avengers” example. Let’s say we want to focus more on people who want a list of the names of characters who were part of the Avengers. In this case, our long-tail keyphrase my be something like “avengers characters,” “who were the avengers,” or “list of avengers characters.”
While those phrases will undoubtedly have a lower volume in search, the criteria is more focused. That means people who are interested in that specific information are more likely to click and spend time reading the post.
3. Research the Competition
To rank highly on Google, or other search engines, you have to create a better piece of content than everyone else, and this isn’t easy.
Naturally, before you start writing anything, you should look at what other sites that are ranking for your keyword are doing. How do you know what sites are ranking for your keyword? Type the keyword into Google.
When browsing the content, identify how long it is (the word count), figure out what kind of user intent they are aiming for, and look for ways you can improve it. Your goal is to make something better and longer than what the competitor is doing.
Something else to keep an eye out for is the title. You want to make sure that whatever you create does have a unique title that stands out from the rest. In some cases, a generic title will work well enough, but keep it in your mind.
This isn’t always the easiest thing to do depending on the popularity of your topic. But it’s more beneficial to your site if you try to come up with something snazzy or unique that isn’t clickbait.
Tools like CoSchedule’s Headline Analyzer can help you create something that is eye-catching in search.
4. Create A New WordPress Post
With some research out of the way, you should know what keywords you are trying to rank and have an idea of what users are looking for. Now, we can finally go to WordPress and create a new post.
From the WordPress dashboard, click on Posts and select the Add New Post option. Alternatively, you can use the “Add New Post” button in the posts section to achieve the same result.
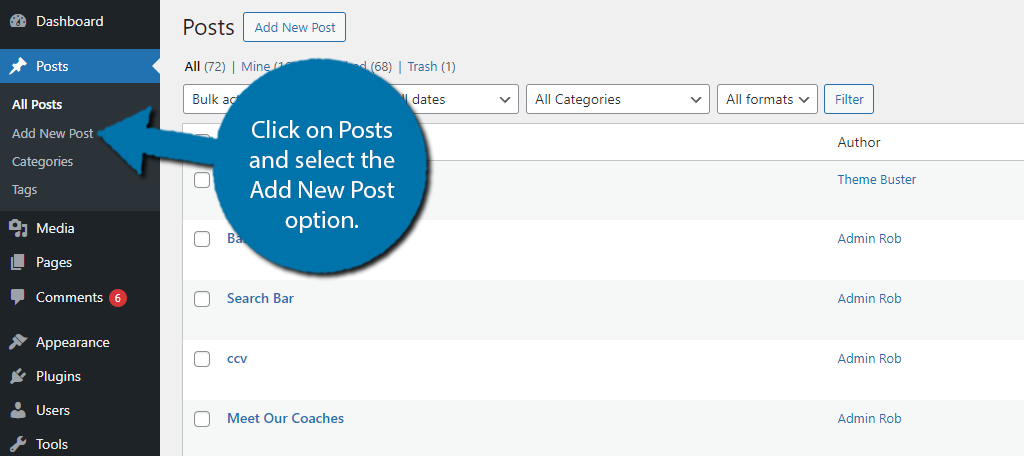
This will open up a blank post where you can begin the writing process, which we will now cover. WordPress uses the Gutenberg editor, which is block-based. This means that every element you may add to a post like an image will have a dedicated block.
This makes the editor extremely easy to use, and you may want to spend some time just experimenting with it so you have a general idea of where things are and what they do. For a full breakdown of Gutenberg, check out this tutorial.
5. Create A Title For Your New WordPress Post
The first thing you’ll want to do is come up with a title for your new post. The title is one of the first things a user will see before they click on your post. On a search engine like Google, it is what appears in the search results.
You can find the title section of your post at the very top of the Gutenberg editor. It will say “Add Title”.
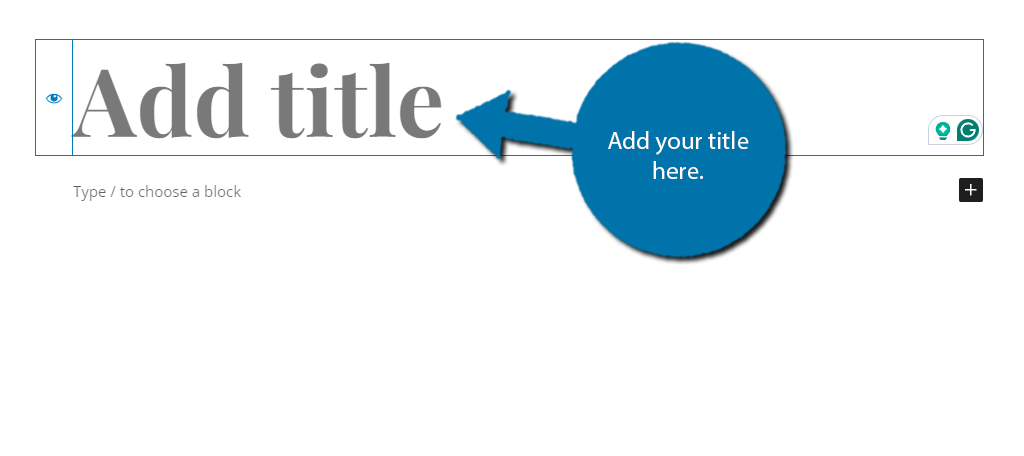
Now, you may be wondering, what should my title include? First off, your title should include the keyword you are trying to rank for. So, if your keyword was “Apple Pie Recipes” a title could be “7 Recipes to Make the Best Apple Pie”.
You may notice that the keyword is out of order, but that doesn’t matter. As long as every word in the keyphrase you want to use appears in the title, you are good to go. You want to also ensure you are using adjectives to describe your post.
Virtually every post online uses terms like Best, Amazing, Incredible, and so on. That’s because they work and increase clicks. As I said earlier, CoSchedule can vastly improve how you create titles that are catchy.
6. Create And Add A Featured Image
A featured image is usually the first thing besides the title that users will see. Another term for it would be the “Thumbnail.”
This image appears directly below the title of the post and will be on display on the front of your site (or wherever you have posts listed) or when it is shared on social media platforms. As such, the image needs to be great.
Many beginners will opt to use royalty-free images, and that is a fine way to start. However, you should still add your logo to the image. You can do this with any photo editing software, but by far the most popular option is to use Photoshop or Canva.
This can be adding your website’s name and logo to a corner of the image. It helps make the image you choose stand out.
That said, taking the time to create a great thumbnail will do wonders for your post. In fact, many users often look at the image first because it takes up more space and is usually more eye-catching than reading a title.
To add the featured image, simply click on the Featured Image option on the right-hand side.

Click on the Set Feature Image option and it will open up the media library where you can either choose an existing image or upload a new one.
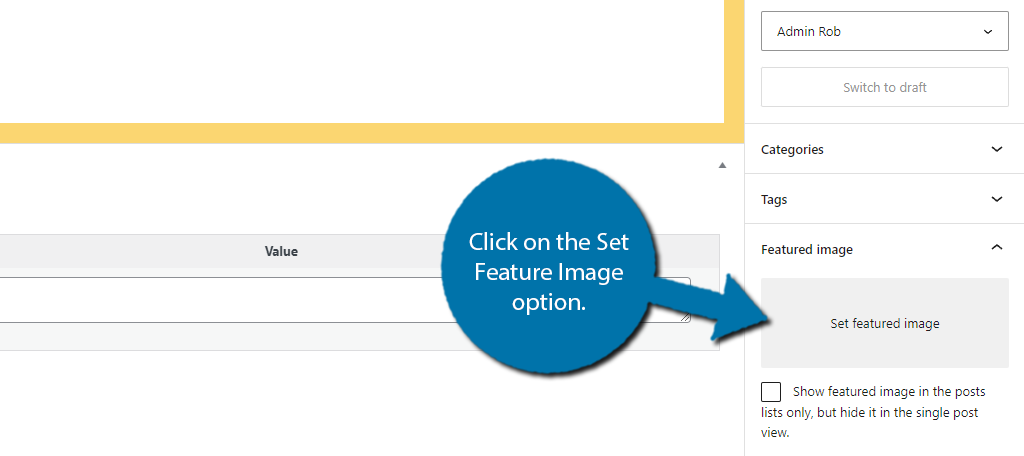
A good thumbnail can help you get views, so take your time to create a great one.
7. Create A Header Structure
Alright, at this point, you are ready to start writing. These next couple of tips will relate to using Gutenberg to create a post.
One of the most important aspects of your site is creating a header structure that pleases search engines while also helping users navigate the post. To add a header, simply add a Heading block.
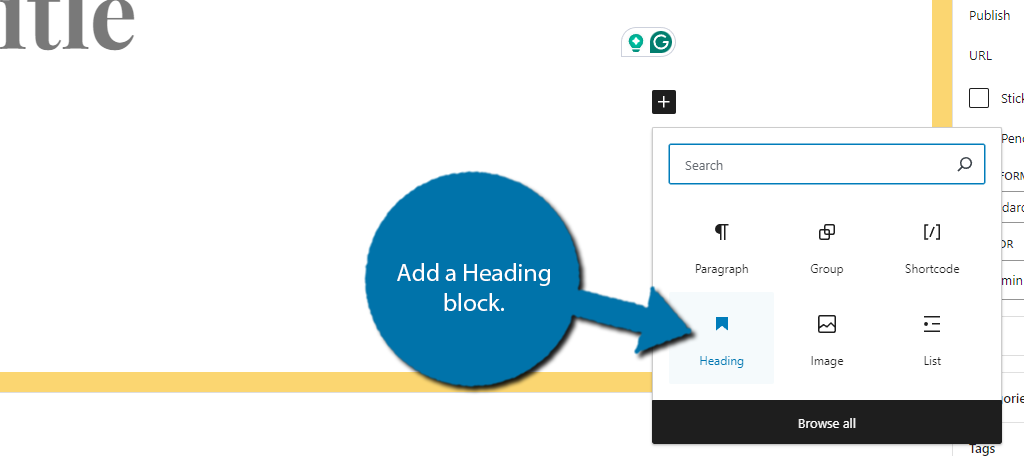
There are six types of headers, but realistically, most sites just stick to H2, H3, and H4. There is a Hierarchy here and it needs to be respected, otherwise, search engines won’t like it.
For example, let’s say you had an H3, followed by an H2, followed by an H4. Going from an H2 to an H4 is not acceptable. An H2 should be the main heading, and if you have a subheading, it should use H3. And H4 would be there in case you need a sub-sub heading.
It might sound tricky, but it is very simple.
Think of it like this; the H2 is a primary point, an H3 supports the H2, and the H4 supports the H3…and so on. It’s a way to drill deeper into the information you’re providing while keeping the points separated.
8. Add Images
We talked about the featured image earlier, but your content should also include regular images as well. Images help spice up your content, or in some cases, they can help explain your topic better.
Like in the case of tutorials, showing an example of how something works accentuates the text.
Adding images is quite easy in WordPress. Simply add an Image block to the editor.
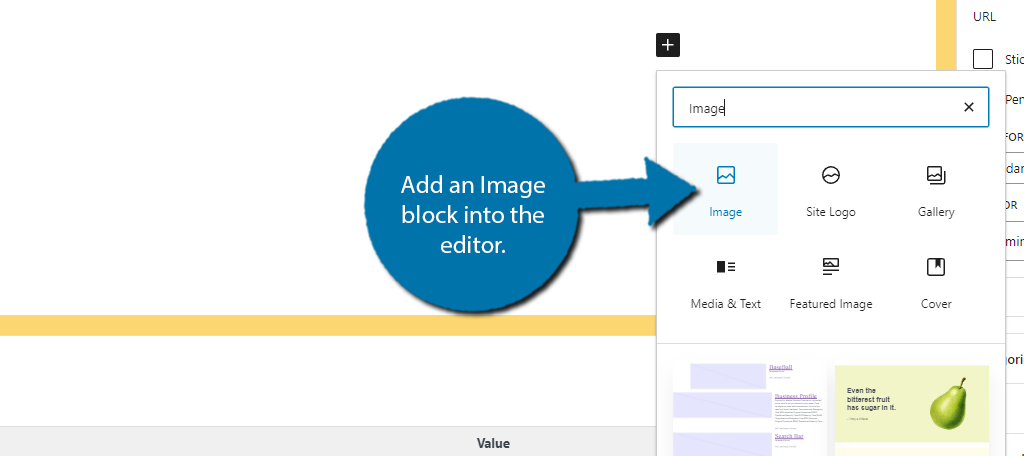
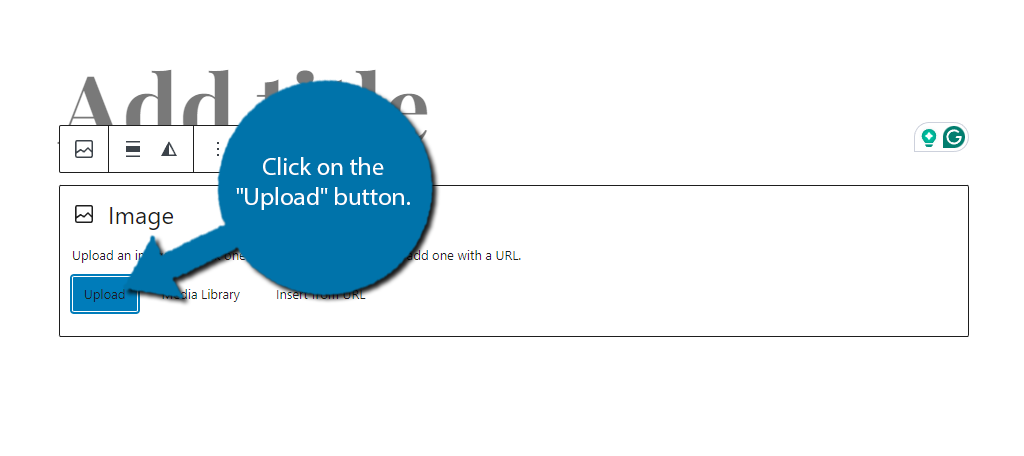
Once the block is in place, click on the “Media Library” to choose an image from your media library. Alternatively, click on the “Upload” button to upload a new image to use.
Once you have the image in place, you are not done. There is another aspect to images called “Alternative Text” that you must fill in. This tells search engines what the image is about and it should also incorporate the keyword when appropriate.
You can find the Alternative text option by looking at the image block setting on the right-hand side of the screen.
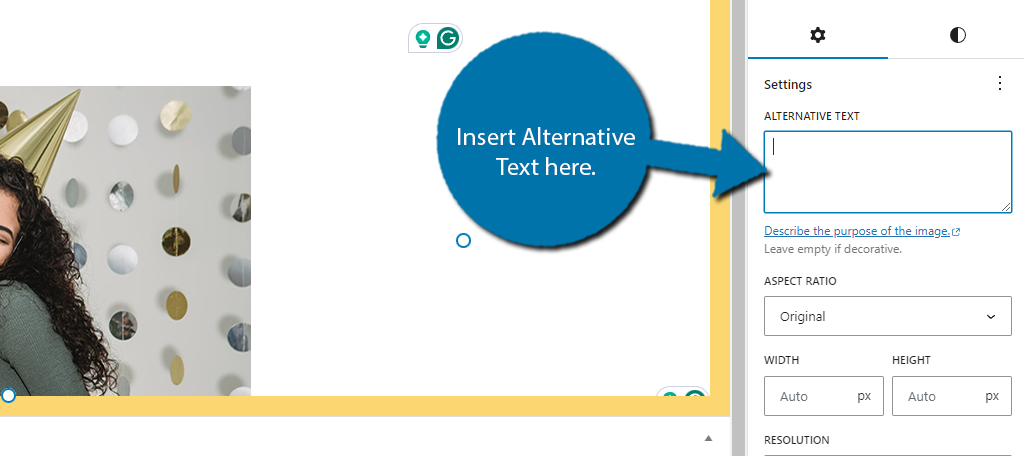
So, you are probably wondering, what should I make my alternative text say? Imagine if you were adding an image of an Apple Pie to the blog. You would want the alternative text to say “Apple Pie” as it refers to the image.
Some people also enable text-to-speech when browsing a website because they have poor eyesight. Browsers and apps will use the Alternate Text to describe that image.
You also want to try any relevant keywords you are ranking for. Thus, if your keyword was “Apple Pie Recipes” that would also work as the alternative text. It’s not hard, just be descriptive about the image and try to include your keyword when applicable.
Just make sure you keep it short and sweet. You shouldn’t have an entire sentence about your image as an Alternate Text. Somewhere around three to six words should be more than enough.
9. Add Taxonomies (Categories & Tags)
Taxonomies help developers organize their content by introducing categories and tags. This helps your users find content topics they are interested in and avoid the rest. It also helps with your SEO efforts by telling the same to search engines.
In most cases, both tags and categories will consist of a single word like “Finance” or “Webhosting”, thus they take very little time to add.
To add a category or tag in WordPress simply click on Categories or Tags on the right-hand side of the screen under the Post settings.
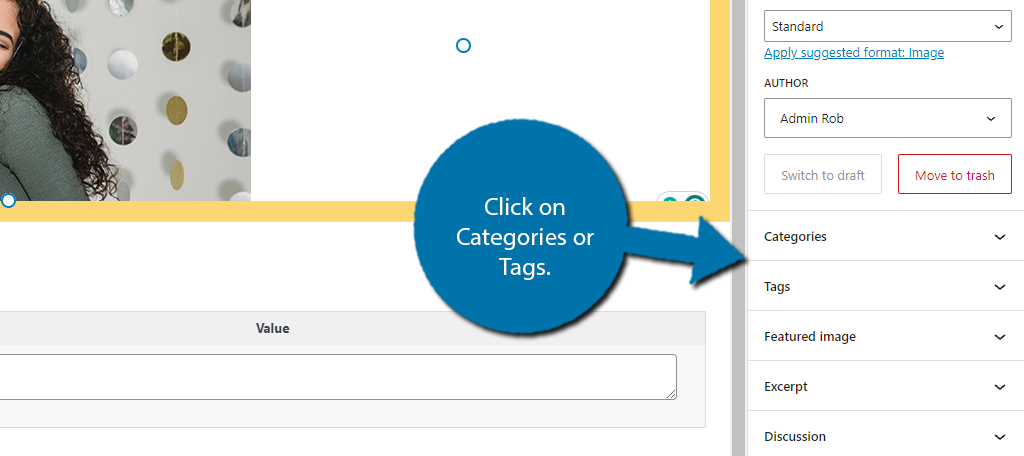
Let’s start with tags. Here, you can simply enter the tags you want to assign and separate them with a comma. For example, if you wanted to use “Avengers”, “Ironman”, and “Hulk”, you would enter each one into the text box.
Pressing “Enter” after each tag also works.
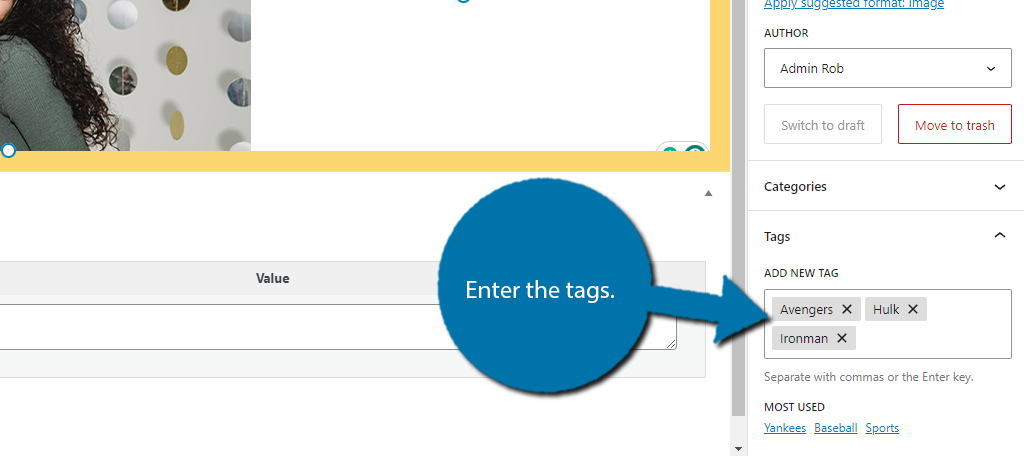
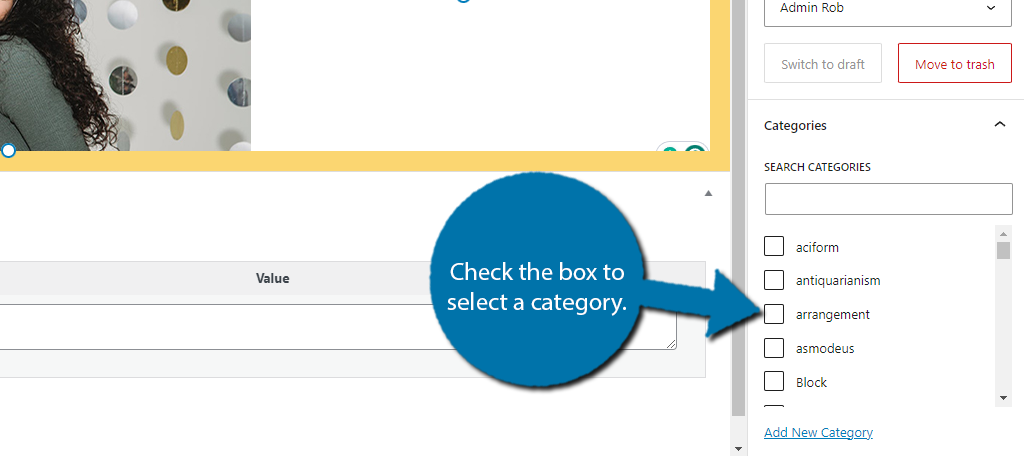
Now for Categories, you would simply select the category that you wish to use by checking the box.
If you do not see any categories, that is because you have not created any. To create one, click on the Add New Category link. This will bring you to the Categories section of WordPress. Simply enter the Name and Description for the category.
Then click on the “Add New Category” button to save it.
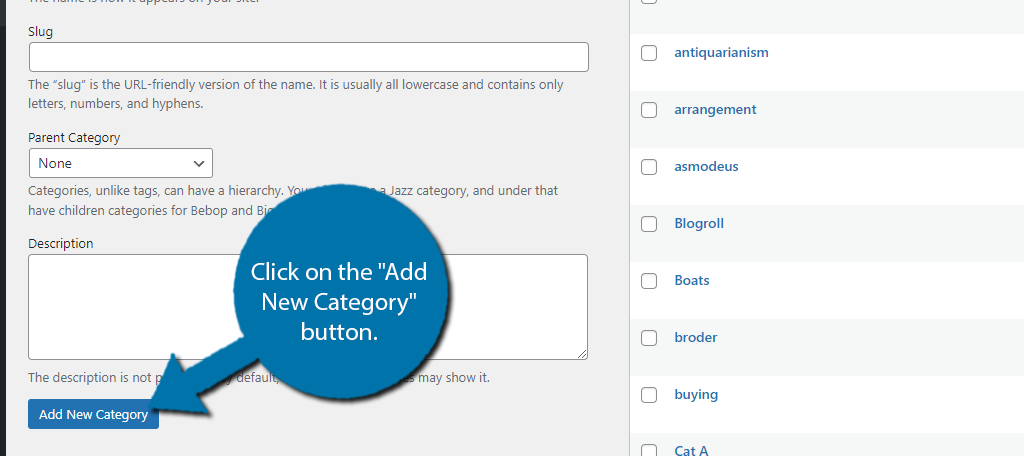
That category will now be available to select on the post.
You can also create a new category directly from the post you’re working on by clicking “Add New Category” under the list of categories in the Post section of the editor.
10. Write An Excerpt
An excerpt is a small piece of your post that is displayed to highlight the article. Many themes, such as ColorNews, will use the excerpt in areas like the front page, but some do not, so be sure to consult your theme’s documentation.
It’s like a teaser for your content that can be displayed without showing the entire piece.
Remember that an excerpt should be short and to the point while also explaining what the article is about. Most importantly, it should make the visitor want to read the rest of the article.
To add one, click on the Excerpt option on the right-hand side of the screen.
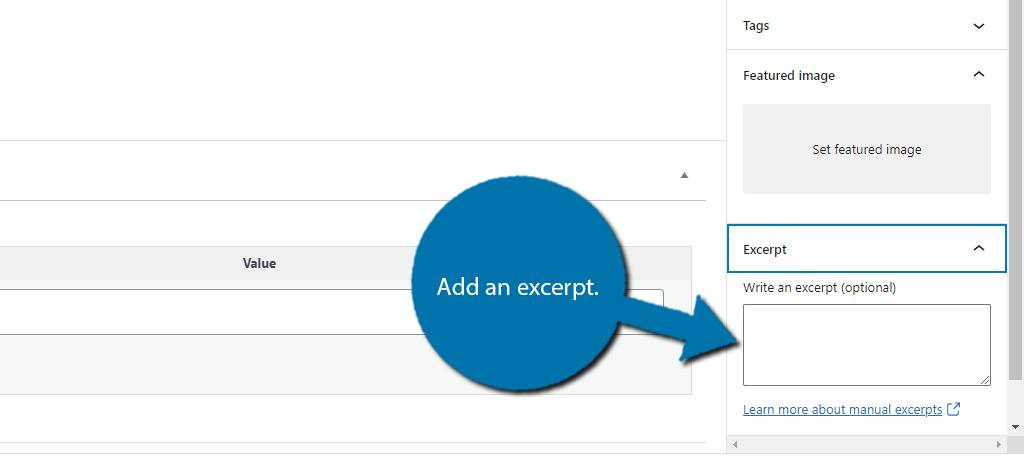
If you do not take the time to create an excerpt. Some themes will just take the first sentence or two from the post. In some cases, this is fine, but you should make sure your theme does this and consider it when writing introductions.
11. Enable/Disable Comments
You can actually choose to turn off comments on specific posts, which may be necessary from time to time. To do this, open the settings wheel and expand the Discussion option. You will find a checkbox to turn comments on or off.
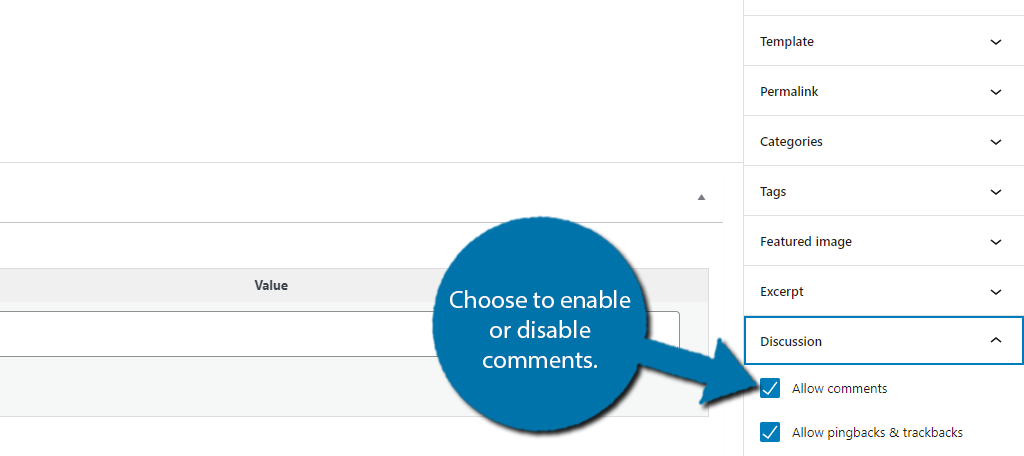
This is particularly useful when making serious announcements, or when delivering bad news that will have a strong negative response. It is also a great tactic to limit the amount of spam your site will receive.
That said, comments are an excellent source of feedback for any website, so don’t be too hasty to turn them off. In fact, they can help with user engagement if you regularly reply to visitors. And can even benefit your SEO efforts.
12. Trackbacks & Pingbacks
When trackbacks are set up, WordPress sends a website owner a message when you link to his or her content. This has the potential to be helpful when establishing a relationship with other owners.
However, there is a much darker side when you enable this system. It can create a ton of spam for the websites you are linking to. And ultimately, it could even slow down your website.
Generally speaking, newer websites leave them on, while more established websites turn them off.
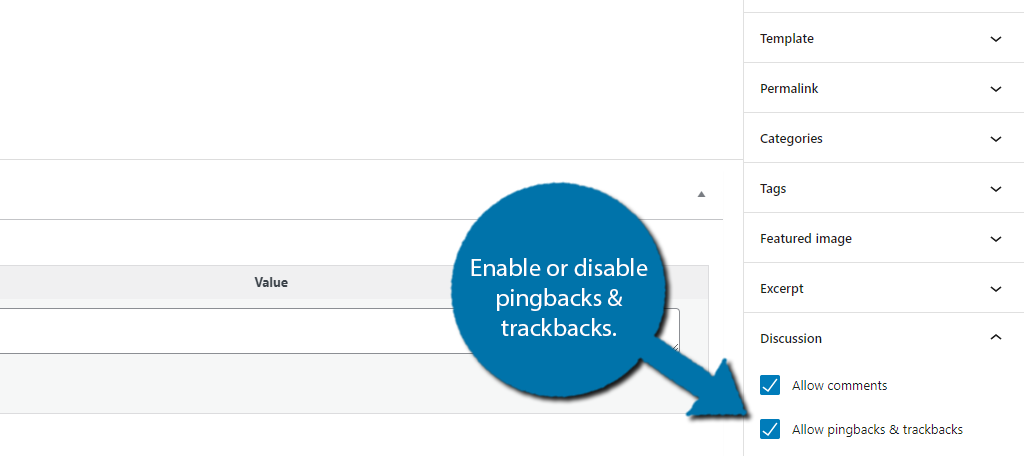
By default, this option is on. To find it, simply click on Discussion on the right-hand side of the screen and uncheck the box to “Allow pingbacks & trackbacks” to disable it.
13. Choose An Author For Your New Post
WordPress will automatically set the author of the article as the account you use to log in. However, there may be times when you’re making a new post from someone else.
The “Author” field allows you to change who gets credit on the site for that content.
This can be very useful if you collect visitor submissions and want to give them credit without giving them access to your website’s backend. Or for guest blogs with other content creators.
You can find the Author option on the right-hand side. Simply use the drop-down to select an author.
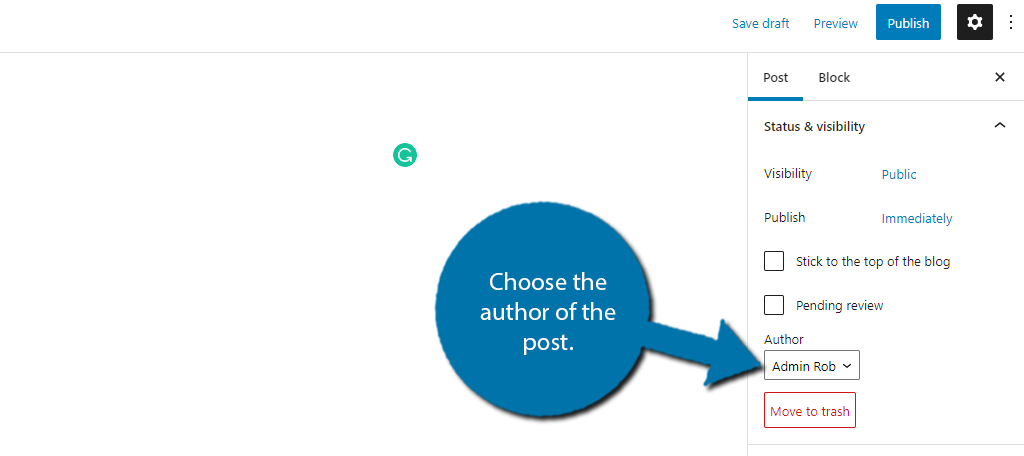
If you do not have any additional authors, you will need to take a minute and create a user with the correct credentials to be an author.
14. Publishing Your New WordPress Post
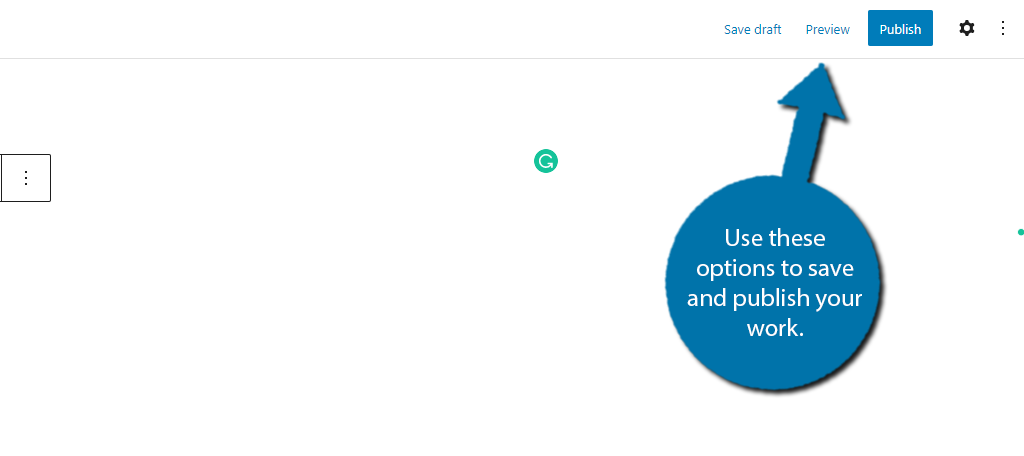
The final part of creating a new post is actually publishing it in WordPress. WordPress provides you with a few options to do this. First, make sure everything looks good by checking out the Preview option.
This will open a new tab by default to show you what the post would look like on the live site.
If it looks good, click on the “Publish” button to make it go live immediately. You can find these options on the top-right of the editor.
However, you may want to schedule your post to be released at a later time or a different day completely. This can help you establish a regular release schedule. Or, perhaps you wrote something that is time-sensitive and want it to go live on a precise date.
To do this, locate the Publish options on the right-hand side.
Click on the “Immediately” link and a calendar will open up. Select the date and time you wish to publish the post.
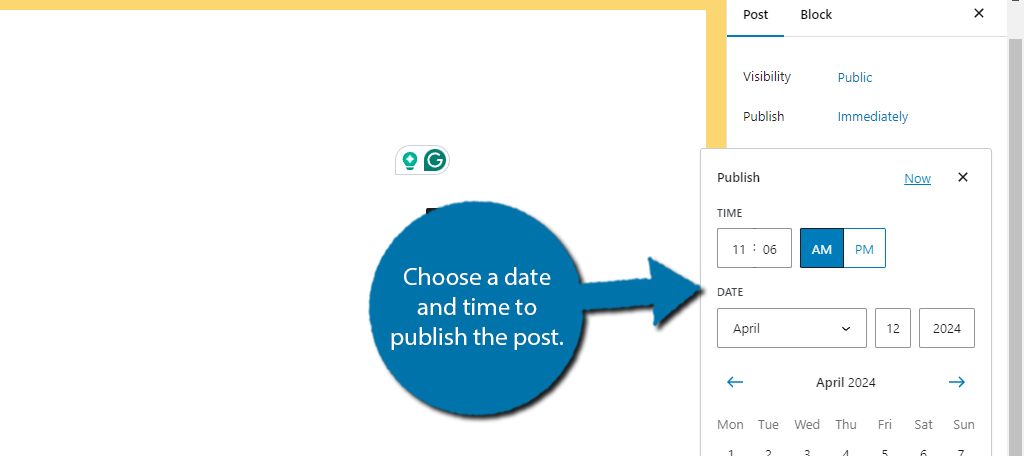
You should notice that the “Immediately” will be changed to the time and date you chose. Be sure to save your work before exiting.
New Post FAQ
You may still have some lingering questions, so here are some of the most frequently asked questions related to new posts.
Absolutely! One I can recommend would be Yoast SEO. It helps you create SEO-friendly content by providing real-time recommendations about what your post is missing. It is free to use, so be sure to give it a try.
Yes. Search engines love it when you have a release schedule because they will know when to expect your next piece of content. Having a steady release schedule is recommended by every SEO specialist.
Drafts are not publicly viewable. The only people who can see them are you and anyone else who has access to the backend of your site. There is no downside to leaving something as a draft, although they get a bit messy after a while and take up space in your database.
Yes. In the post settings, you will see that the default option is Public. Simply change this to Password Protected and that is it. This is great for internal posts for your staff, but you may want to use something like Slack or Discord for this.
You should have both internal (links for other posts and pages on your site) and external (links that point to other sites) in your post. There is no set number to aim for, but if it is relevant, you should include it.
Create A New Post in WordPress Today
As you can see, a lot more goes into creating a new post in WordPress than just writing. If you do not do these things, then your post will suffer for it in the search engine results. If you fail to rank highly, your web traffic will suffer.
Luckily, nothing we covered today is difficult. While it may sound like a lot, it will become second nature as you gain more experience as a WordPress developer. And with the right plugins, some of this may even be automated for you.
I hope you found this tutorial helpful in learning how to create a new post in WordPress.
How long does it take you to create a new post in WordPress? Do you find the Gutenberg editor easy to use?

