These instructions take you through the process of generating a Certificate Signing Request (CSR) to present to the SSL certificate issuer of your choice and then uploading that certificate to your account cPanel. But we would also like to let you know that if you purchase an SSL Certificate From GreenGeeks, we will install it for you! So if you want to save yourself some time, purchase an SSL Certificate from GreenGeeks for your GreenGeeks-hosted site and let us take care of the rest.
To have an SSL certificate issued at an SSL certificate issuer other than GreenGeeks, you need to generate a KEY and CSR. You then provide the CSR to the SSL certificate issuer to obtain your SSL certificate.
Log in to cPanel
Log in to GreenGeeks and go to cPanel by clicking the “cPanel Login” button in the “Quick Server Login” section.
Open the SSL/TLS Manager
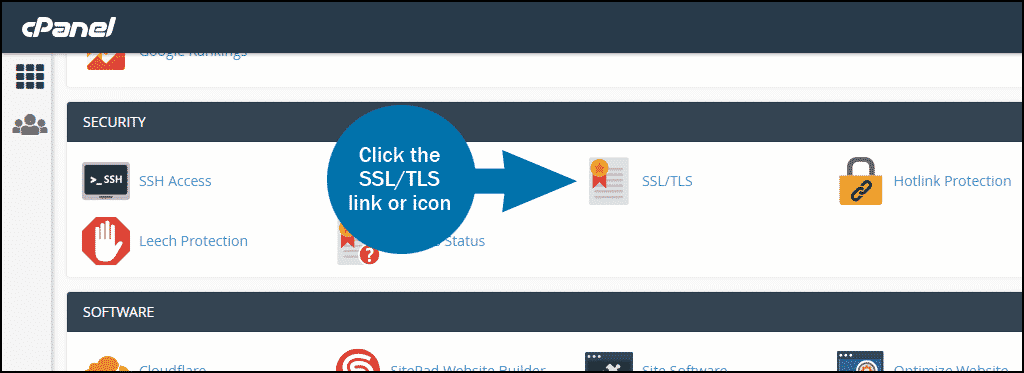
In the “SECURITY” section, click the “SSL/TLS” link or icon.
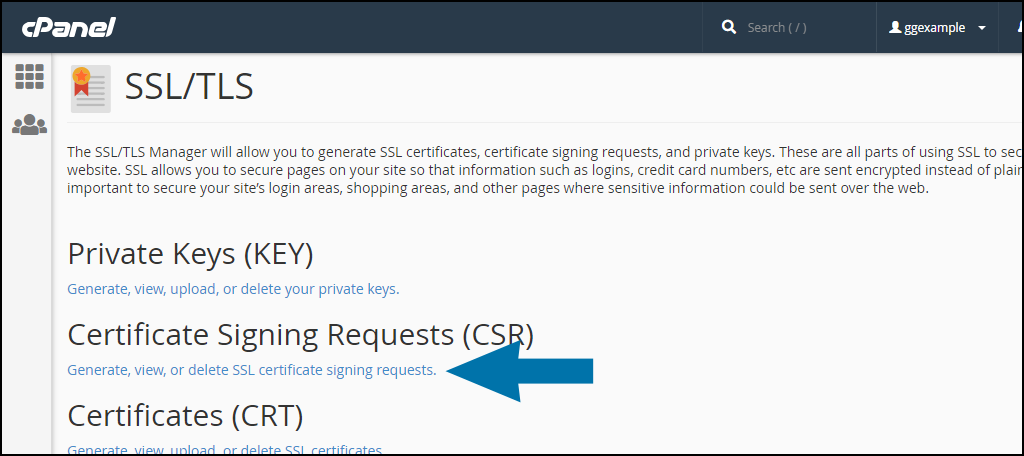
Under “Certificate Signing Requests (CSR),” click the “Generate, view, or delete SSL certificate signing requests” link.
Enter the form information
- Key – Select the default: “Generate a new 2,048 bit key.”
- Domains – List the domains that you wish to secure, one per line. Use an asterisk for a wildcard domain (*.ggexample.com).
- City – Provide the complete name for the city or locality. Do not use abbreviations.
- State – Provide the complete name for the state or province. Do not use abbreviations.
- Country – Select your country from the drop-down list.
- Company – Provide the legally-registered name for your business. If your company name includes symbols other than a period or comma, check with your certificate authority to confirm that they are acceptable.
The remainder of the fields—Company Division, Email, Passphrase, Description—are optional, so unless your certificate authority has a specific need or requirement for them, you can leave them blank.
When the form fields are complete, click the “Generate” button.
Copy the CSR
Copy the “Encoded Certificate Signing Request” and send it to the Certificate Authority that is issuing your SSL certificate.
Part two: Installing the certificate
When your certificate (CERT/CRT) has been issued, go back to the “SECURITY” section of cPanel and click the “SSL/TLS” link or icon.
Under “Certificates (CRT),” click the “Generate, view, upload, or delete SSL certificates” link.
There are two options available in the “Upload a New Certificate” section.
- First is “Paste the certificate into the following text box,” which you can use if the certificate has been sent in the body of an email.
- The second option, “Choose a certificate file (*.crt),” should be used if the certificate authority has sent you a .crt file.


It doesn’t say anything about how to generate the Key. Are a Key and a CSR the same thing?
The cPanel CSR flow has been updated, so the key is now generated at the same time as the CSR (actually it generates four things: and encoded CSR, a decoded CSR and encoded and decoded keys).
Cpanel now does free SSL’s for sites, which are great for the vast majority of websites. If you are a brick and mortar or taking payments over the website you should consider investing in a EV certificate. AutoSSL is enabled from any WHM control panel under SSL/TLS functions.
I thought buying domains through Greengeeks, there is a free certificate with each domain. So do we simply send the CSR to greengeeks? Or is this automated? I am confused between the cpanel options for ssl and the option for ssl on the whm account. When I install an ssl plugin on my wordpress it says there is a certificate but the host name is greengeeks host name not my individual sites
Ya, I got it to work. It is confusing because when I look up the definition of a “FQDN” it always says it has “two dots” and “includes the hostname” and the examples are always something like:
hostname.mycooldomain.com
With a dot after hostname and another dot before the “com.”